

Integración de Microsoft Entra ID (SSO)
Con esta integración, los usuarios de su organización inician sesión en SecureAI con su cuenta de trabajo de Microsoft (botón Continuar con Microsoft). La configuración es self-serve: un administrador de su organización registra SecureAI en su propio tenant de Microsoft Entra ID (antes Azure Active Directory) y carga los datos en Admin → Integraciones. No hace falta abrir un ticket ni esperar a Hiper AI: el botón aparece en la página de login apenas guarda la configuración. Tiempo estimado: 10 minutos.Requisitos previos
- Un rol de Microsoft Entra que permita crear registros de aplicación (por ejemplo Desarrollador de aplicaciones o Administrador de aplicaciones). Para otorgar el consentimiento de administrador (paso 4) se necesita Administrador de aplicaciones en la nube, Administrador de aplicaciones o Administrador global.
- Acceso de administrador a SecureAI, con permiso de Administrador sobre la sección Integraciones.
Cómo funciona
- Usted crea un registro de aplicación en su tenant de Entra ID. SecureAI usa OpenID Connect (flujo de código de autorización) con un secreto de cliente.
- En SecureAI carga el Id. de directorio (inquilino), el Id. de aplicación (cliente) y el valor del secreto. El secreto se guarda cifrado y nunca se vuelve a mostrar.
- Cuando un usuario hace clic en Continuar con Microsoft, Microsoft lo autentica (con su MFA y sus políticas de Acceso condicional) y SecureAI lo deja entrar si su email coincide con una cuenta activa de SecureAI.
common / organizations).
Paso 1: Copiar la URI de redirección desde SecureAI
- Inicie sesión en SecureAI como administrador.
- Vaya a Admin → Integraciones y filtre por la categoría IAM.
- En la tarjeta Microsoft Entra ID (SSO) haga clic en Conectar integración (o en Reconfigurar, si la tarjeta dice Configurado por Hiper AI).
- En la sección 1. Registrá SecureAI en Microsoft Entra ID, haga clic en Copiar junto a la URI de redirección.
https://.
Deje esta ventana abierta; va a volver para pegar los datos.
Paso 2: Registrar la aplicación en Microsoft Entra ID
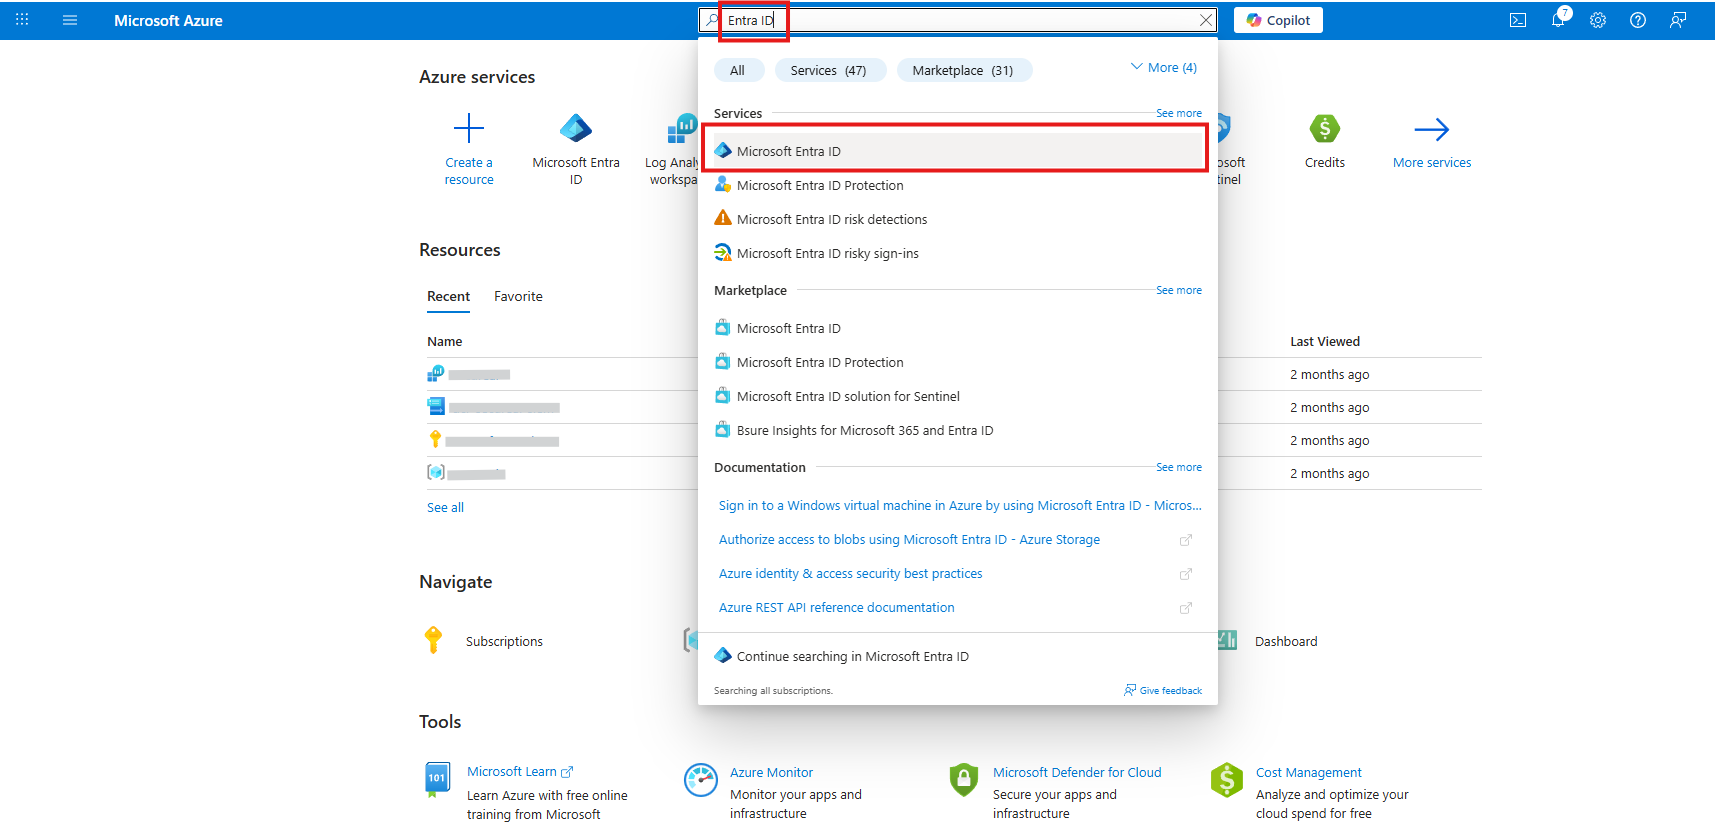
- Abra el centro de administración de Microsoft Entra (o el portal de Azure → Microsoft Entra ID).
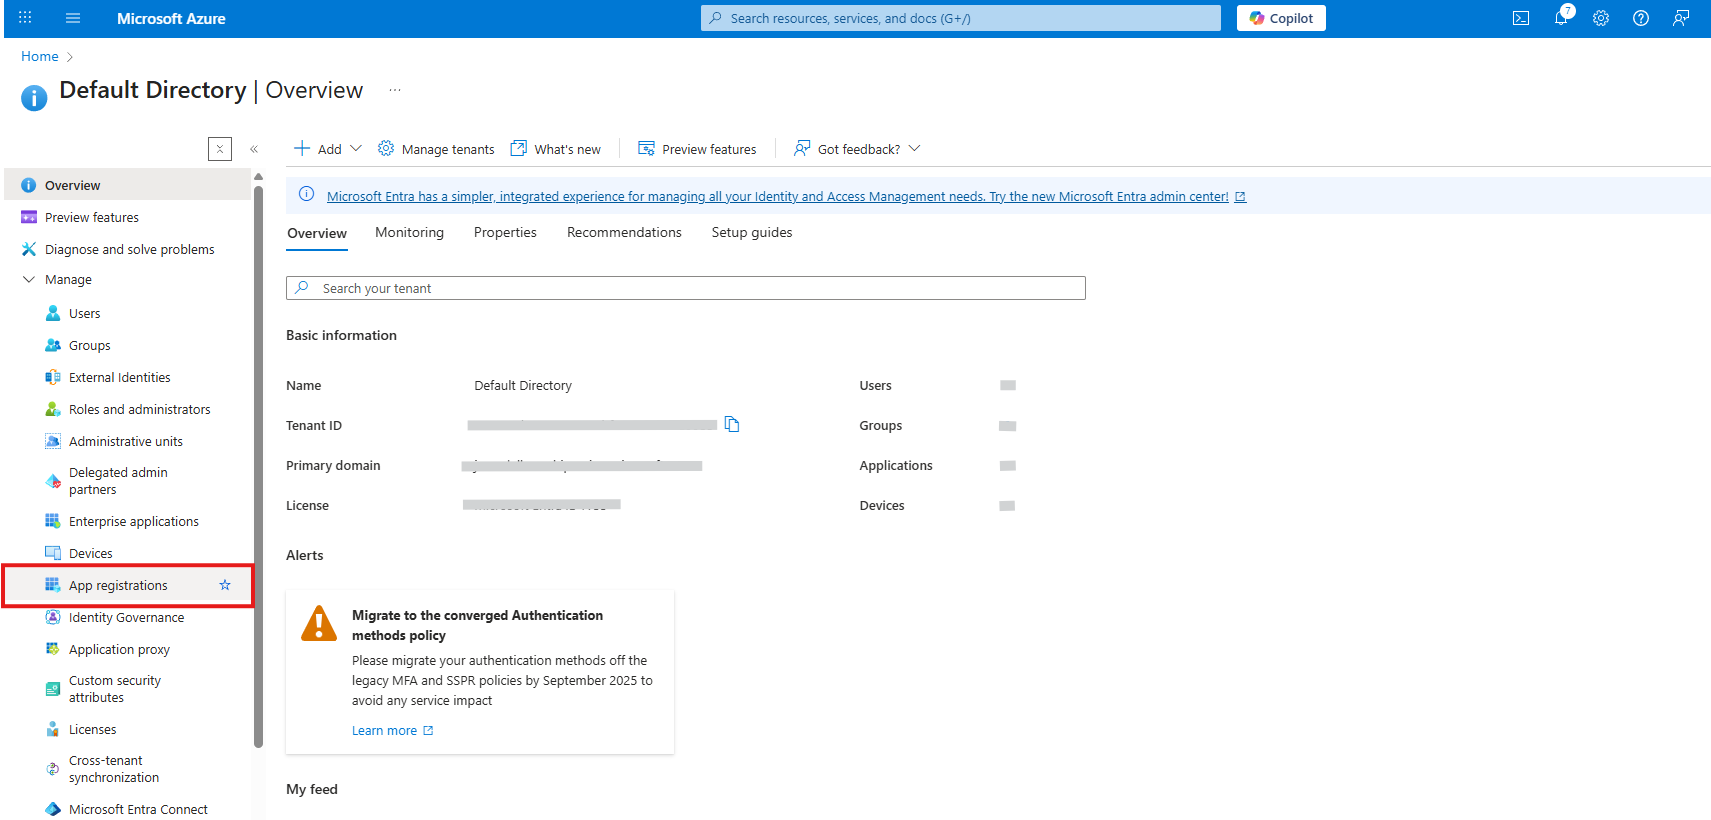
- Vaya a Aplicaciones → Registros de aplicaciones.
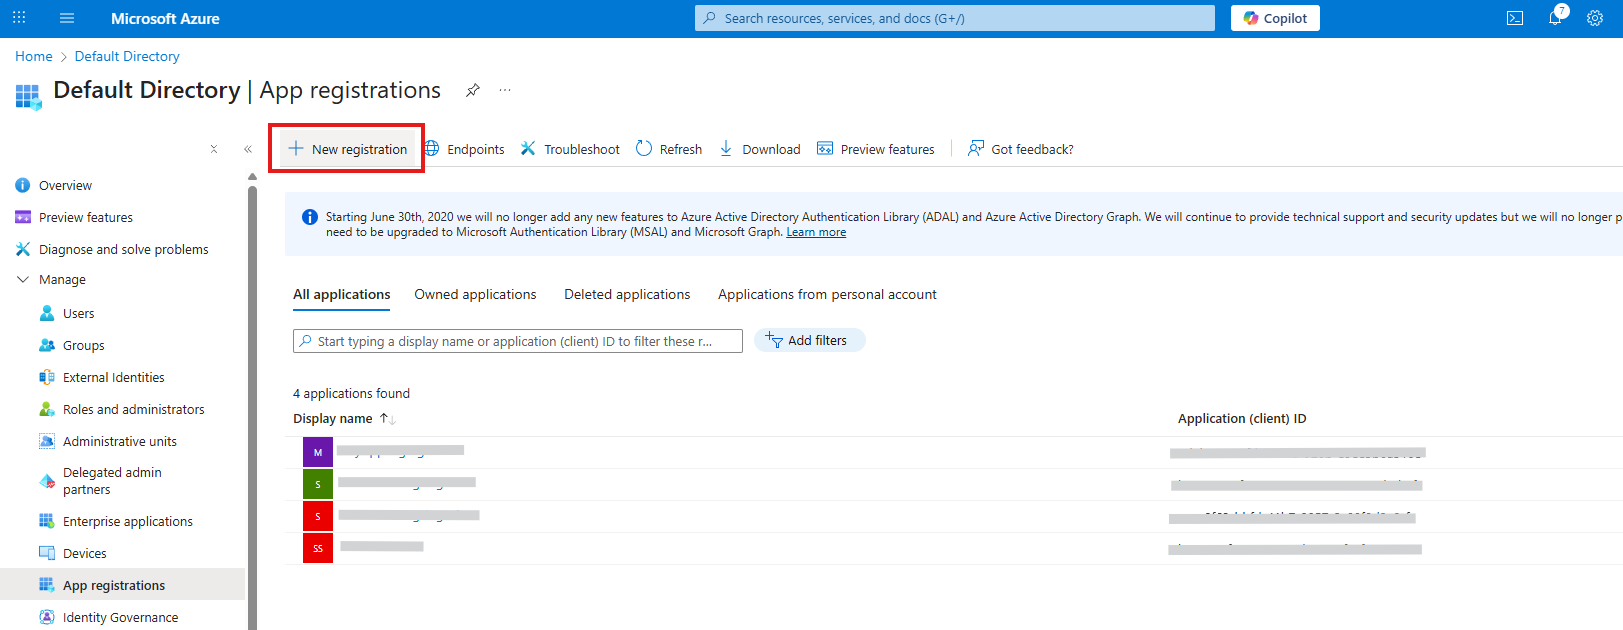
- Haga clic en + Nuevo registro.
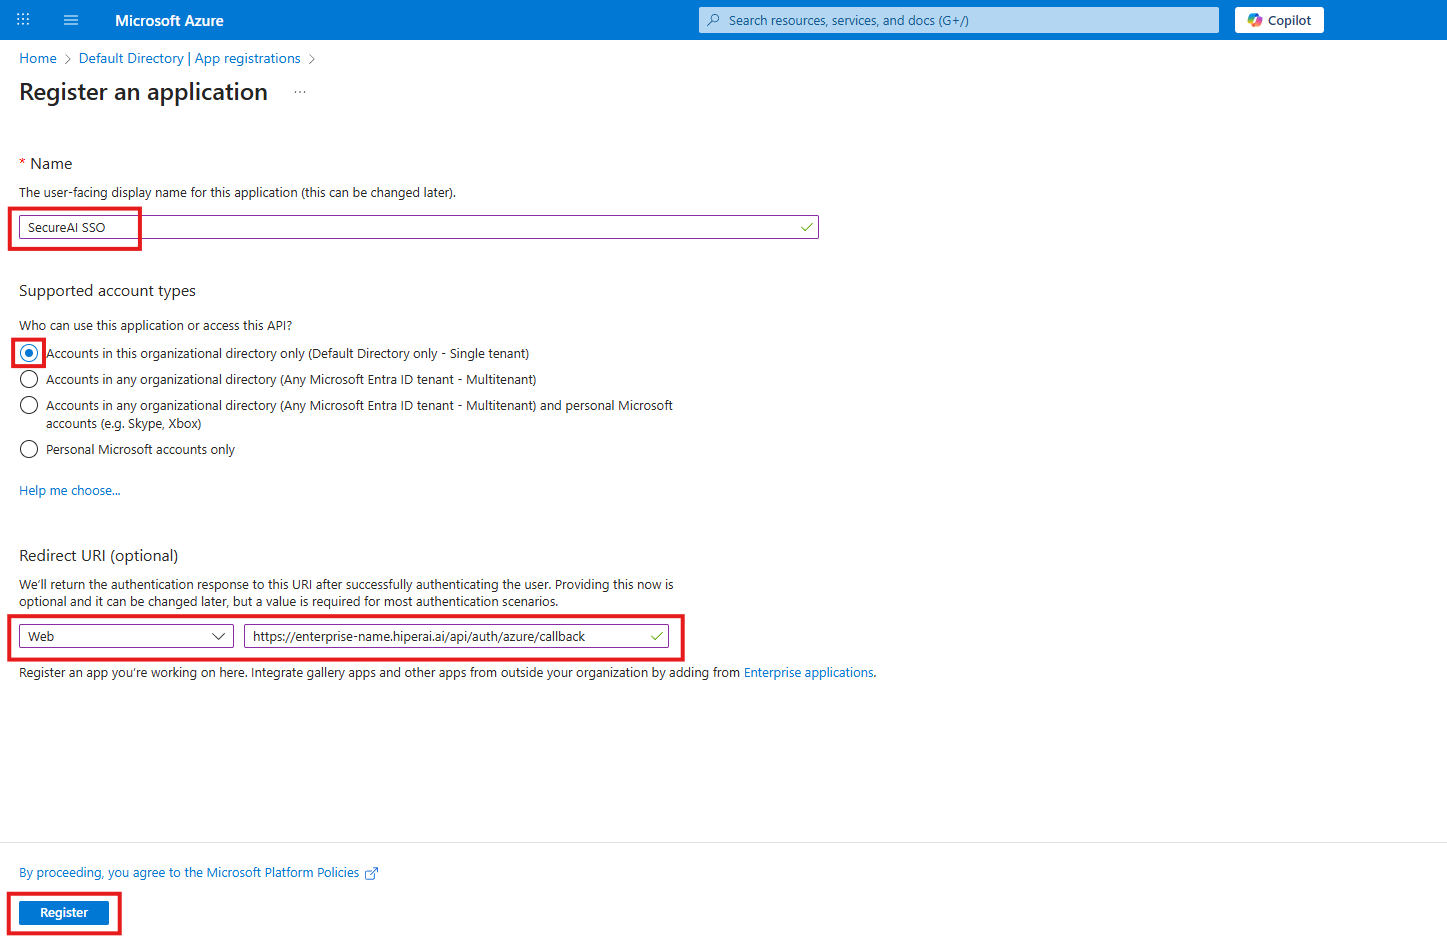
- Complete el formulario:
- Nombre: un nombre descriptivo, por ejemplo
SecureAI SSO. Es el que verán los usuarios en la pantalla de consentimiento. - Tipos de cuenta admitidos: Solo las cuentas de este directorio organizativo (inquilino único).
- URI de redirección: plataforma Web (no “Aplicación de página única”) y pegue la URI que copió en el paso 1.
- Nombre: un nombre descriptivo, por ejemplo
- Haga clic en Registrar.
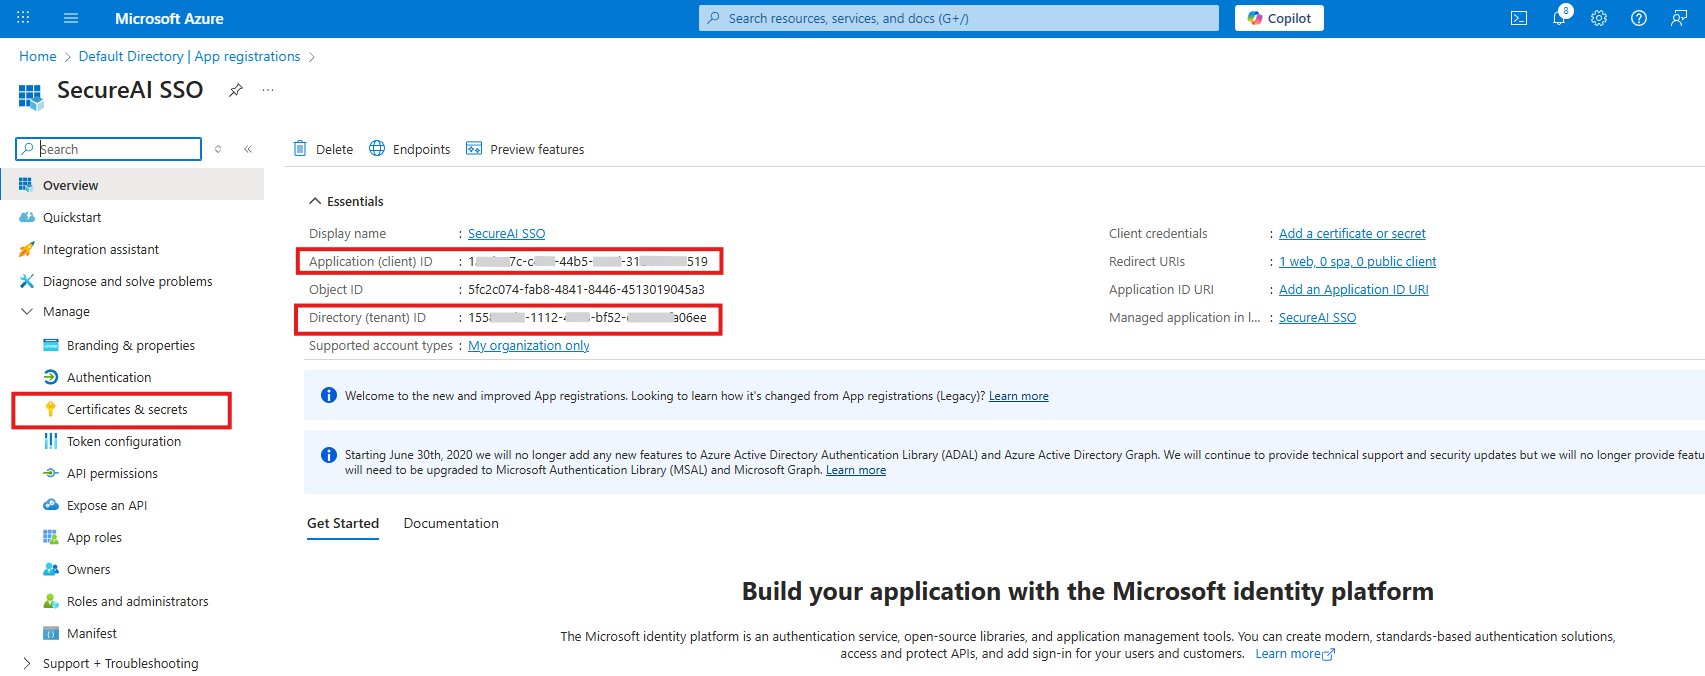
- En la página Información general de la aplicación, copie:
- Id. de aplicación (cliente) — un GUID como
b96ee19f-5a15-4a85-b936-xxxxxxxxxxxx. - Id. de directorio (inquilino) — otro GUID, como
155812d2-1112-46c8-bf52-xxxxxxxxxxxx.
- Id. de aplicación (cliente) — un GUID como
Paso 3: Crear un secreto de cliente
- En el menú de la aplicación, abra Certificados y secretos.
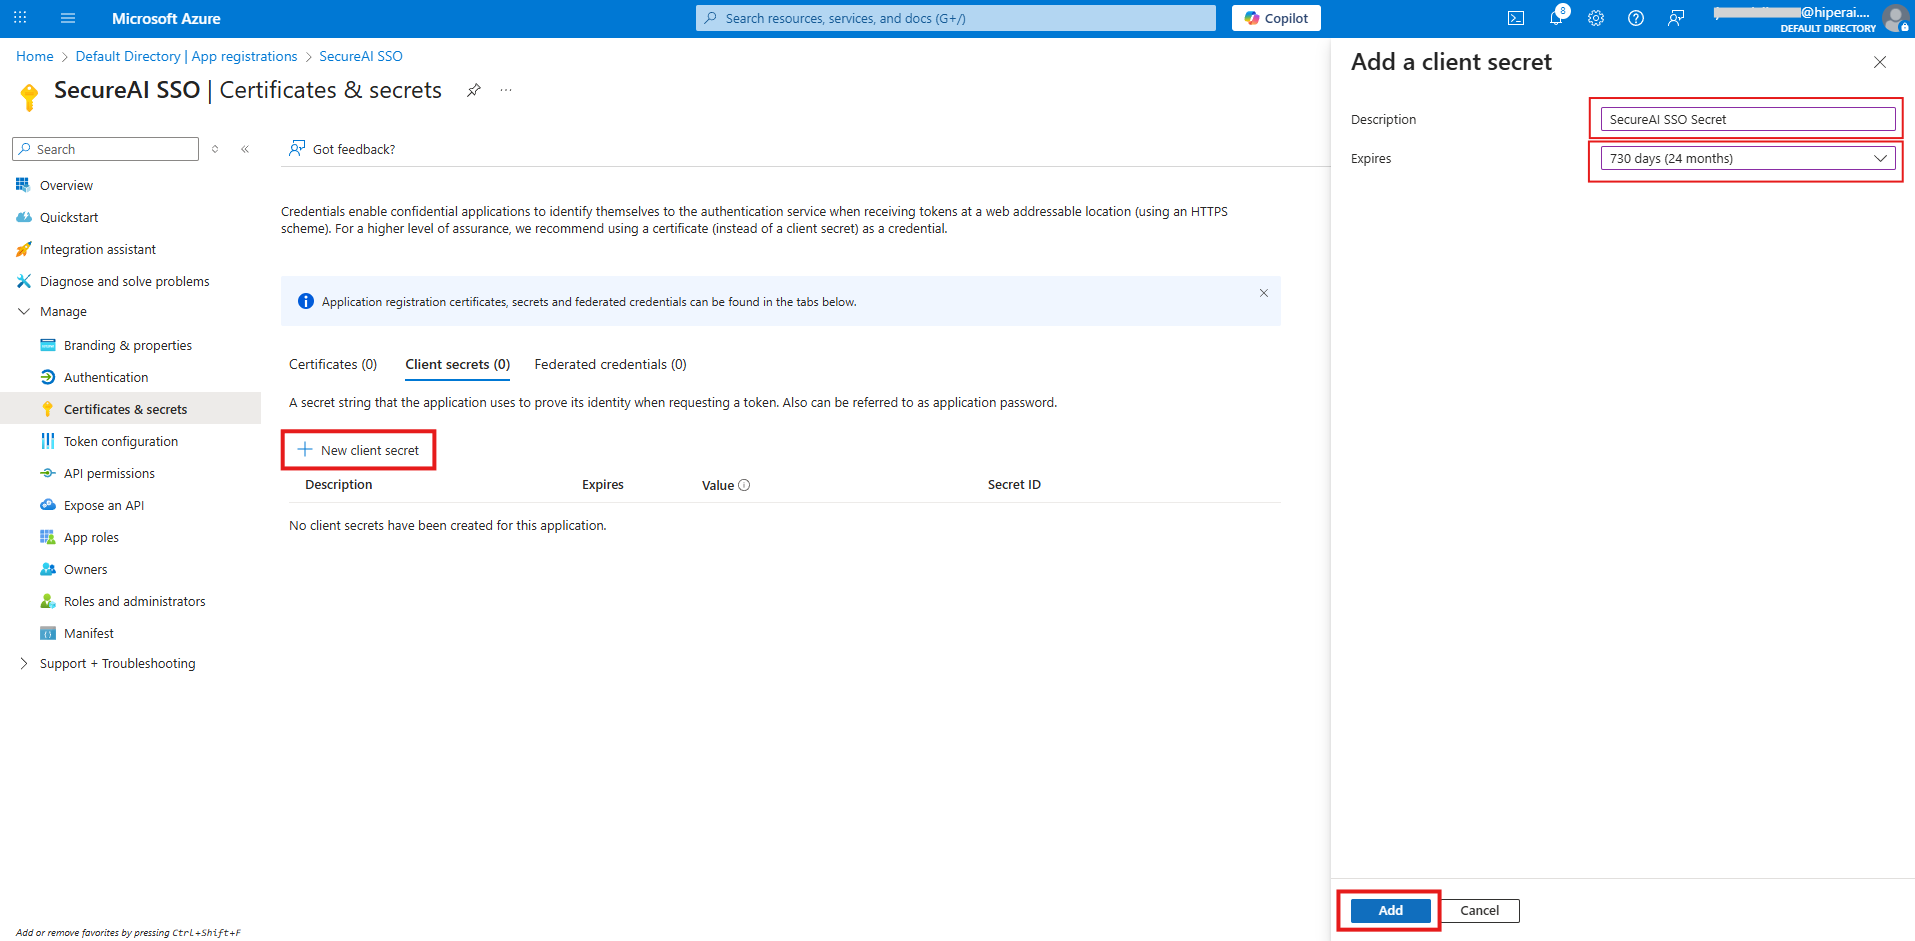
- En Secretos de cliente, haga clic en + Nuevo secreto de cliente.
- Escriba una descripción (por ejemplo
SecureAI SSO) y elija un vencimiento (Microsoft recomienda menos de 12 meses; el máximo es 24). - Haga clic en Agregar.
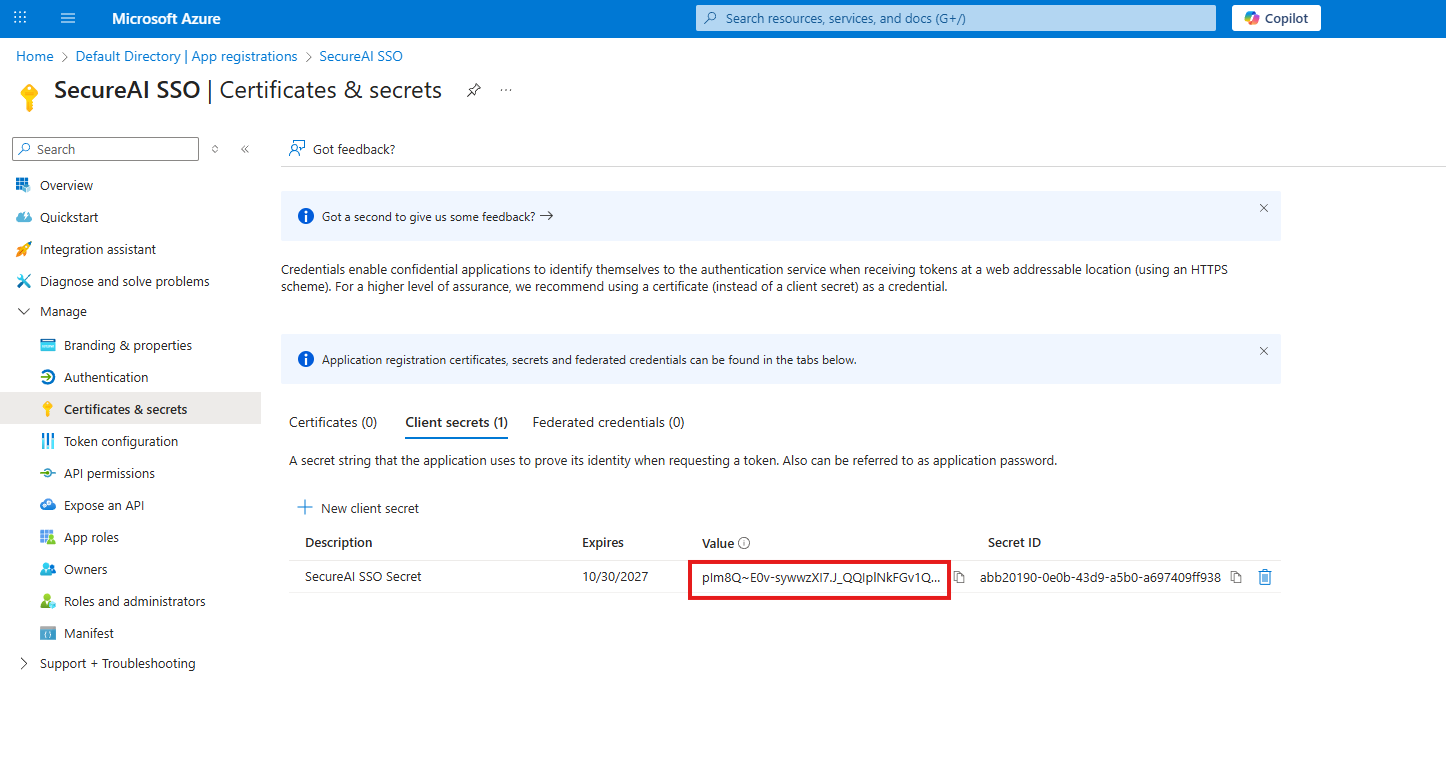
- Copie inmediatamente la columna Valor (se ve como
plm8Q~xxxxxxxx…). Se muestra una sola vez.
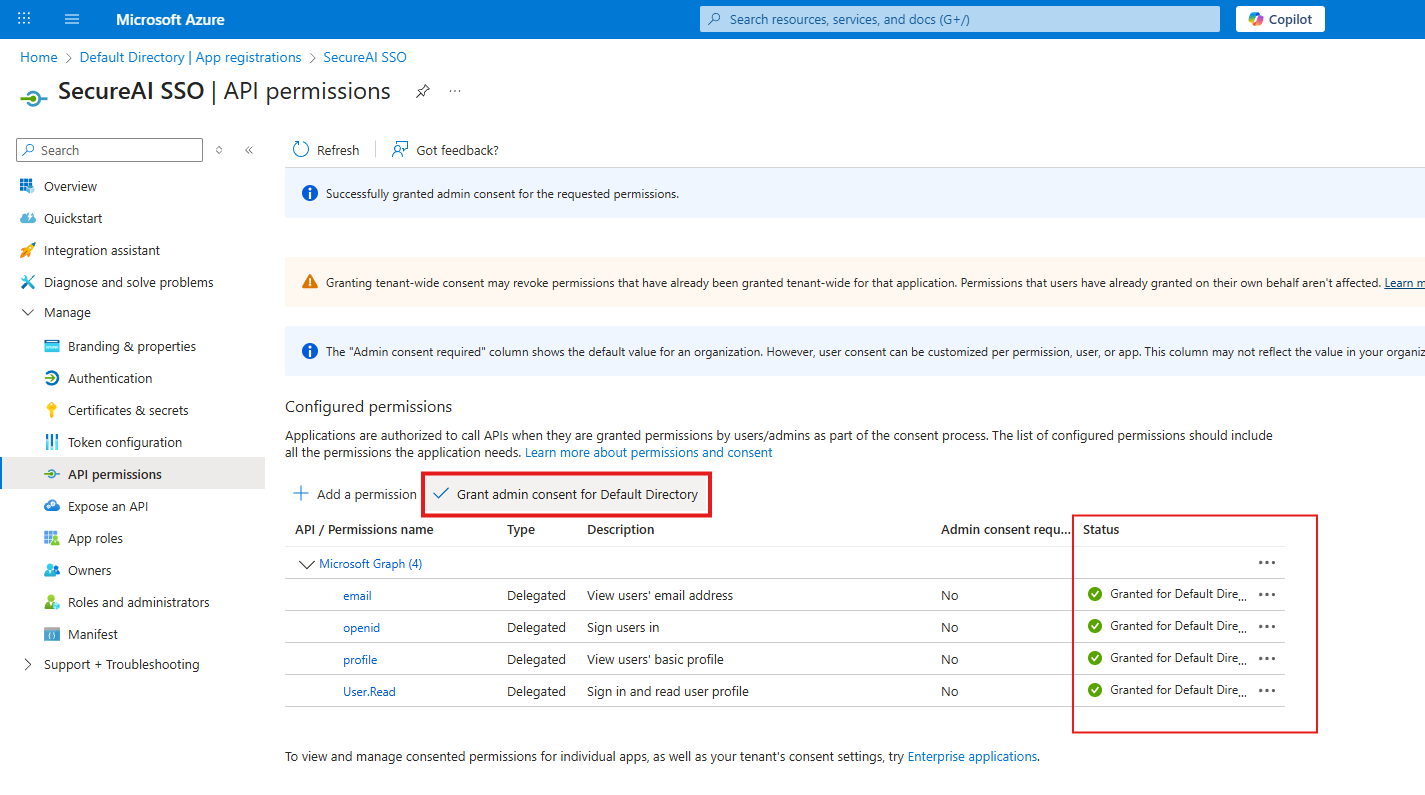
Paso 4: Revisar los permisos de API
SecureAI pide los permisos delegadosopenid, profile, email y User.Read de Microsoft Graph (este último para leer la foto de perfil del usuario). User.Read viene agregado por defecto en los registros nuevos.
- En el menú de la aplicación, abra Permisos de API.
- Verifique que estén Microsoft Graph → Permisos delegados:
User.Ready, si quiere dejarlos explícitos,openid,profileyemail(con + Agregar un permiso → Microsoft Graph → Permisos delegados).
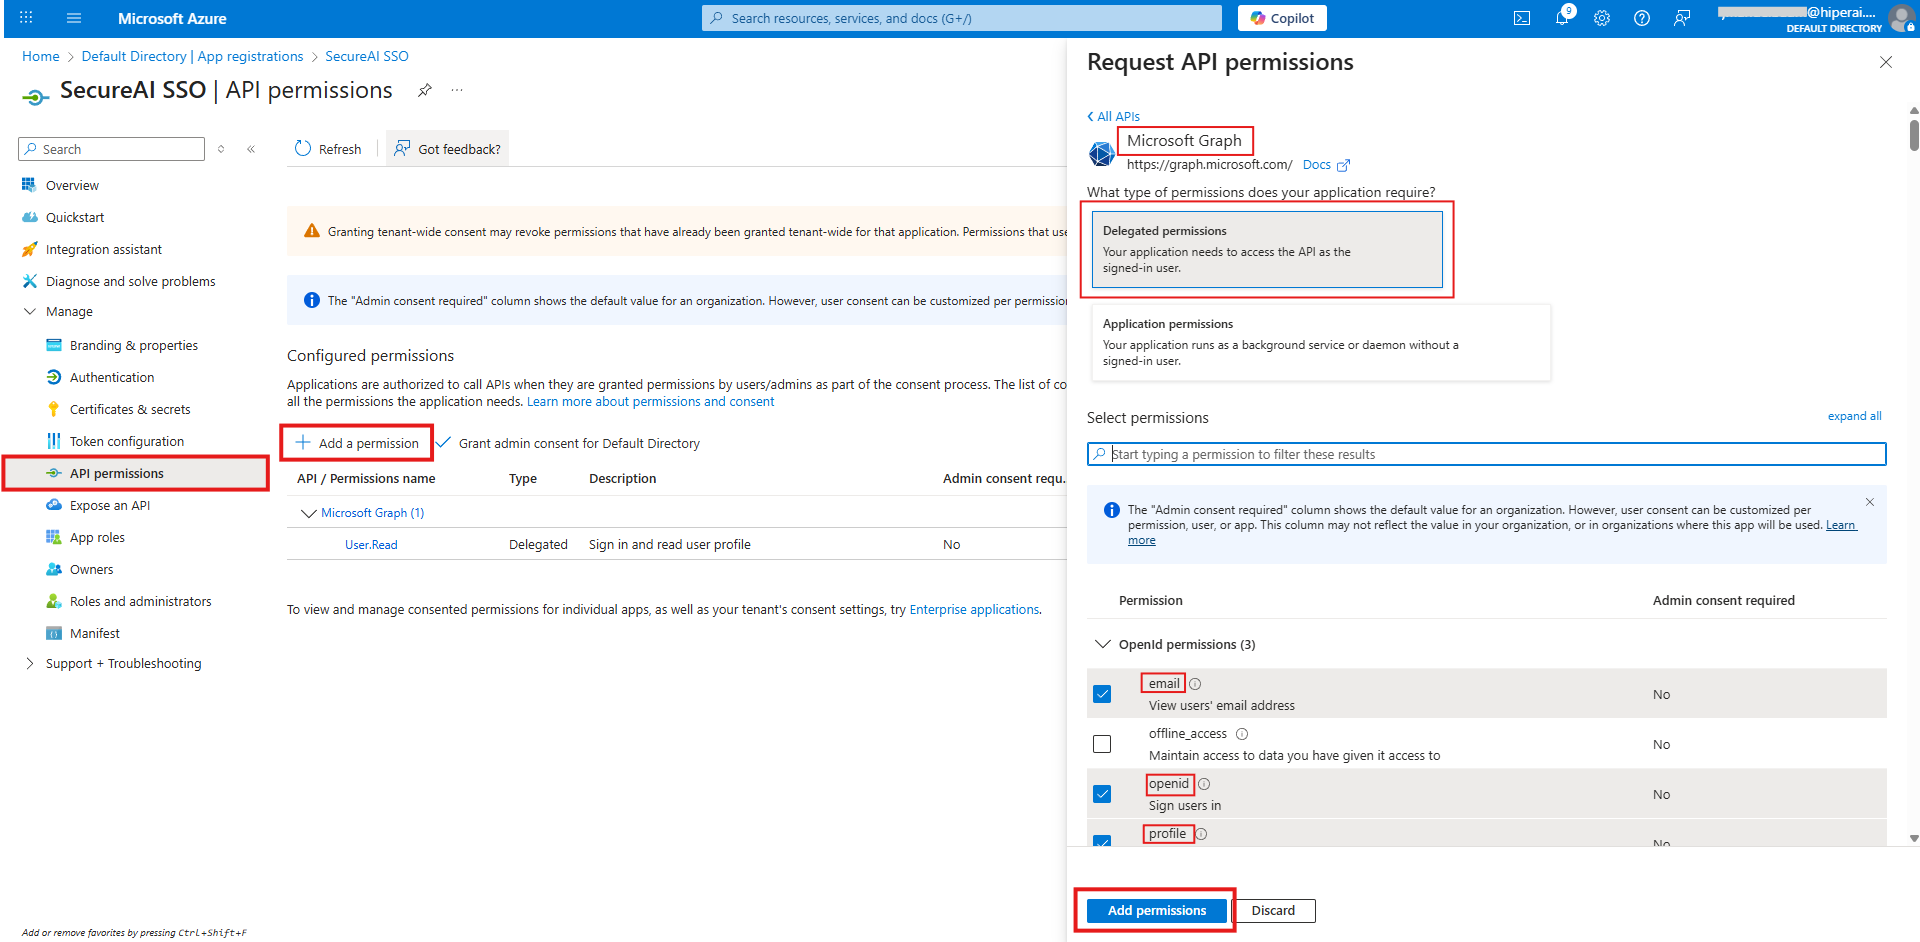
- Haga clic en Conceder consentimiento de administrador para [su organización] y confirme.
Paso 5: Cargar los datos en SecureAI y probar
Vuelva a Admin → Integraciones → Microsoft Entra ID (SSO):-
En 2. Pegá los datos del registro de aplicación complete:
- Id. de directorio (inquilino): el GUID del paso 2 (también acepta un dominio verificado de su tenant, como
contoso.onmicrosoft.com). - Id. de aplicación (cliente): el GUID del paso 2.
- Valor del secreto de cliente: el valor del paso 3.
- Dominios de email permitidos (opcional, recomendado): los dominios de email de su organización separados por coma, por ejemplo
contoso.com, contoso.com.ar. Solo esas direcciones podrán entrar con Microsoft. Si lo deja vacío, se acepta cualquier cuenta de su tenant que exista en SecureAI.
- Id. de directorio (inquilino): el GUID del paso 2 (también acepta un dominio verificado de su tenant, como
-
En 3. Probá la conexión haga clic en Probar conexión. SecureAI consulta a Microsoft (sin iniciar sesión a nadie) y verifica:
La prueba usa lo que está escrito en el formulario, así que puede probar antes de guardar. Si su tenant tiene una política de Acceso condicional que bloquea tokens de aplicación, el secreto puede aparecer como “no se pudo verificar automáticamente”: no es un error, confirme haciendo un login real.La prueba confirma que la URI está registrada, pero no si se registró en la plataforma Web o en Aplicación de página única (SPA). Registrada como SPA, la prueba da bien y el login falla con “No se pudo completar el inicio de sesión único”. Revise que en Autenticación la URI aparezca bajo Web.
- Verifique que esté activado Mostrar “Continuar con Microsoft” en la página de login (viene activado la primera vez).
- Haga clic en Guardar.
Paso 6: Dar de alta a los usuarios
SecureAI no crea cuentas automáticamente al primer login: cada persona que vaya a entrar con Microsoft tiene que existir en SecureAI y estar activa. El email de la cuenta de SecureAI tiene que coincidir con el email del usuario en Entra ID (el atributo Correo; si está vacío, se usa el nombre principal de usuario / UPN). Mayúsculas y minúsculas no importan.- Usuarios existentes: los que ya tienen cuenta en SecureAI (incluso con contraseña) no se recrean. Pueden seguir entrando con contraseña y además con Microsoft.
- Usuarios nuevos solo con SSO: en Admin → Gestión IAM → Gestión de Usuarios → Agregar Usuario, elija el método de autenticación Cuenta Empresarial / SSO. El usuario no recibe un email para crear contraseña y entra directamente con Continuar con Microsoft.
- Muchos usuarios: puede aprovisionarlos y darlos de baja automáticamente desde Entra ID con SCIM.
Probar el inicio de sesión
- Abra la página de login de su instancia en una ventana de incógnito.
- Haga clic en Continuar con Microsoft.
- Elija su cuenta de trabajo y complete el MFA si se lo pide.
- Microsoft lo devuelve a SecureAI con la sesión iniciada.
Desactivar o quitar la integración
- Para ocultar el botón sin perder la configuración, desactive el interruptor y guarde.
- Para borrarla, use Quitar configuración. Si su instancia tenía un SSO configurado previamente por Hiper AI, vuelve a aplicarse ese.
Rotar el secreto de cliente
Antes de que venza el secreto:- En Entra ID, cree un nuevo secreto de cliente (paso 3) sin borrar el anterior.
- En SecureAI, abra la integración, pegue el nuevo valor en Valor del secreto de cliente, haga clic en Probar conexión y luego en Guardar. Dejar el campo vacío conserva el secreto actual.
- Cuando confirme que el login funciona, borre el secreto viejo en Entra ID.
Si su instancia ya tenía SSO configurado por Hiper AI
Las instancias a las que Hiper AI les configuró Microsoft SSO a pedido muestran la tarjeta como Configurado por Hiper AI. Esa configuración sigue funcionando. Si guarda la suya en Integraciones, la reemplaza; si después la quita, vuelve a aplicarse la anterior.Solución de problemas
Los errores del login se muestran en la página de inicio de sesión de SecureAI:
Errores que muestra Microsoft (antes de volver a SecureAI):
- AADSTS50011 – La URI de redirección no coincide: la URI registrada en Entra ID no es exactamente la que muestra SecureAI en el paso 1 (una barra final de más alcanza para que no coincida). Probar conexión lo detecta antes del primer login.
- AADSTS65001 / “Se necesita aprobación del administrador”: otorgue el consentimiento de administrador (paso 4).
- AADSTS50105 – El usuario no está asignado a un rol de la aplicación: la aplicación empresarial tiene ¿Asignación requerida? en Sí. Asigne el usuario o un grupo en Aplicaciones empresariales → SecureAI SSO → Usuarios y grupos.
- AADSTS7000215 / AADSTS7000222: secreto inválido o vencido. Cargue uno nuevo.