> ## Documentation Index
> Fetch the complete documentation index at: https://docs.hiperai.com/llms.txt
> Use this file to discover all available pages before exploring further.
# Google Drive — Add from Drive
> 允许用户在 SecureAI 聊天中附加 Google 云端硬盘和共享云端硬盘中的文件。使用您自己的 Google Cloud OAuth 客户端进行自助配置。
# Google Drive — Add from Drive
通过此集成,您的用户可以使用附件按钮中的 **Add from Drive** 选项,直接在聊天中附加 **Google 云端硬盘**(我的云端硬盘、与我共享,以及**共享云端硬盘**)中的文件。
配置采用**自助方式**:贵组织的管理员在**贵组织自己的 Google Cloud 项目**中创建 OAuth 客户端和 API 密钥,并在 **Admin → Integrations → Files** 中填写。无需提交工单,也无需等待 Hiper AI:保存配置后,该选项会立即出现在聊天中。
预计耗时:10 分钟。
## 工作原理
1. 用户点击 **Attach → Add from Drive**。首次使用时,Google 会要求用户使用**自己的账号**登录并授权 SecureAI。
2. 打开 **Google 云端硬盘官方选择器**(Google Picker)。用户选择一个或多个文件。
3. 用户的浏览器使用用户自己的令牌,**仅下载所选文件**,并将其附加到消息中。Google 文档会导出为 Office 格式(Docs → `.docx`,Sheets → `.xlsx`,Slides → `.pptx`,其余导出为 PDF)。
4. 文件与任何附件走相同的流程:在到达模型之前,会先经过 **DLP** 和贵组织的策略。
**SecureAI 永远不会看到您的整个云端硬盘。** 使用的范围是 `drive.file`:SecureAI 只能读取每位用户在选择器中选择的文件,其他一概无法读取。没有服务账号,没有域范围委派,也没有后台读取:用户只能附加自己在云端硬盘中本来就能打开的文件。
## 前提条件
* 一个位于**您的 Google Workspace 组织内**的 Google Cloud 项目,以及在该项目中启用 API、配置 Google Auth Platform 和创建凭据的权限(例如项目的**所有者**或**编辑者**角色)。
* SecureAI 管理员访问权限,并在 **Integrations** 部分具有 **Administrator** 权限。
* 包含 **Attach from Drive / SharePoint** 的 SecureAI 套餐。没有该套餐时,您仍可以先完成配置,但用户将看不到该选项。
## 步骤 1:从 SecureAI 复制地址
1. 以管理员身份登录 SecureAI。
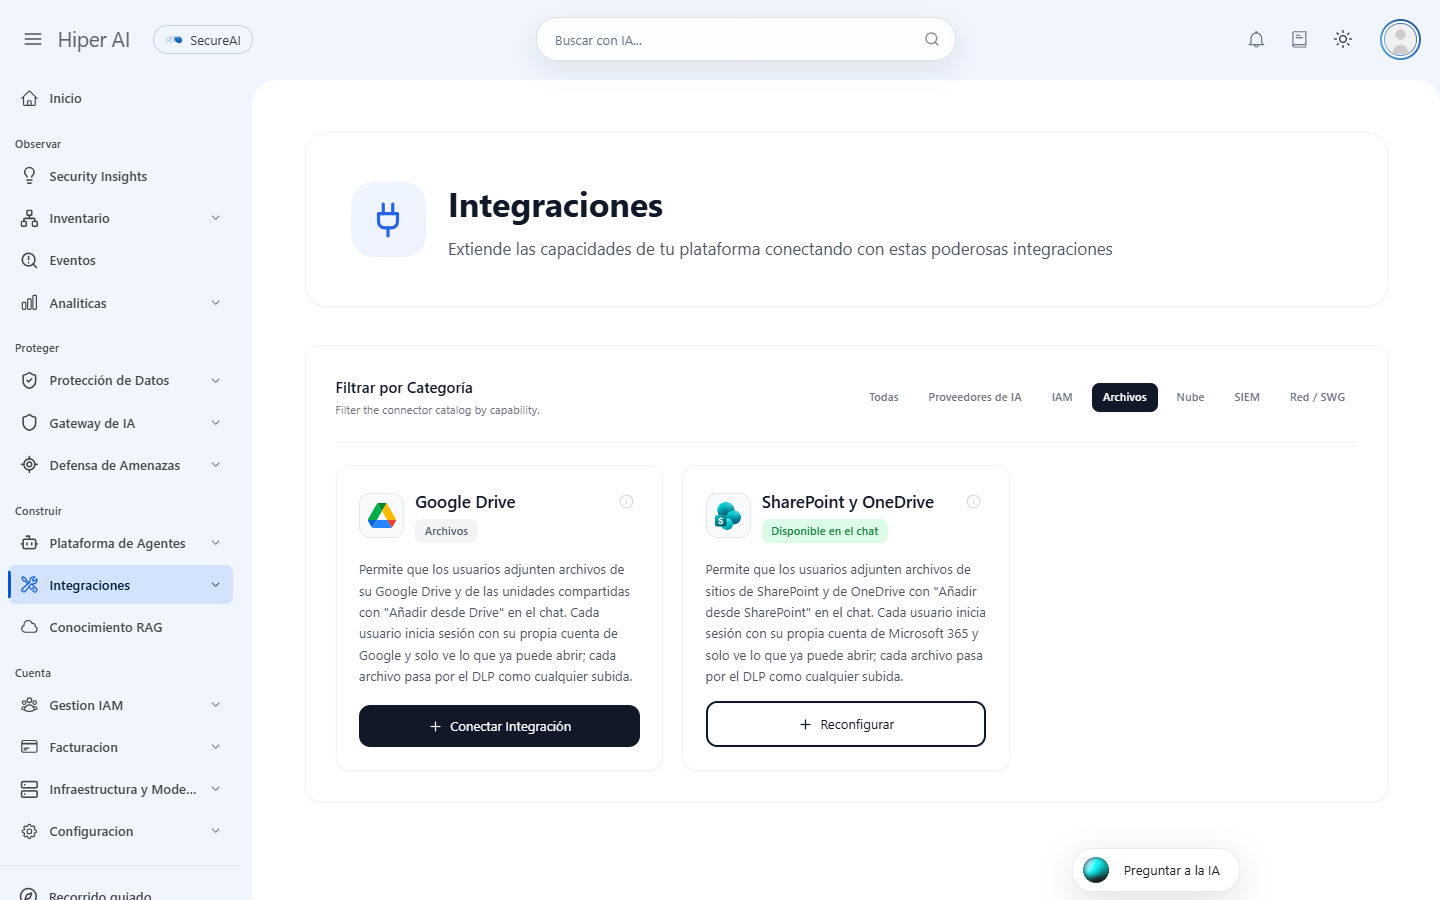
2. 前往 **Admin → Integrations**,并按 **Files** 类别筛选。
3. 在 **Google Drive** 卡片上,点击 **Connect integration**。
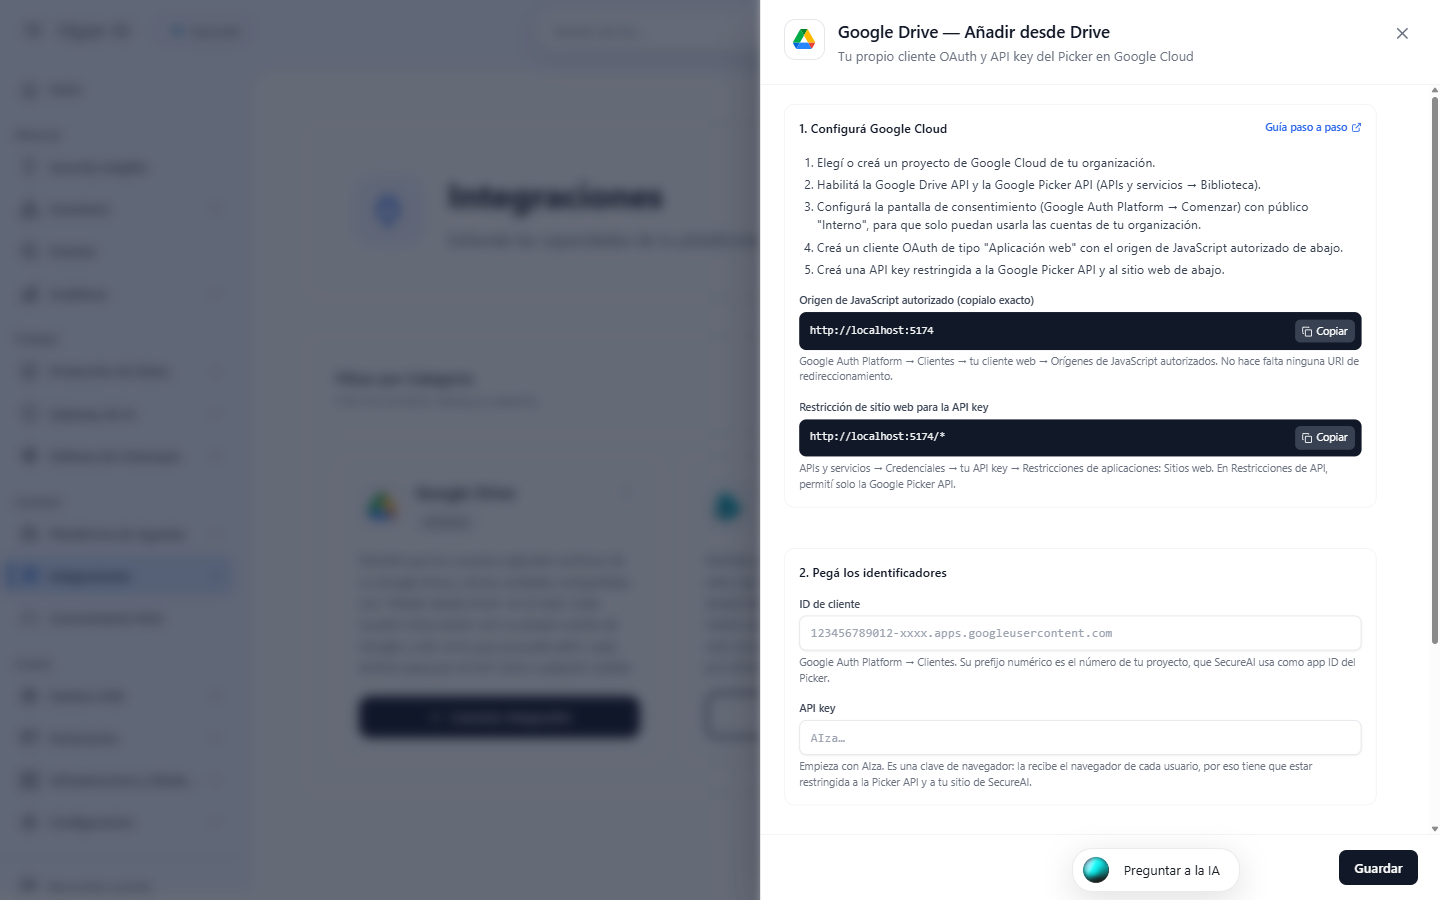
4. 在 **1. Set up Google Cloud** 部分,您会看到在 Google Cloud 中需要的两个值,每个值都有各自的 **Copy** 按钮:
* **Authorized JavaScript origin**:您的实例地址,例如 `https://<您的公司>.hiperai.ai`。
* **Website restriction for the API key**:同一地址,末尾加上 `/*`。
请始终使用您的实例所显示的值:它们必须完全一致,包括 `https://`,且来源末尾不带 `/`。
## 步骤 2:选择项目并启用 API
1. 打开 [Google Cloud 控制台](https://console.cloud.google.com),在顶部栏的项目选择器中选择贵组织的项目(或新建一个,例如 `SecureAI Drive`)。
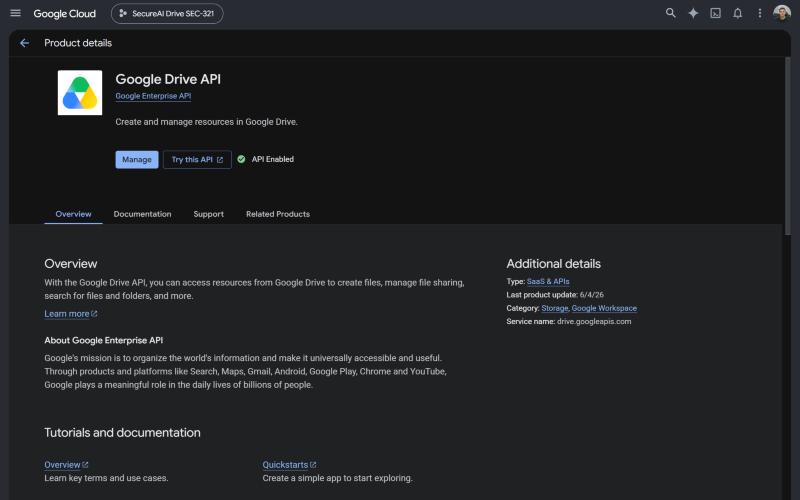
2. 前往 **API 和服务 → 库**(APIs & Services → Library),搜索 **Google Drive API**,然后点击**启用**(Enable)。
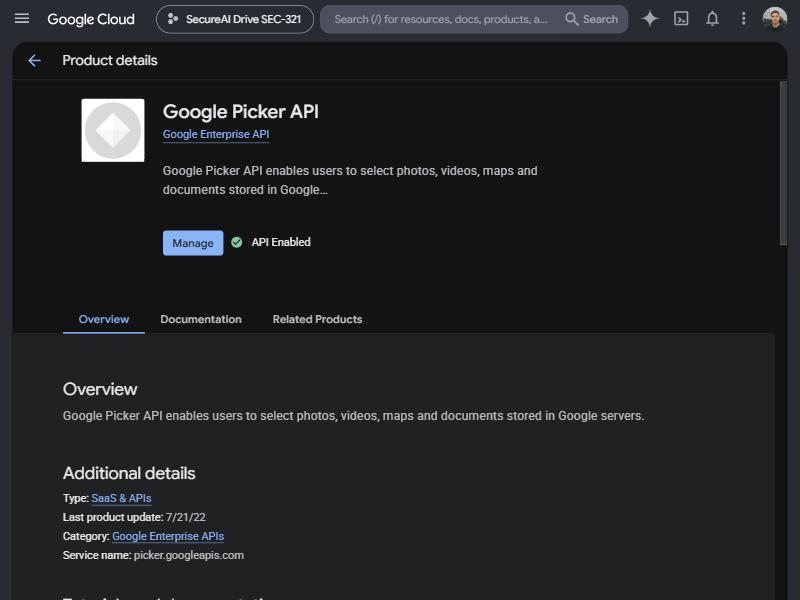
3. 对 **Google Picker API** 重复同样的操作。
## 步骤 3:配置同意屏幕
1. 前往 **Google Auth Platform**(菜单 **API 和服务 → OAuth 权限请求界面**,英文为 "OAuth consent screen")。如果项目尚未配置,请点击**开始使用**(Get started)。
2. 填写**应用名称**(App name,例如 `SecureAI`)和**用户支持电子邮件地址**(User support email)。
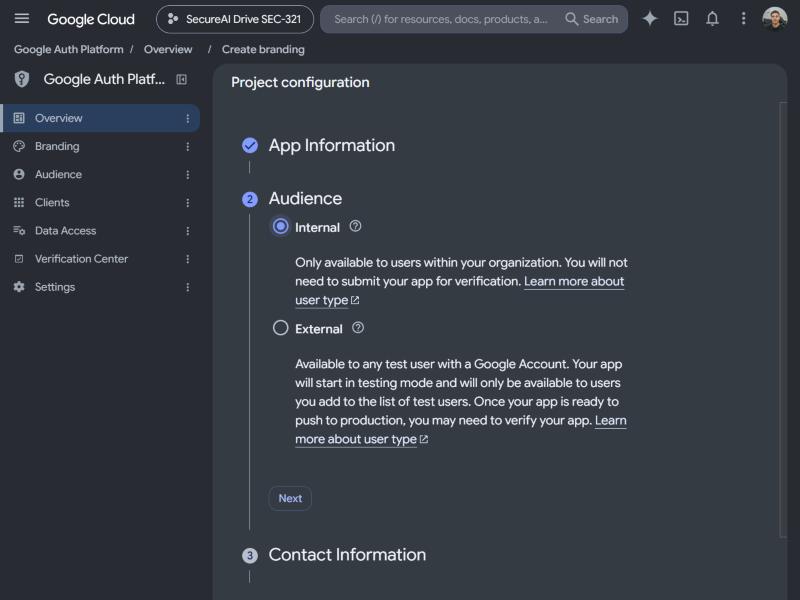
3. 在**目标对象**(Audience)中选择**内部**(Internal):只有贵组织 Google Workspace 的账号才能授权该应用,且 Google 无需进行验证。
4. 填写联系电子邮件地址,接受用户数据政策,然后点击**创建**(Create)。
无需手动添加范围:SecureAI 仅请求 `drive.file`,这是一个非敏感范围。
## 步骤 4:创建 OAuth 客户端
1. 在 **Google Auth Platform → 客户端**(Clients)中,点击**创建客户端**(Create client)。
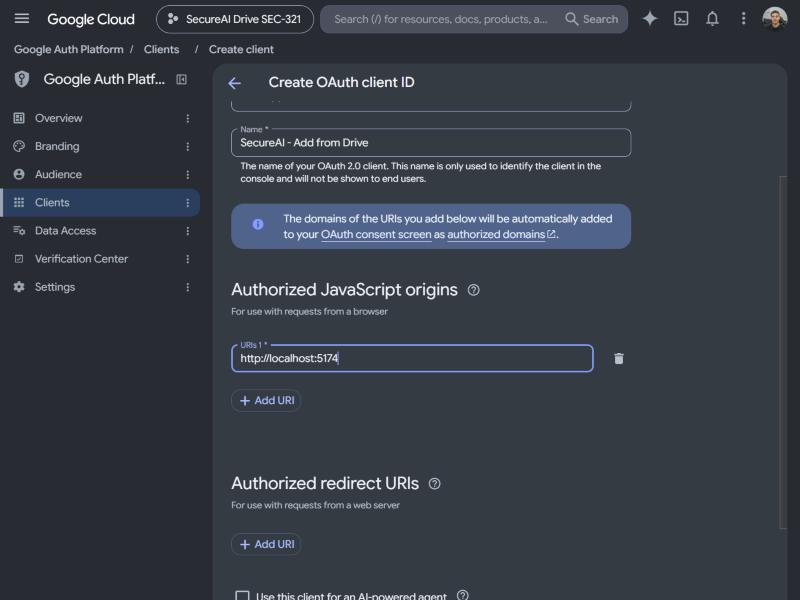
2. 在**应用类型**(Application type)中选择 **Web 应用**(Web application),并为其命名(例如 `SecureAI — Add from Drive`)。
3. 在**已获授权的 JavaScript 来源**(Authorized JavaScript origins)中,点击**添加 URI**(Add URI),并粘贴您在步骤 1 中复制的 **Authorized JavaScript origin**。
4. 将**已获授权的重定向 URI**(Authorized redirect URIs)留空:选择器不使用它们。
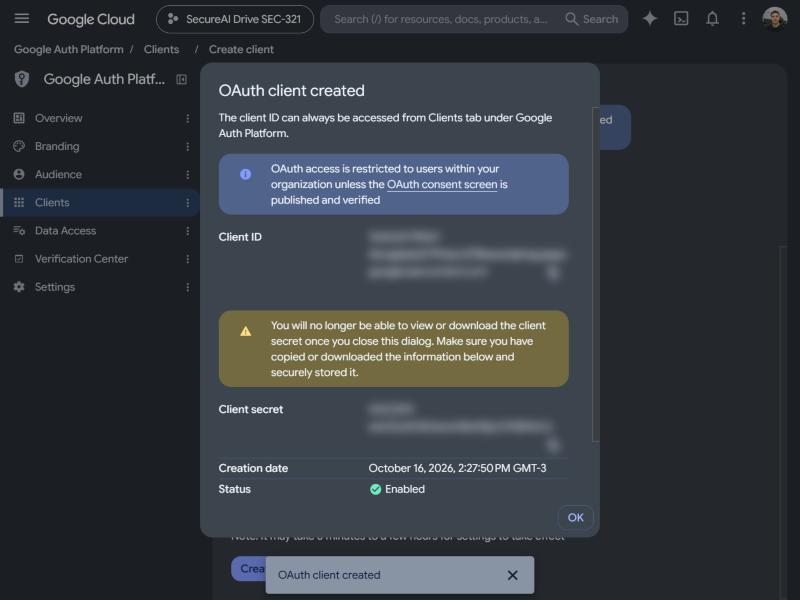
5. 点击**创建**。
6. 复制**客户端 ID**(Client ID,以 `.apps.googleusercontent.com` 结尾)。此客户端不需要密钥:请勿复制密钥,也不要在任何地方填写。
如果贵组织已在 SecureAI 中使用 Google Web 客户端进行 [Google Workspace 登录](/zh/iam/google-workspace),您可以复用该客户端:将 JavaScript 来源添加到同一个客户端即可。
## 步骤 5:创建并限制 API 密钥
1. 前往 **API 和服务 → 凭据**(Credentials),点击**创建凭据 → API 密钥**(Create credentials → API key)。
2. 打开刚创建的密钥(**修改 API 密钥**,"Edit API key"):
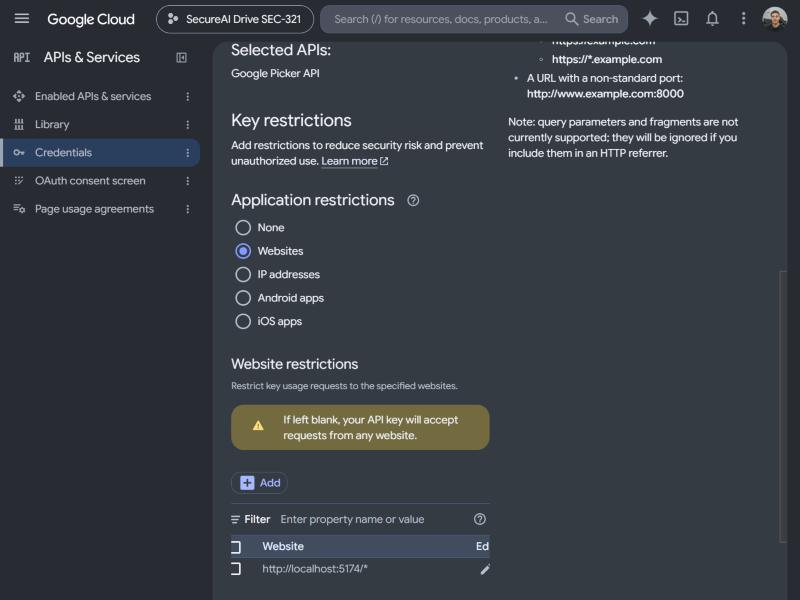
* 在**应用限制**(Application restrictions)中选择**网站**(Websites),并添加您在步骤 1 中复制的 **Website restriction**(末尾带 `/*` 的地址)。
* 在 **API 限制**(API restrictions)中选择**限制密钥**(Restrict key),并仅勾选 **Google Picker API**。
3. 点击**保存**(Save),并复制密钥(以 `AIza` 开头)。
API 密钥**在设计上是公开的**:每位用户的浏览器都会收到它,以便打开选择器。因此必须将其限制为仅可用于 SecureAI 网站和 Google Picker API。请在 SecureAI 中使用 **Test connection** **之前**完成限制:对于已记录过其他 API 使用情况的密钥,Google 可能不允许您再添加限制。
## 步骤 6:在 SecureAI 中填写、测试并启用
1. 返回 SecureAI 中的 **Google Drive** 侧边面板。
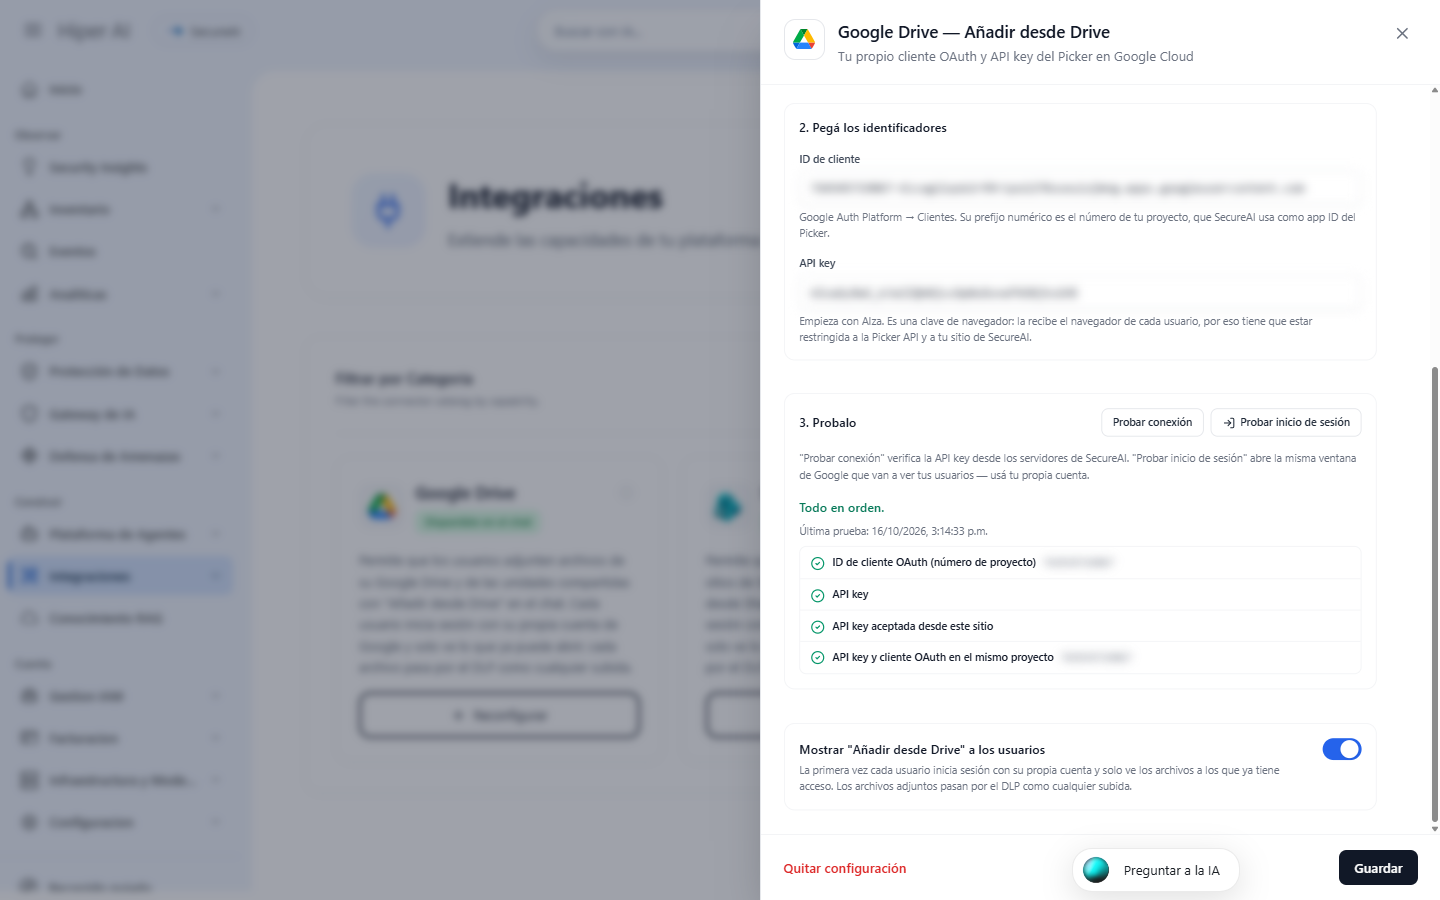
2. 在 **2. Paste the identifiers** 下,粘贴 **Client ID** 和 **API key**。
3. 在 **3. Test it** 下:
* **Test connection** 会从 SecureAI 服务器验证 API 密钥是否有效、是否接受来自您实例的请求,以及是否与 OAuth 客户端属于**同一项目**。
* **Try signing in** 会打开用户将看到的同一个 Google 窗口:请使用您的账号登录。SecureAI 会确认来源已获授权,并确认 Google Drive API 有响应。
4. 在 **4.** 下,保持 **Show "Add from Drive" to users** 处于开启状态,然后点击 **Save**。
卡片将变为 **Available in the chat**。
## 步骤 7:用户如何使用
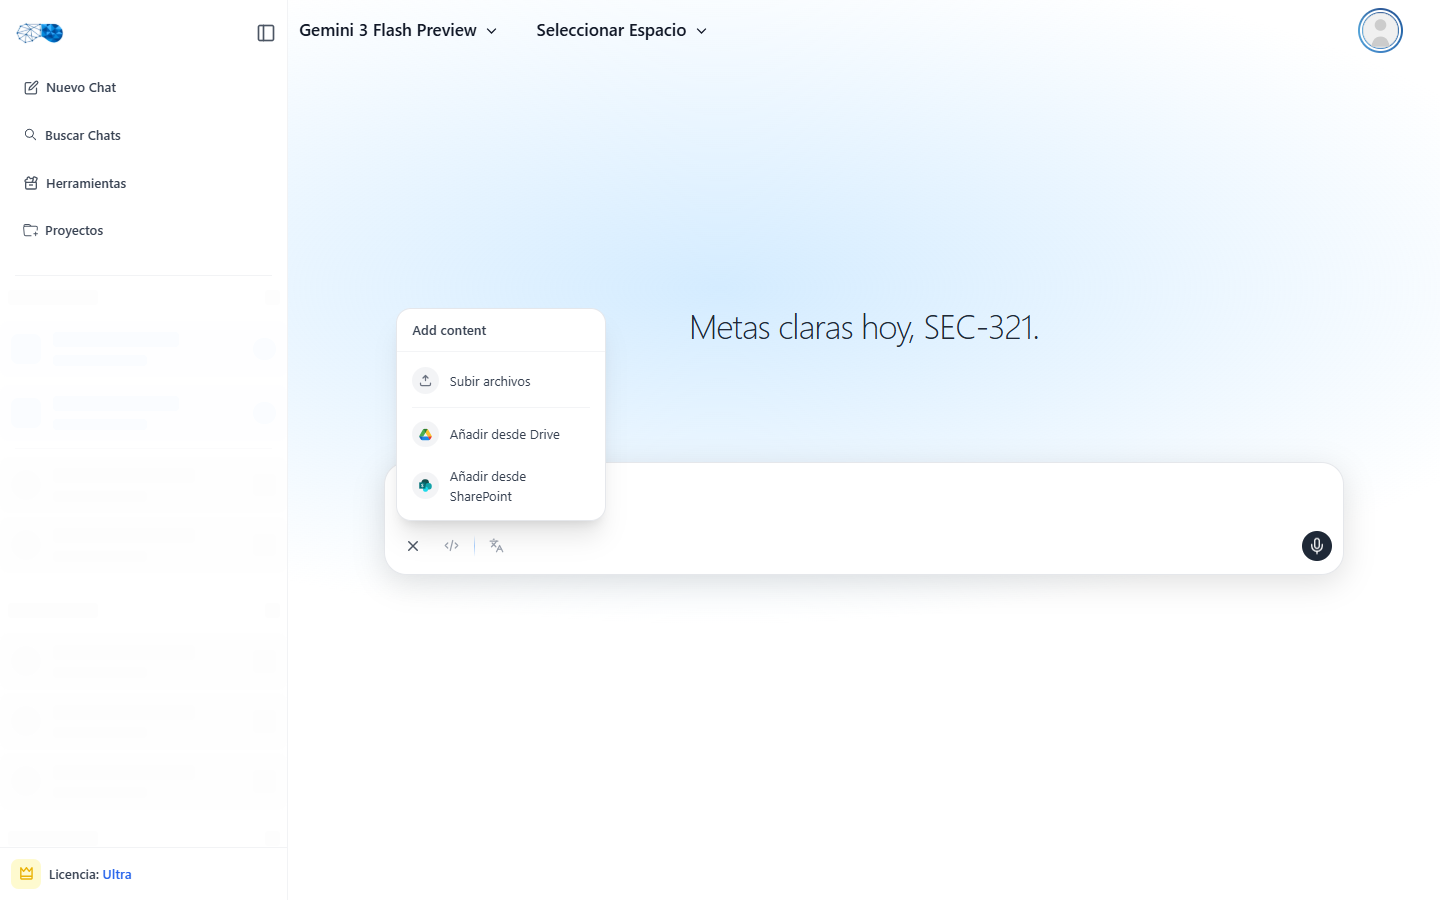
1. 在聊天中,用户点击**附件**按钮并选择 **Add from Drive**。
2. 首次使用时,Google 会要求用户选择账号,并授权 SecureAI 查看其所选的文件。
3. 打开 Google 云端硬盘选择器,其中包含“我的云端硬盘”、共享云端硬盘和图片标签页。用户选择一个或多个文件,然后点击 **Select**。
4. 文件会带着 Google 云端硬盘图标附加到消息中。
## 故障排除
| 您看到的现象 | 原因 | 处理方法 |
| - | - | - |
| **Test connection**:"The API key's website restrictions do not include this address"(API 密钥的网站限制不包含此地址) | API 密钥未包含 SecureAI 站点 | 添加步骤 1 中的精确限制值(末尾带 `/*`) |
| **Test connection**:"The API key belongs to a different project than the OAuth client"(API 密钥与 OAuth 客户端不属于同一项目) | 凭据是在不同项目中创建的 | 在与 OAuth 客户端相同的项目中创建 API 密钥 |
| **Test connection**:"The Google Drive API is not enabled"(未启用 Google Drive API) | 尚未启用该 API | 步骤 2 |
| Google 窗口显示 **Error 400: origin\_mismatch** 或 **redirect\_uri\_mismatch** | JavaScript 来源不在 OAuth 客户端中 | 添加该来源(步骤 4)。更改可能需要几分钟才能生效 |
| Google 窗口显示 **Error 403: org\_internal** | 用户使用了 Workspace 之外的账号 | 必须使用组织账号登录 |
| 选择器显示 "The API developer key is invalid" | API 密钥复制有误,或未包含 Google Picker API | 检查步骤 5 |
| "SecureAI did not receive access to this file"(SecureAI 未获得对此文件的访问权限) | 文件未在选择器中选择 | 通过云端硬盘窗口选择该文件 |
| "Its owner does not allow downloading it"(所有者不允许下载) | 所有者已禁用下载 | 请所有者启用下载 |
| 用户看不到 **Add from Drive** | 集成已关闭、未保存,或套餐不包含该功能 | 检查 **Admin → Integrations → Files** 中的卡片 |
## 常见问题
**是否支持共享云端硬盘?** 支持。选择器中有共享云端硬盘标签页;用户可以看到自己所属的云端硬盘。
**每位用户向 SecureAI 授予哪些权限?** 仅 `drive.file`:即对用户在选择器中所选文件的访问权限。SecureAI 无法列出、搜索或读取您云端硬盘中的任何其他文件。
**如何关闭?** 关闭 **Show "Add from Drive" to users** 并保存,或点击 **Remove configuration**。如果还要切断用户已授予的访问权限,请在 Google Cloud 中删除 OAuth 客户端。
**Hiper AI 已经为我配置过 Drive。我需要做什么吗?** 不需要。只要您没有保存自己的配置,卡片就会显示 **Configured by Hiper AI**,一切照常运行。如果您保存了自己的配置,它将替换原有配置。
**之前版本中的“Google Drive 服务账号”呢?** 已不再使用:每次下载都使用用户自己的令牌,这样更安全,因为用户永远无法附加自己打不开的文件。
This documentation is built and hosted on [Mintlify](https://mintlify.com), a developer documentation platform.