> ## Documentation Index
> Fetch the complete documentation index at: https://docs.hiperai.com/llms.txt
> Use this file to discover all available pages before exploring further.
# 마이크로소프트 센티넬 통합
> 통합 가이드: Azure DCR(데이터 수집 규칙)을 통해 Microsoft Sentinel을 HiperAI와 연결
# 마이크로소프트 센티넬 통합
통합 가이드: Microsoft Sentinel과 HiperAI 연결
이 가이드에서는 Azure DCR(데이터 수집 규칙)을 통해 SecureAI에서 보안 로그를 수신하도록 Microsoft Sentinel을 구성하는 데 필요한 단계를 설명합니다.
## 1단계: 애플리케이션 ID 생성(앱 등록)
먼저 Azure에서 애플리케이션에 대한 ID를 만들어 안전하게 인증할 수 있도록 하겠습니다.
### A. Azure Active Directory로 이동
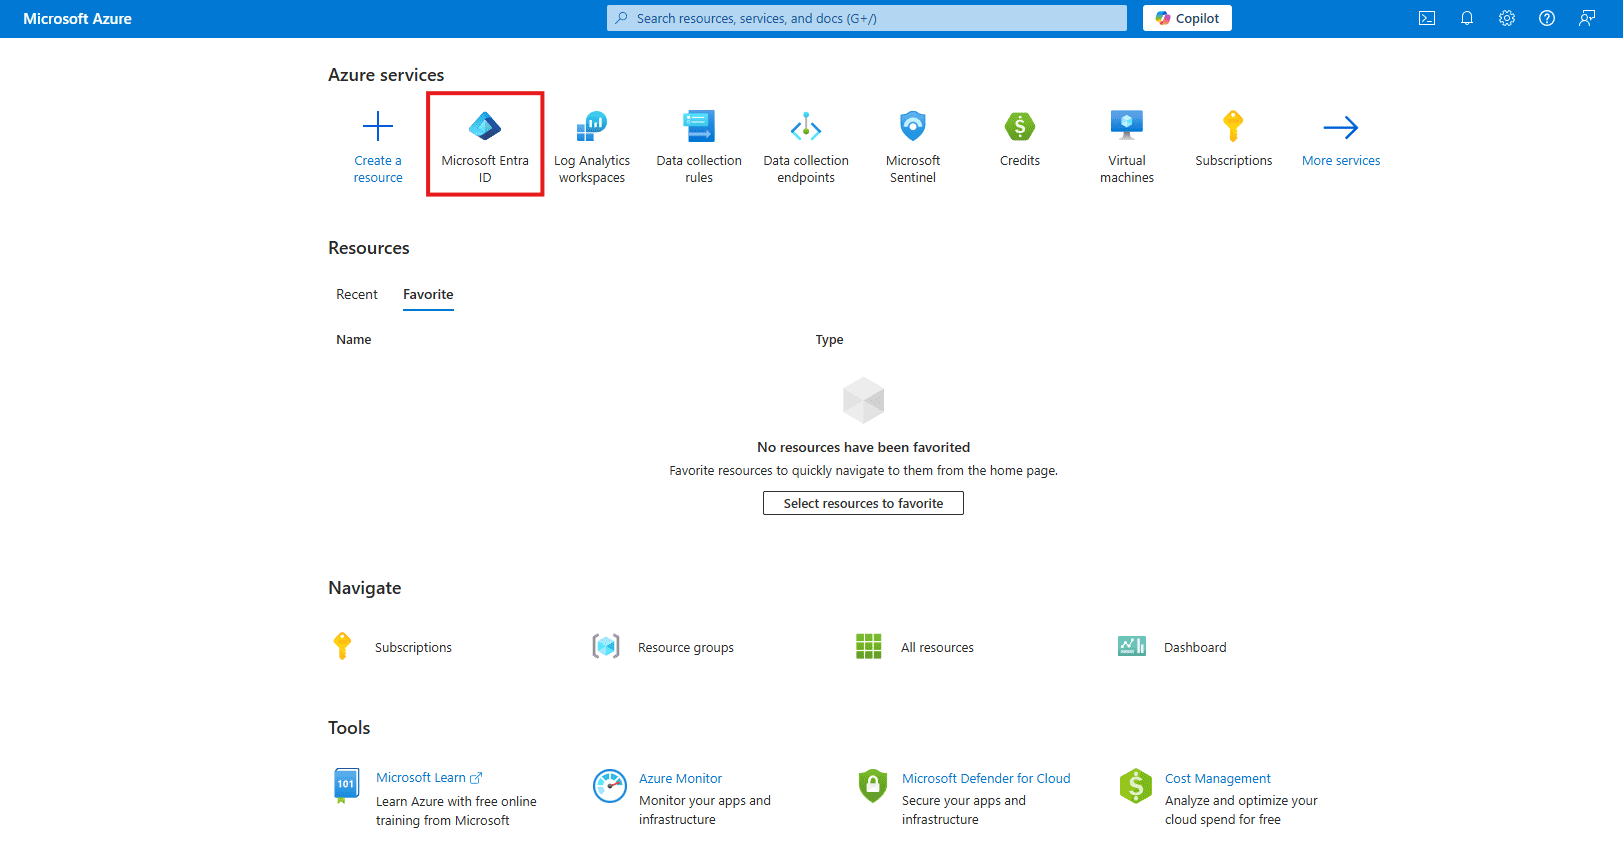
Azure Portal에서 **Azure Active Directory**를 검색하여 선택합니다.
### 나. 신규등록
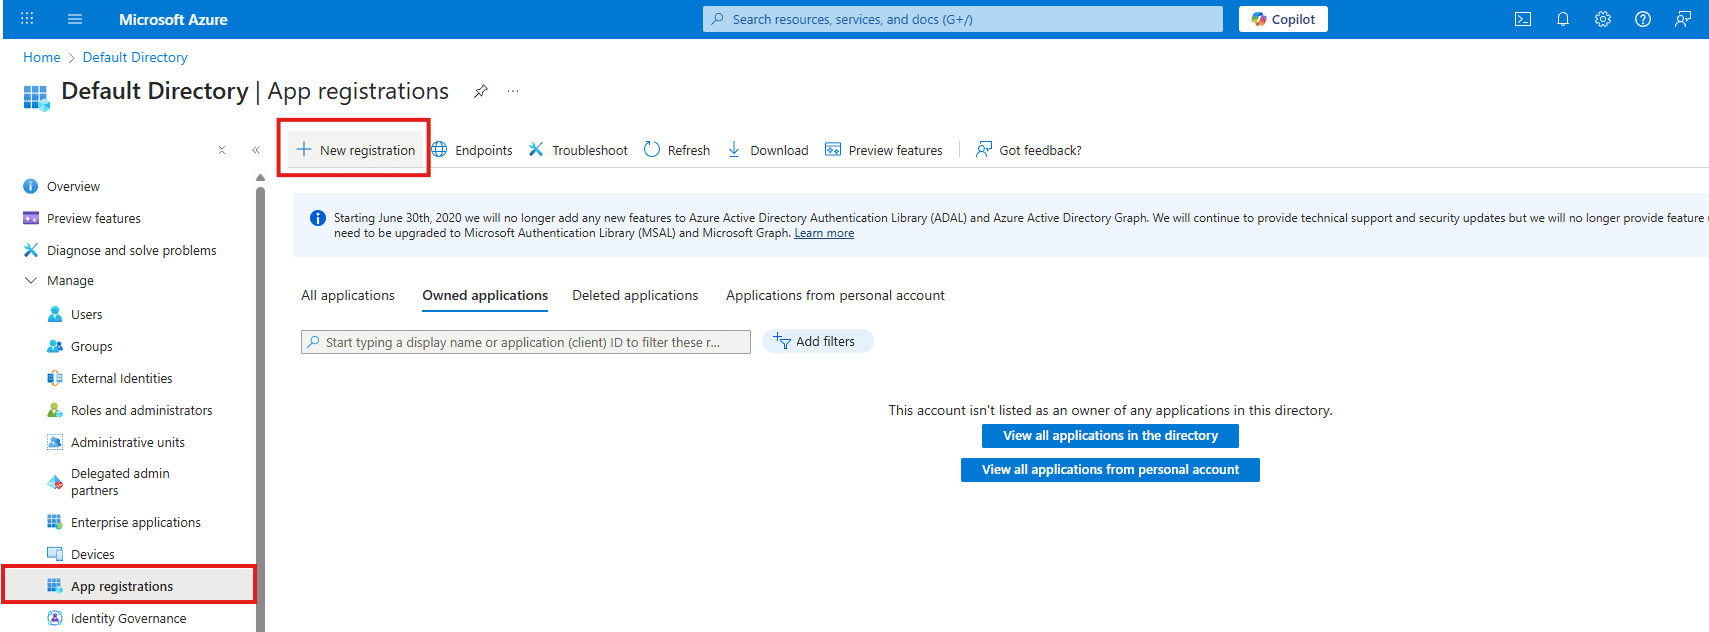
왼쪽 메뉴에서 **앱 등록**으로 이동하여 **+ 신규 등록**을 클릭합니다.
### C. 애플리케이션 이름 지정
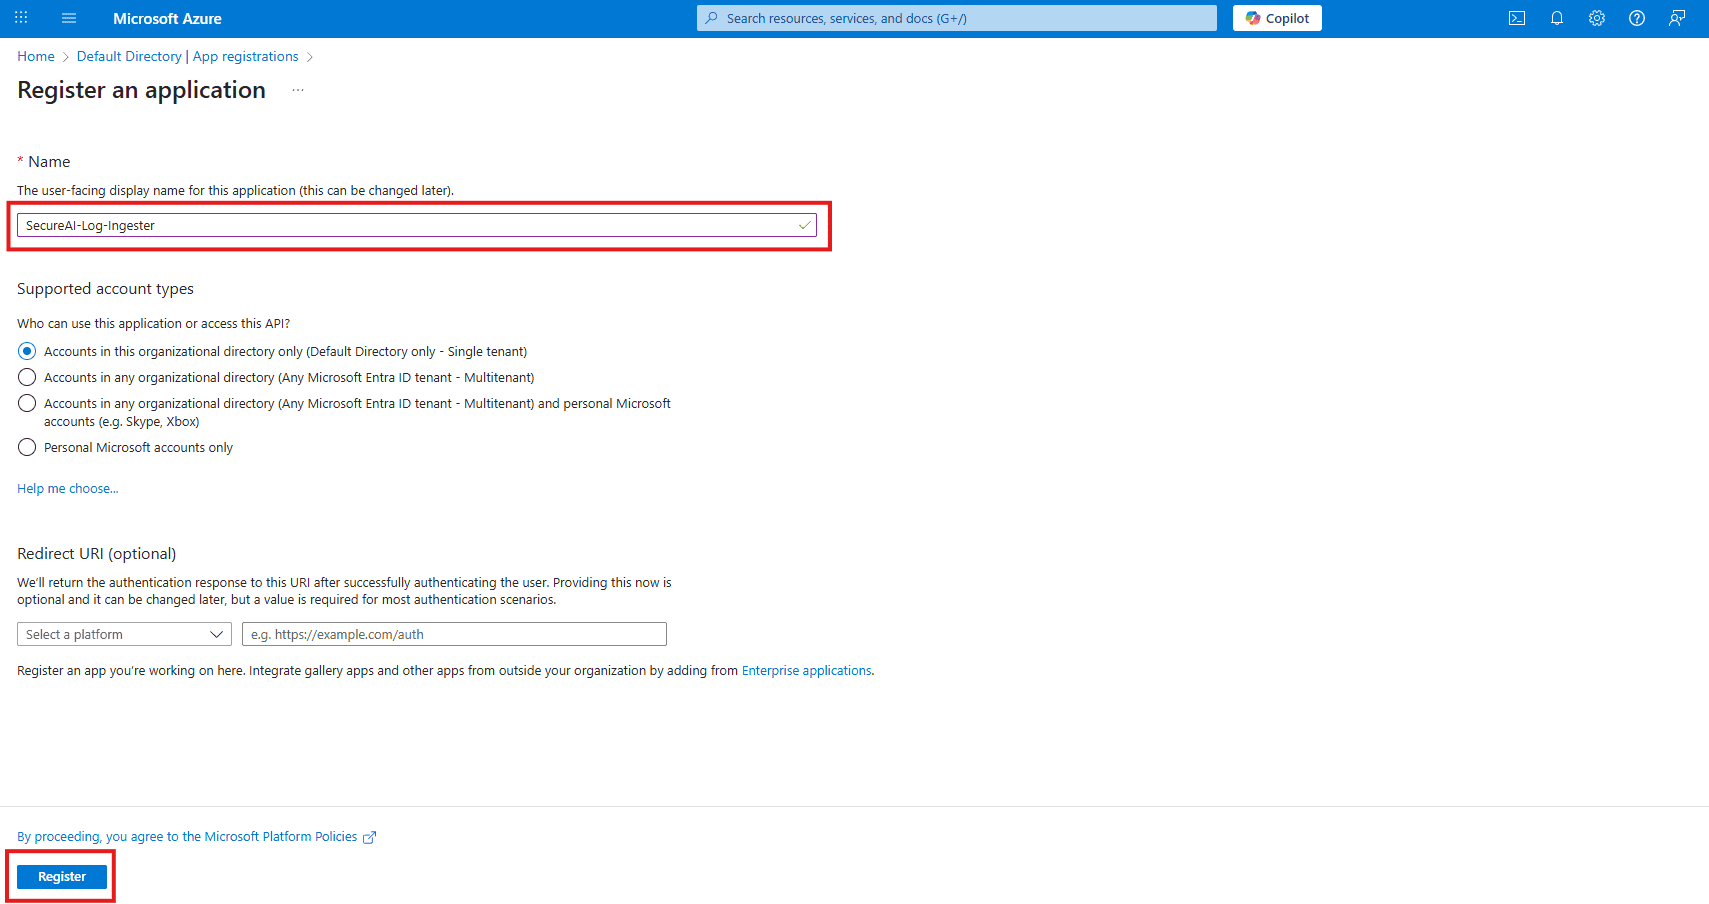
`SecureAI-Log-Ingester`과 같은 명확한 이름을 제공하고 다른 옵션은 기본값으로 둡니다. **등록**을 클릭하세요.
### D. ID 복사
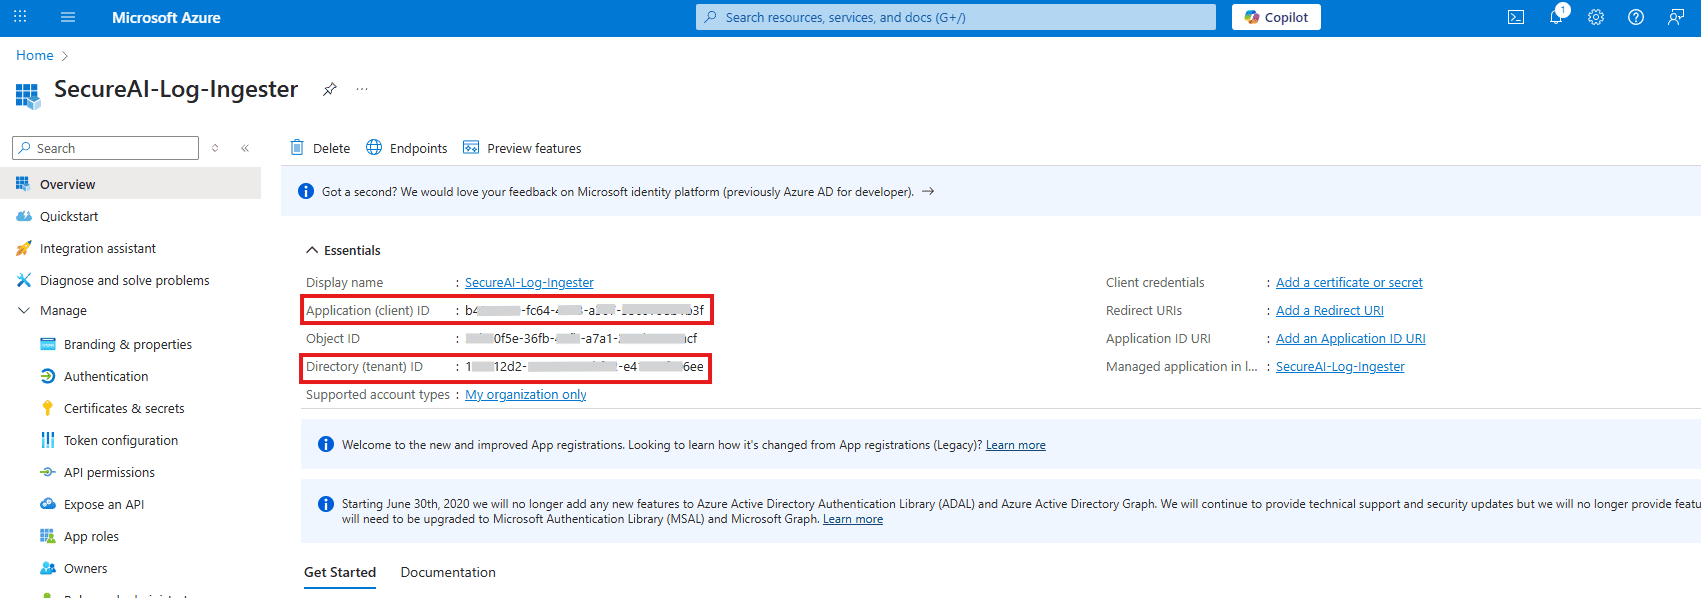
새 애플리케이션의 개요 페이지에서 다음 값을 복사하여 안전하게 저장하세요.
* **애플리케이션(클라이언트) ID**
* **디렉터리(테넌트) ID**
### E. 클라이언트 비밀번호 생성
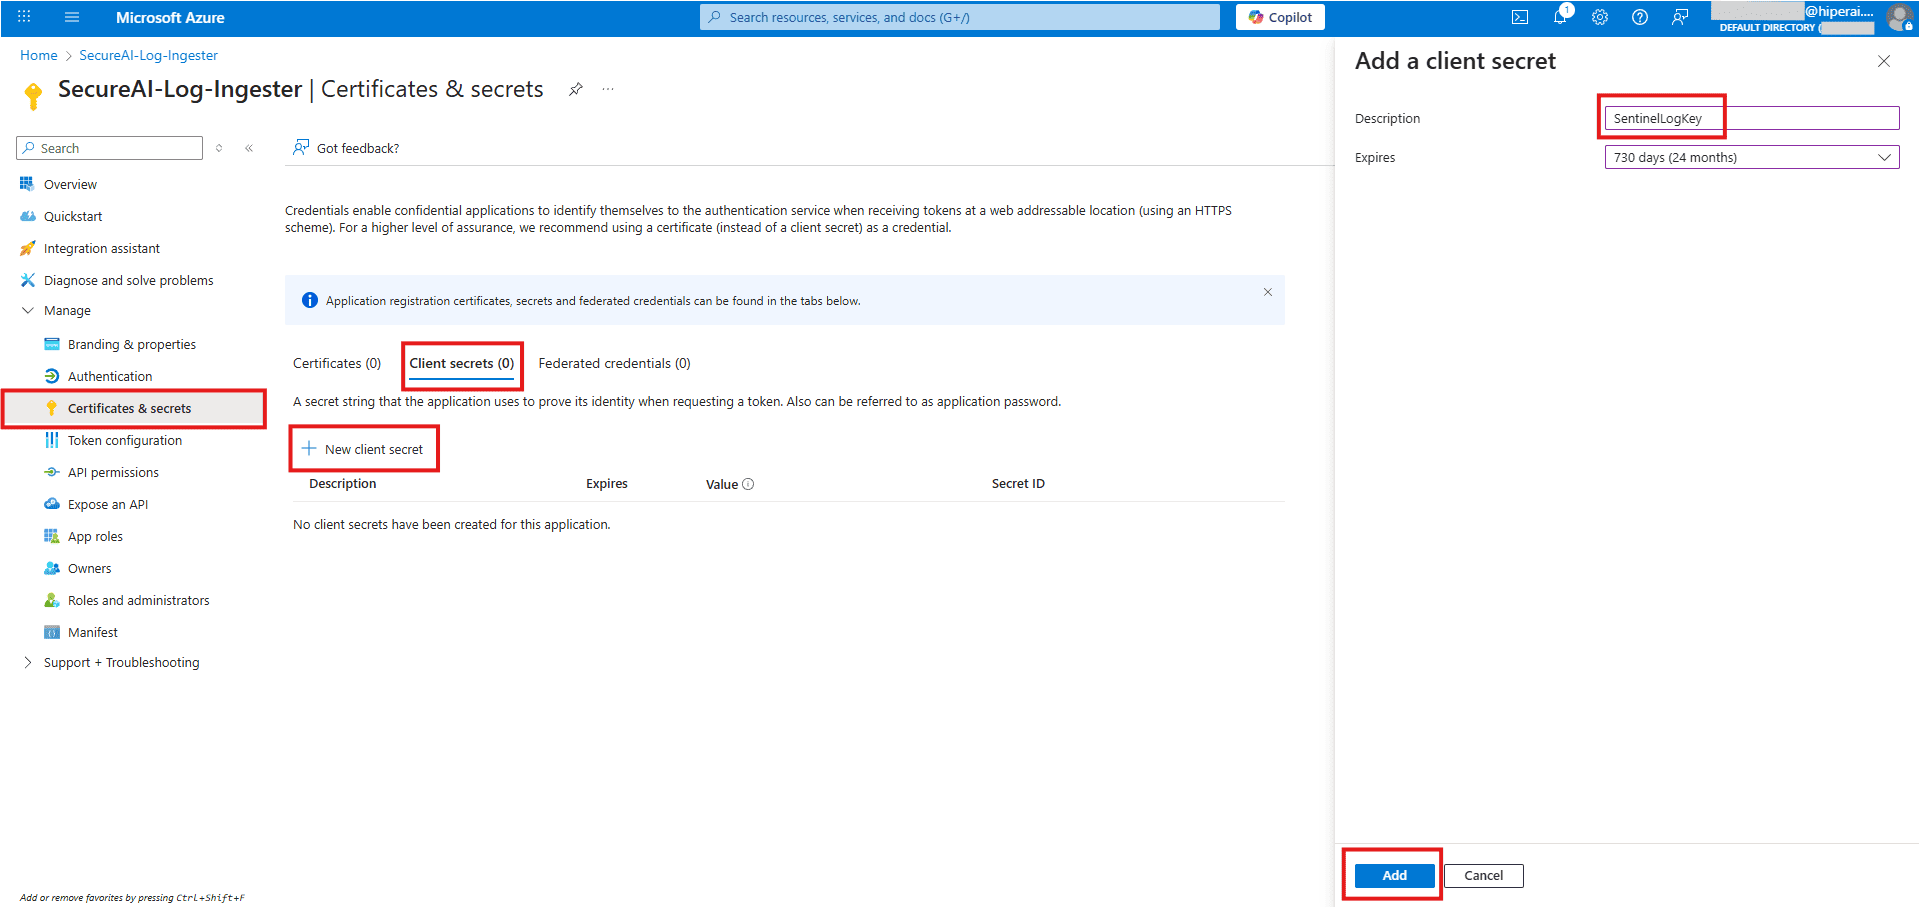
왼쪽 메뉴에서 **인증서 및 비밀**로 이동하여 **+ 새 클라이언트 비밀**을 클릭합니다. 설명(예: "SentinelLogKey")을 제공하고 **추가**를 클릭합니다.
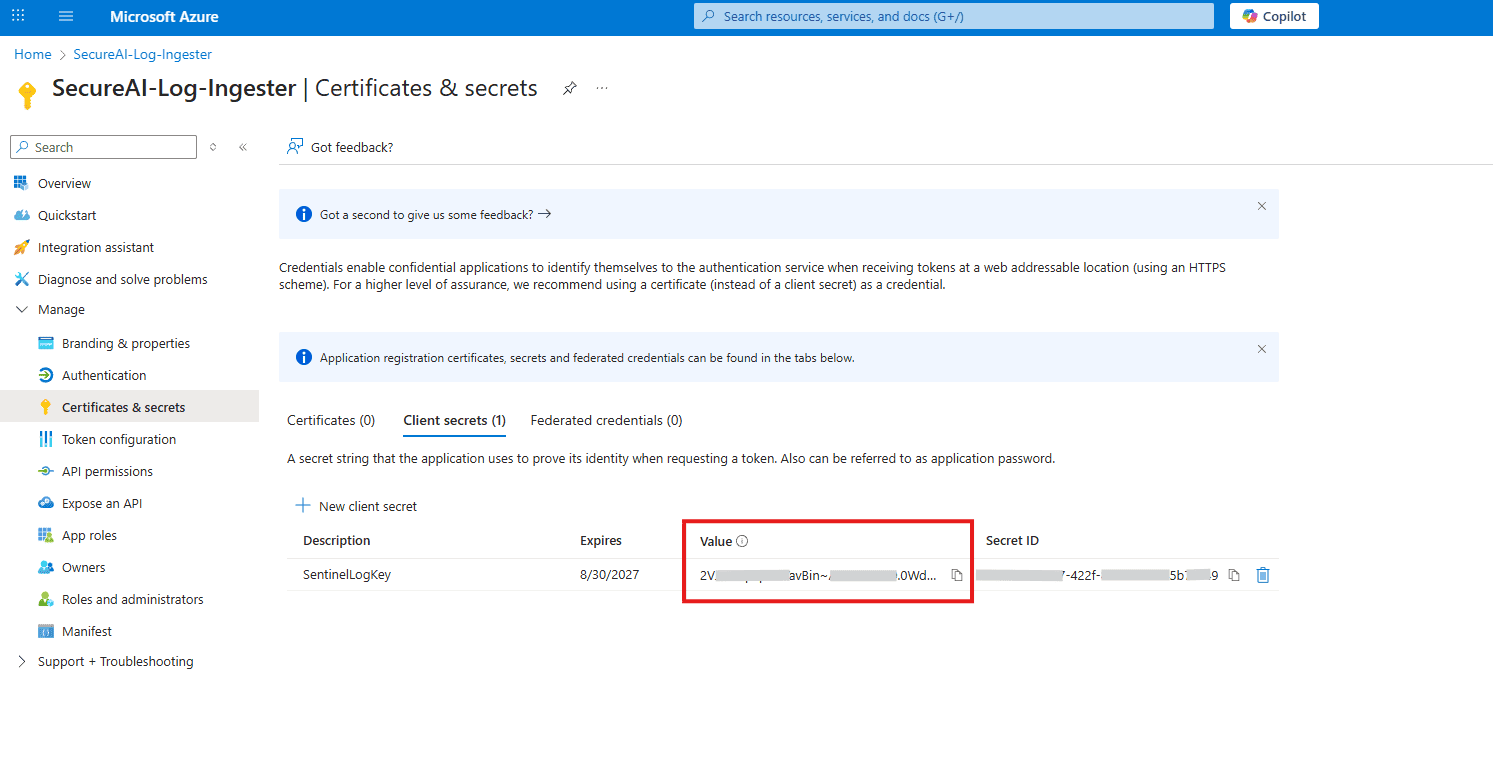
**중요 단계**: 비밀의 **값**을 즉시 복사합니다. 이것이 완전히 보이는 유일한 시간입니다. 다른 ID와 함께 안전하게 보관하세요.
## 2단계: Azure 수집 인프라 만들기
이제 로그에 대한 "경로"와 "저장소"를 구축하겠습니다.
### A. 데이터 수집 끝점(DCE) 생성
#### 1. 서비스 찾기
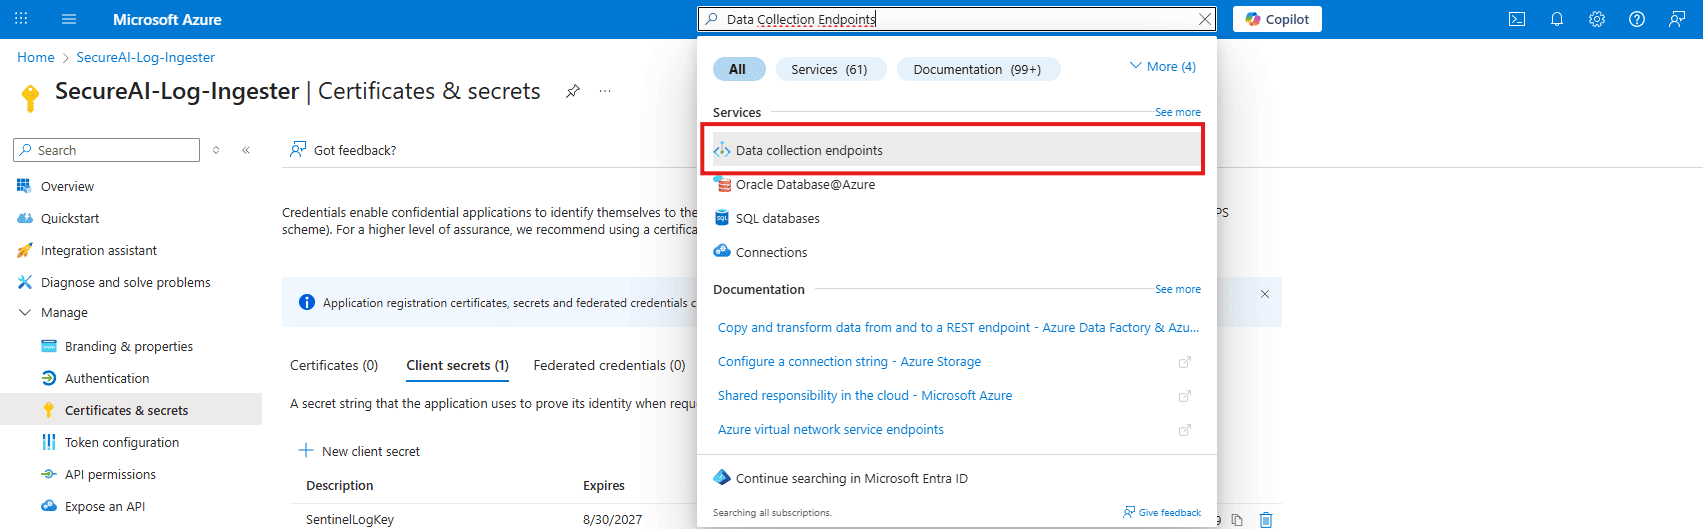
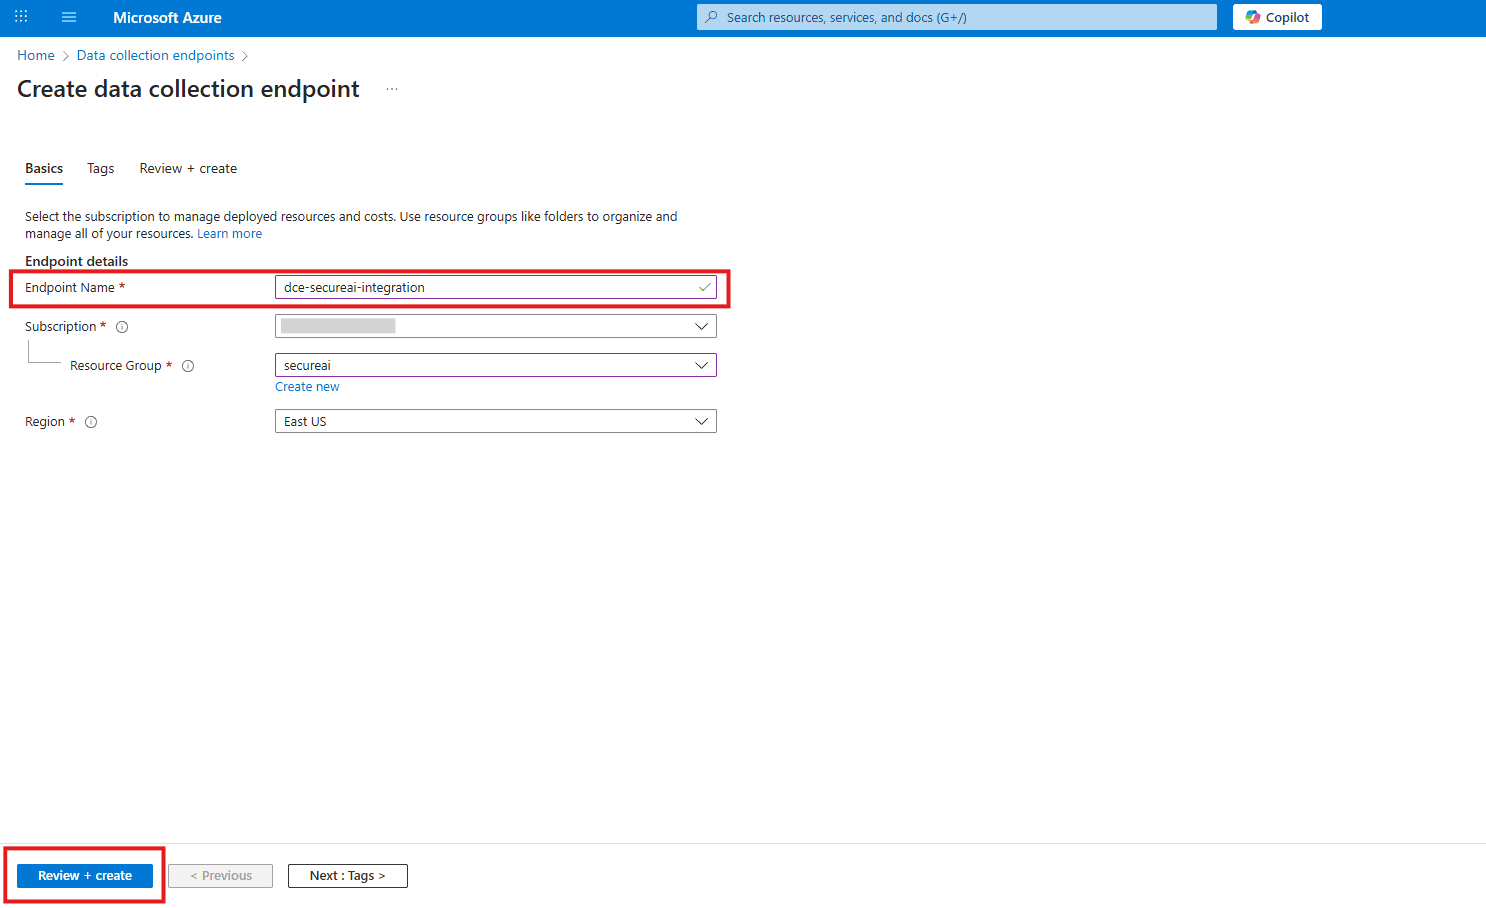
Azure 검색 창에서 **데이터 수집 끝점**을 검색하여 선택합니다.
#### 2. 새 DCE 만들기
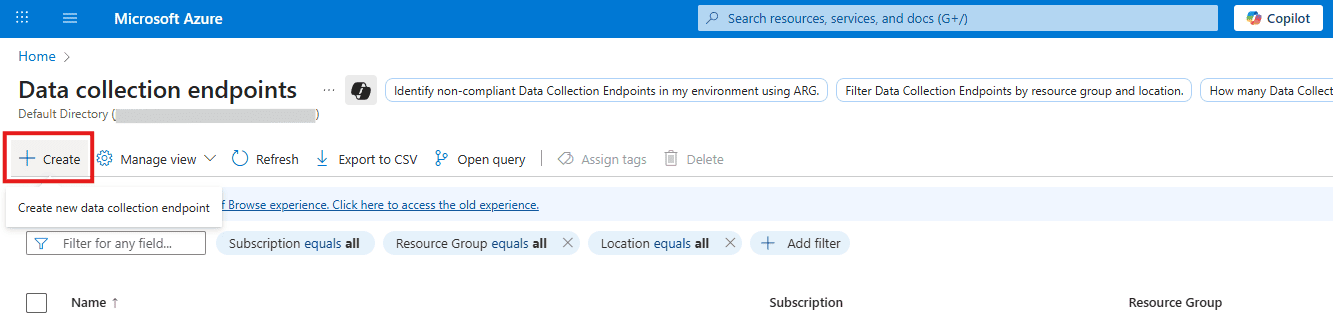
**+ 만들기**를 클릭합니다.
#### 3. DCE 구성
* **이름**: `dce-secureai-integration`
* **지역**: Log Analytics 작업 영역과 동일한 지역을 선택합니다.
* **검토 + 만들기**를 클릭한 다음 **만들기**를 클릭합니다.
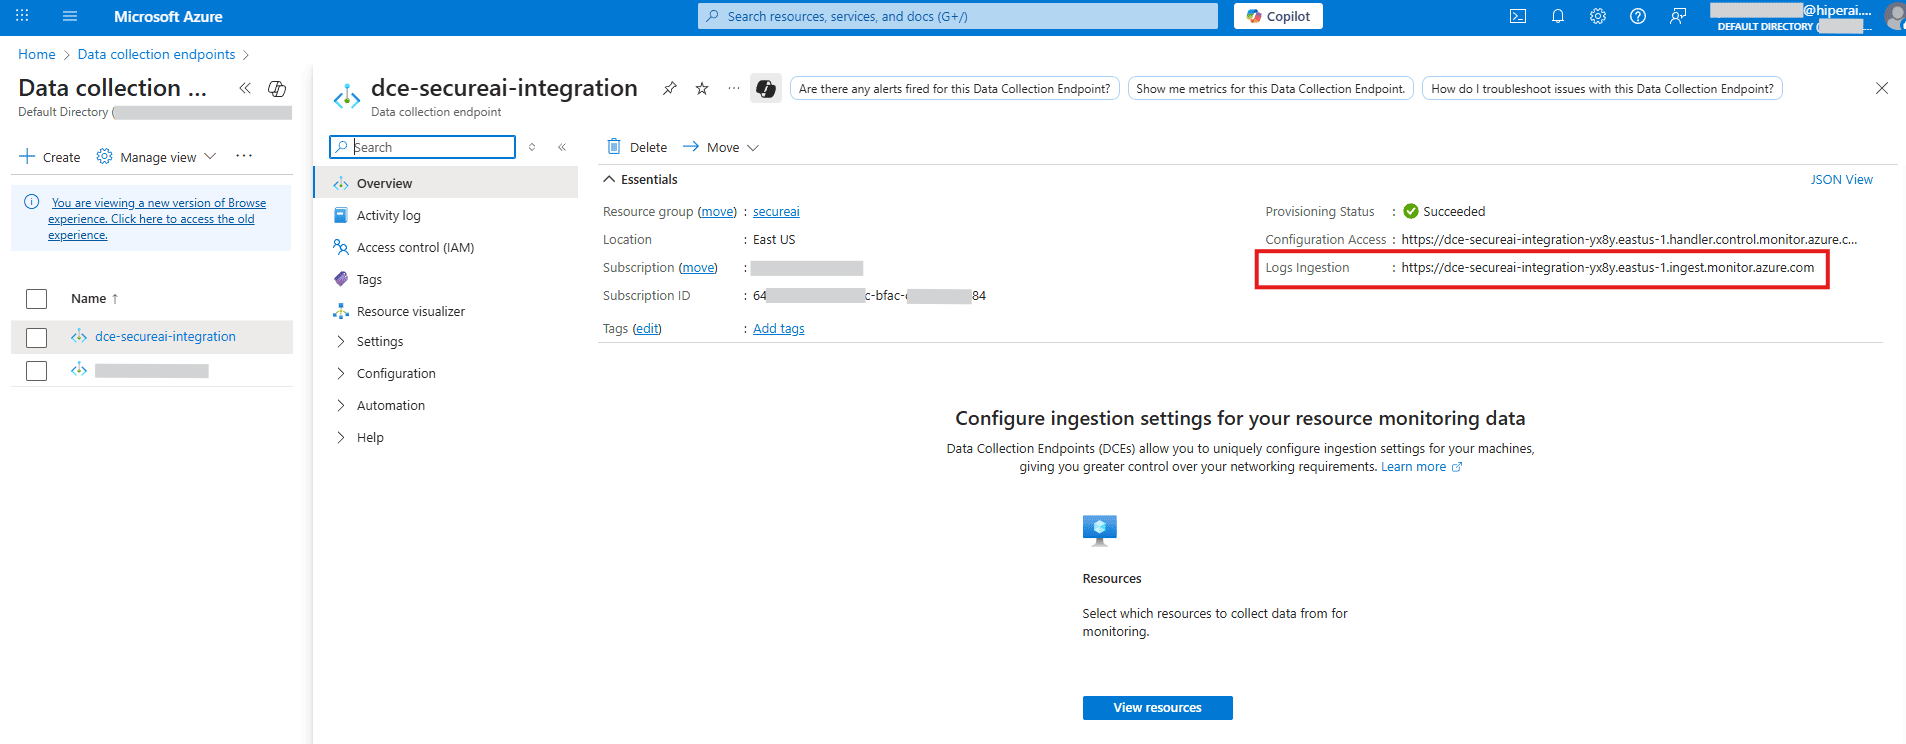
#### 4. URI를 복사합니다.
배포되면 리소스로 이동합니다. 개요 페이지에서 **로그 수집 URI**를 복사하여 저장합니다.
### B. 사용자 정의 테이블 및 데이터 수집 규칙(DCR) 생성
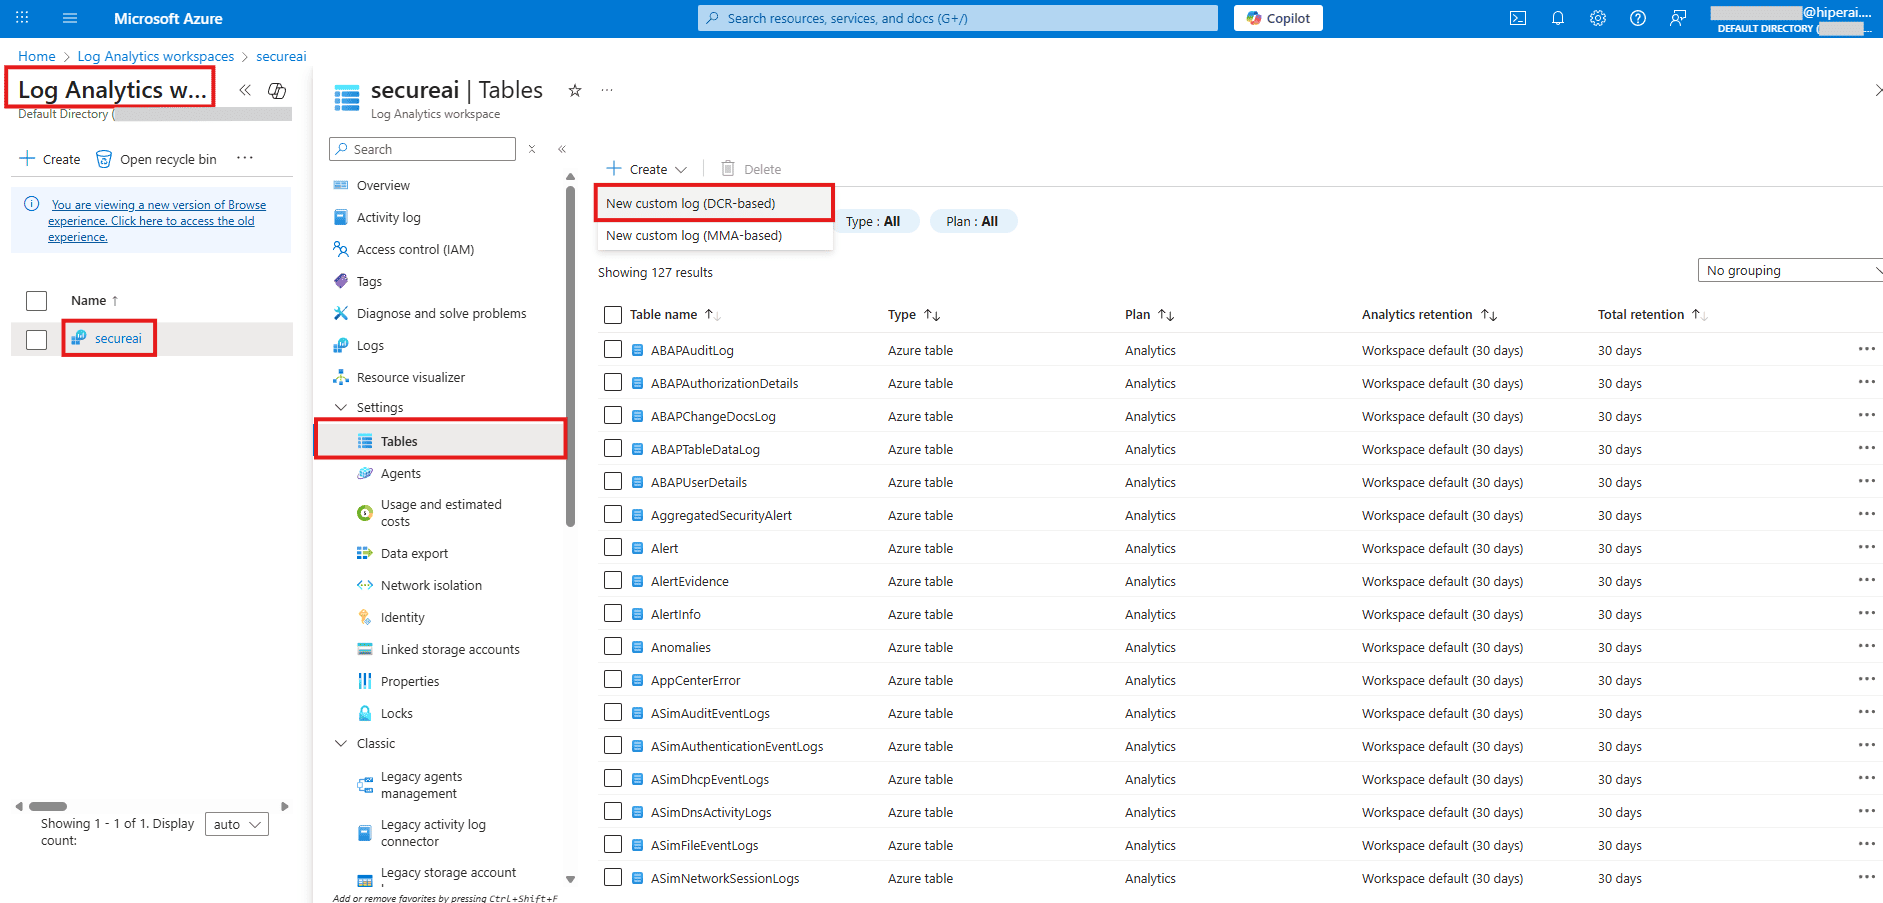
#### 1. 로그분석으로 이동합니다.
**Log Analytics 작업 영역**으로 이동합니다.
#### 2. 맞춤 테이블 만들기
왼쪽 메뉴에서 **테이블**을 클릭한 다음 **+ 만들기**를 클릭하고 \*\*새 사용자 정의 로그(DCR 기반)\*\*를 선택합니다.
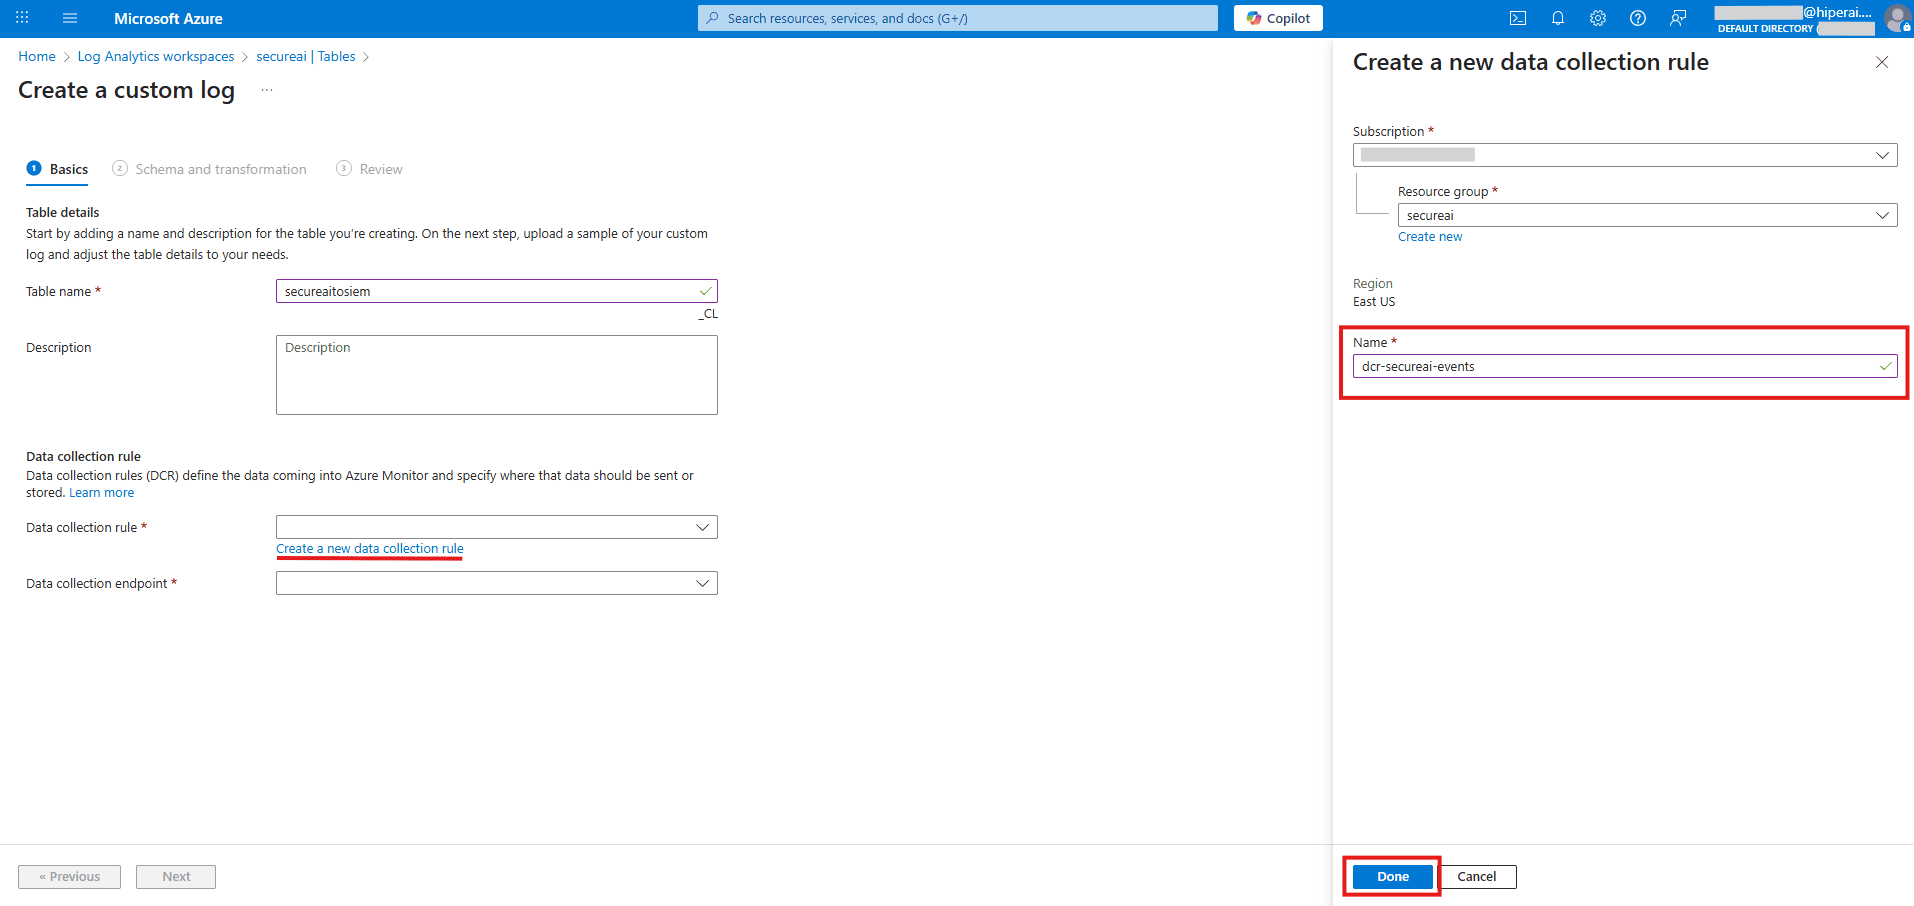
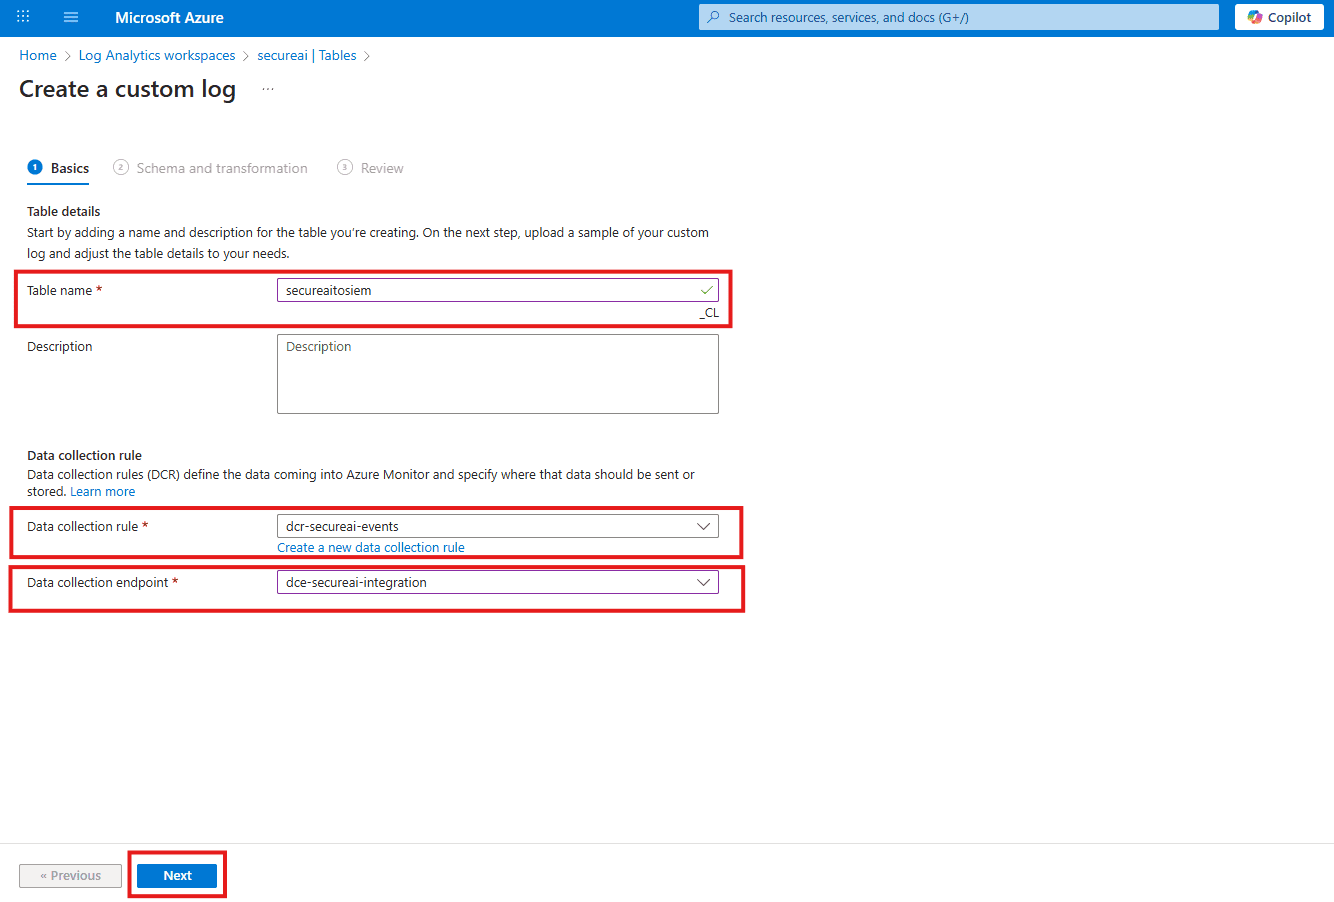
#### 3. '기본' 탭
* **테이블 이름**: `secureaitosiem`(Azure는 자동으로 `_CL`를 추가하여 전체 이름을 `secureaitosiem_CL`로 만듭니다.)
* **데이터 수집 규칙**: "새로 만들기..."를 선택하고 이름을 `dcr-secureai-events`로 지정합니다.
* **데이터 수집 끝점**: 앞서 생성한 DCE를 선택합니다(`dce-secureai-integration`).
* **다음: 스키마 및 변환**을 클릭합니다.
#### 4. "스키마 및 변환" 탭
**샘플 파일 업로드**: 시스템에서 메시지를 표시합니다. 다음 내용으로 `.json` 파일을 생성하고 업로드합니다.
```json theme={null}
[
{
"time": "2025-08-30T21:34:29.013Z",
"level": "Info",
"message": "SecureAI platform started successfully",
"component": "SystemService",
"correlationId": "test-001"
},
{
"time": "2025-08-30T21:34:30.013Z",
"level": "Warning",
"message": "High memory usage detected on server",
"component": "MonitoringService",
"correlationId": "test-002"
},
{
"time": "2025-08-30T21:34:31.013Z",
"level": "Error",
"message": "Database connection timeout after 30 seconds",
"component": "DatabaseService",
"correlationId": "test-003"
},
{
"time": "2025-08-30T21:34:32.013Z",
"level": "Info",
"message": "User admin@secureai.com logged in successfully",
"component": "AuthService",
"correlationId": "test-004"
},
{
"time": "2025-08-30T21:34:33.013Z",
"level": "Warning",
"message": "API rate limit approaching threshold",
"component": "APIGateway",
"correlationId": "test-005"
},
{
"time": "2025-08-30T21:34:34.013Z",
"level": "Info",
"message": "Security scan completed - 0 threats found",
"component": "SecurityScanner",
"correlationId": "test-006"
},
{
"time": "2025-08-30T21:34:35.013Z",
"level": "Error",
"message": "Failed to sync with external SIEM system",
"component": "SIEMSync",
"correlationId": "test-007"
},
{
"time": "2025-08-30T21:34:36.013Z",
"level": "Info",
"message": "Backup job completed successfully",
"component": "BackupService",
"correlationId": "test-008"
}
]
```
**샘플 파일 다운로드**: 전체 샘플 JSON 파일을 다운로드하여 직접 사용할 수도 있습니다.
📥 샘플.json
#### 5. 변환 적용
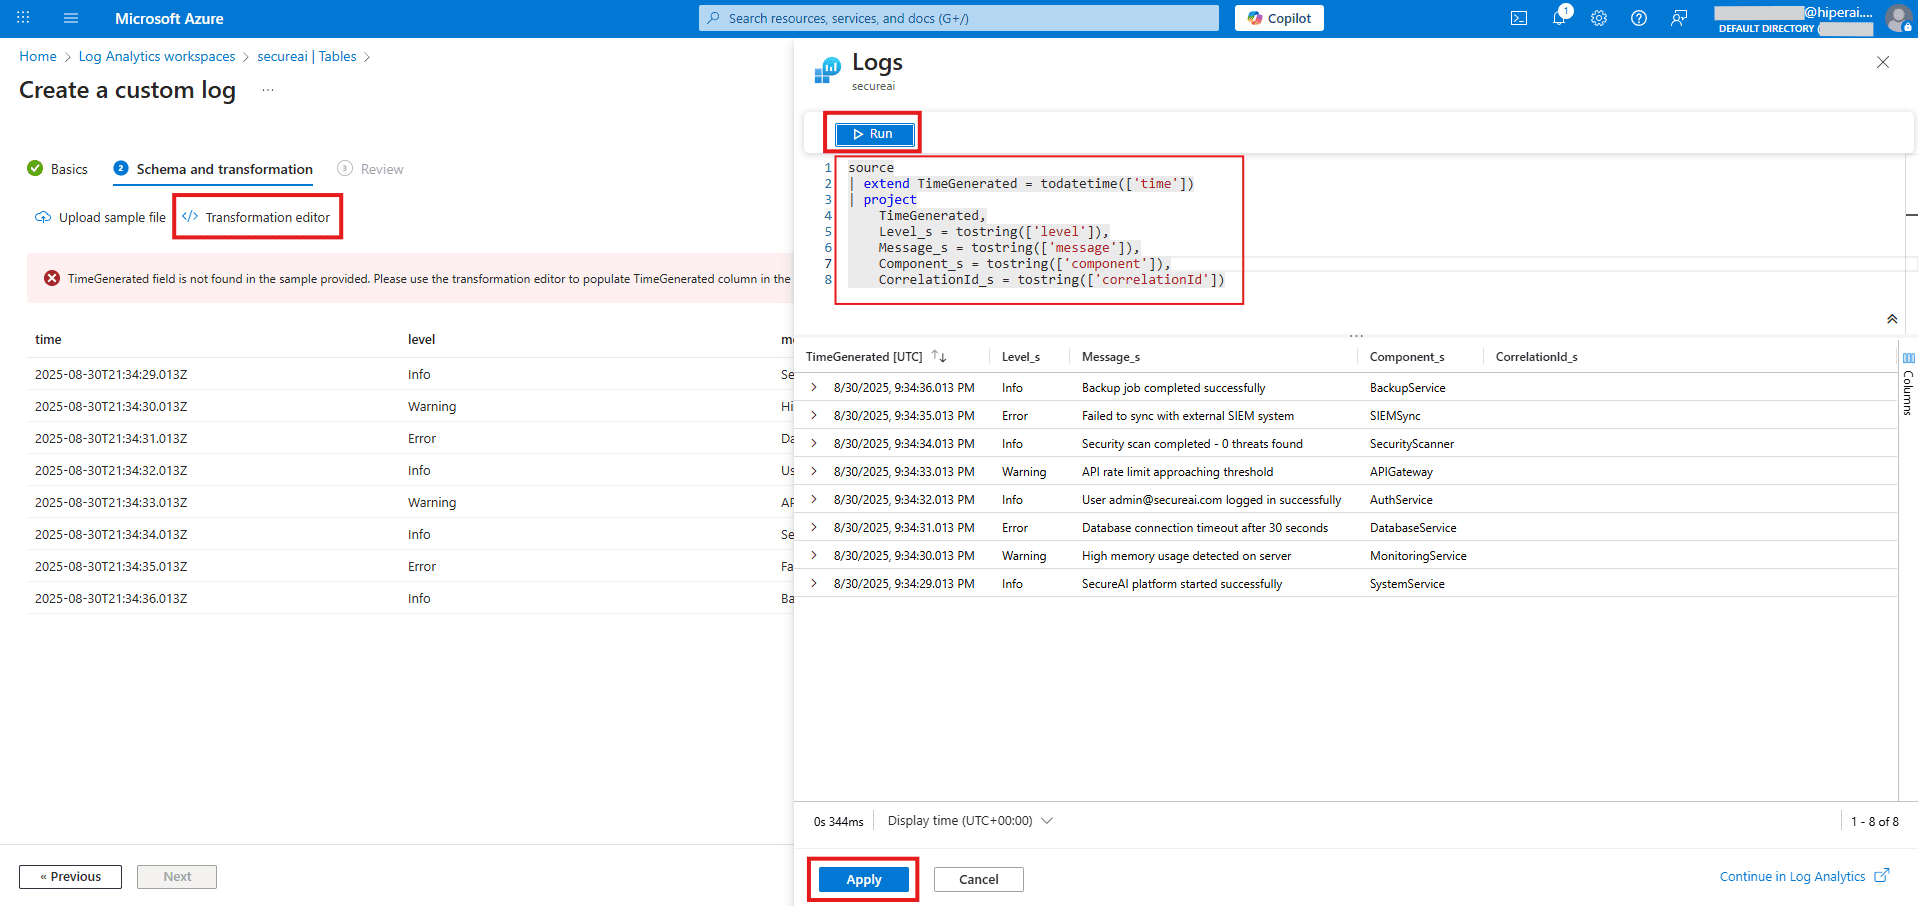
시스템에서 TimeGenerated 필드에 대한 경고를 표시할 수 있습니다. **변환 편집기** 버튼을 클릭하고 기존 콘텐츠를 모두 삭제한 후 다음 전체 KQL 쿼리를 붙여넣습니다.
```kql theme={null}
source
| extend TimeGenerated = todatetime(['time'])
| project
TimeGenerated,
Level_s = tostring(['level']),
Message_s = tostring(['message']),
Component_s = tostring(['component']),
CorrelationId_s = tostring(['correlationId'])
```
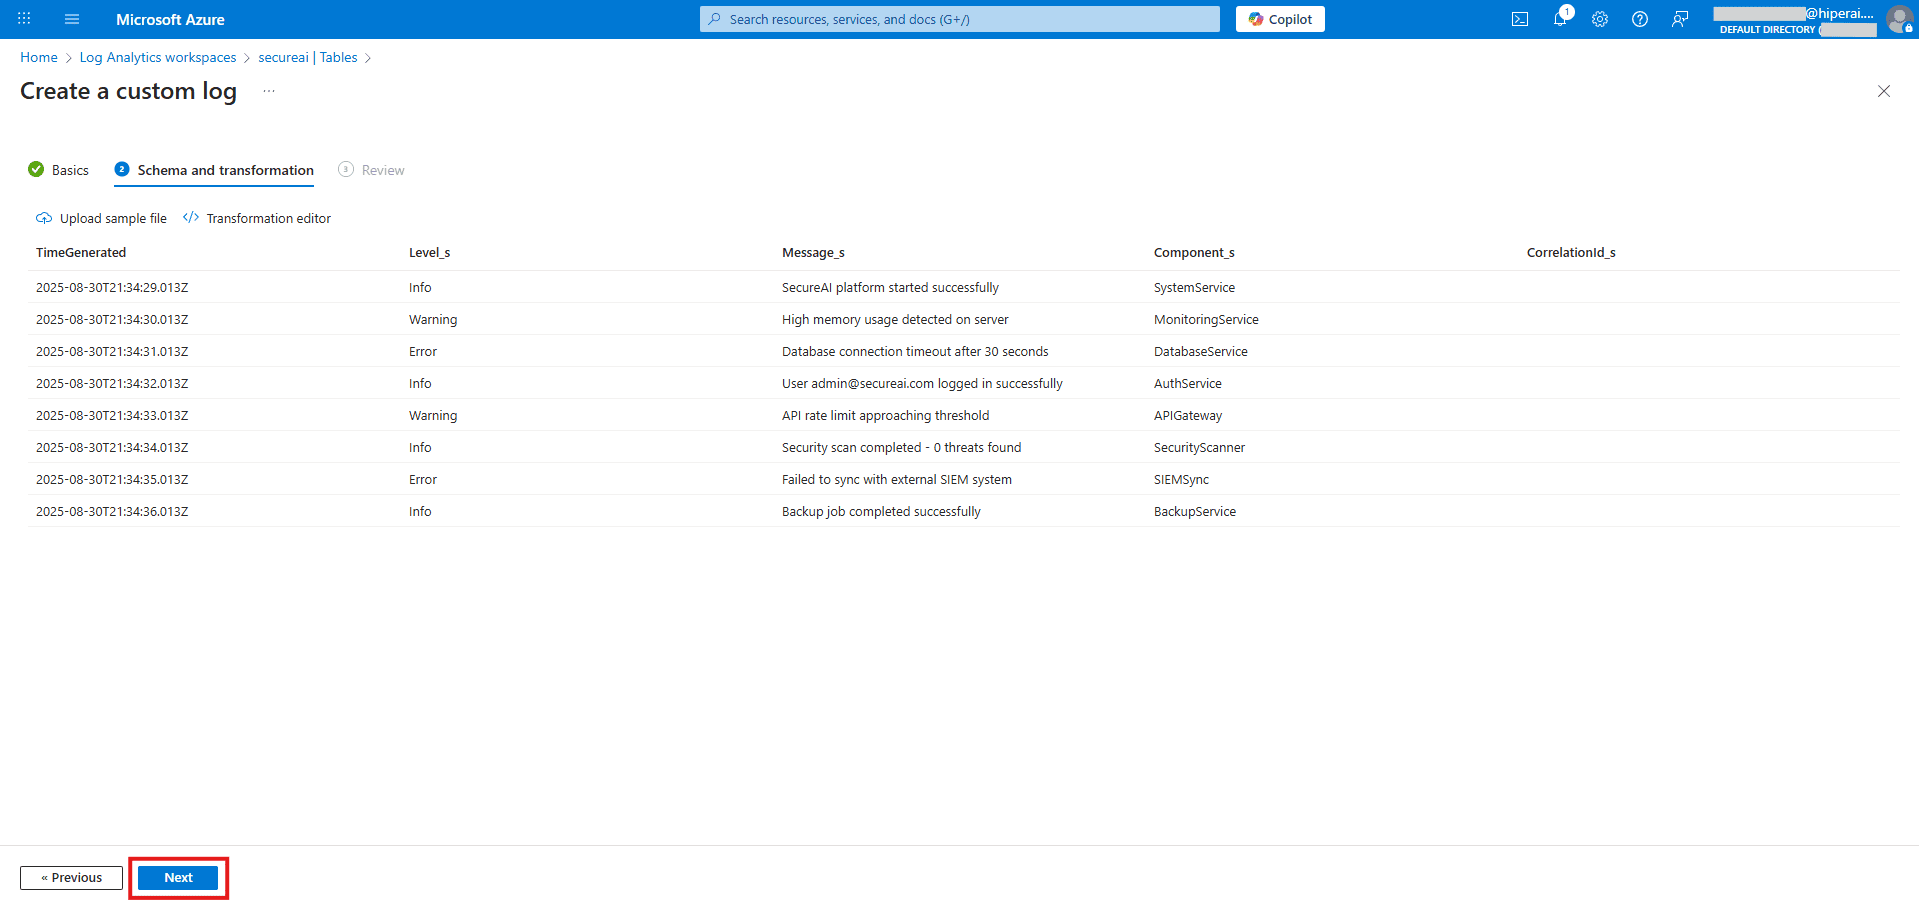
**적용**을 클릭합니다. 올바른 열과 데이터 유형이 모두 포함된 테이블 미리보기가 표시됩니다.
#### 6. 생성 마무리
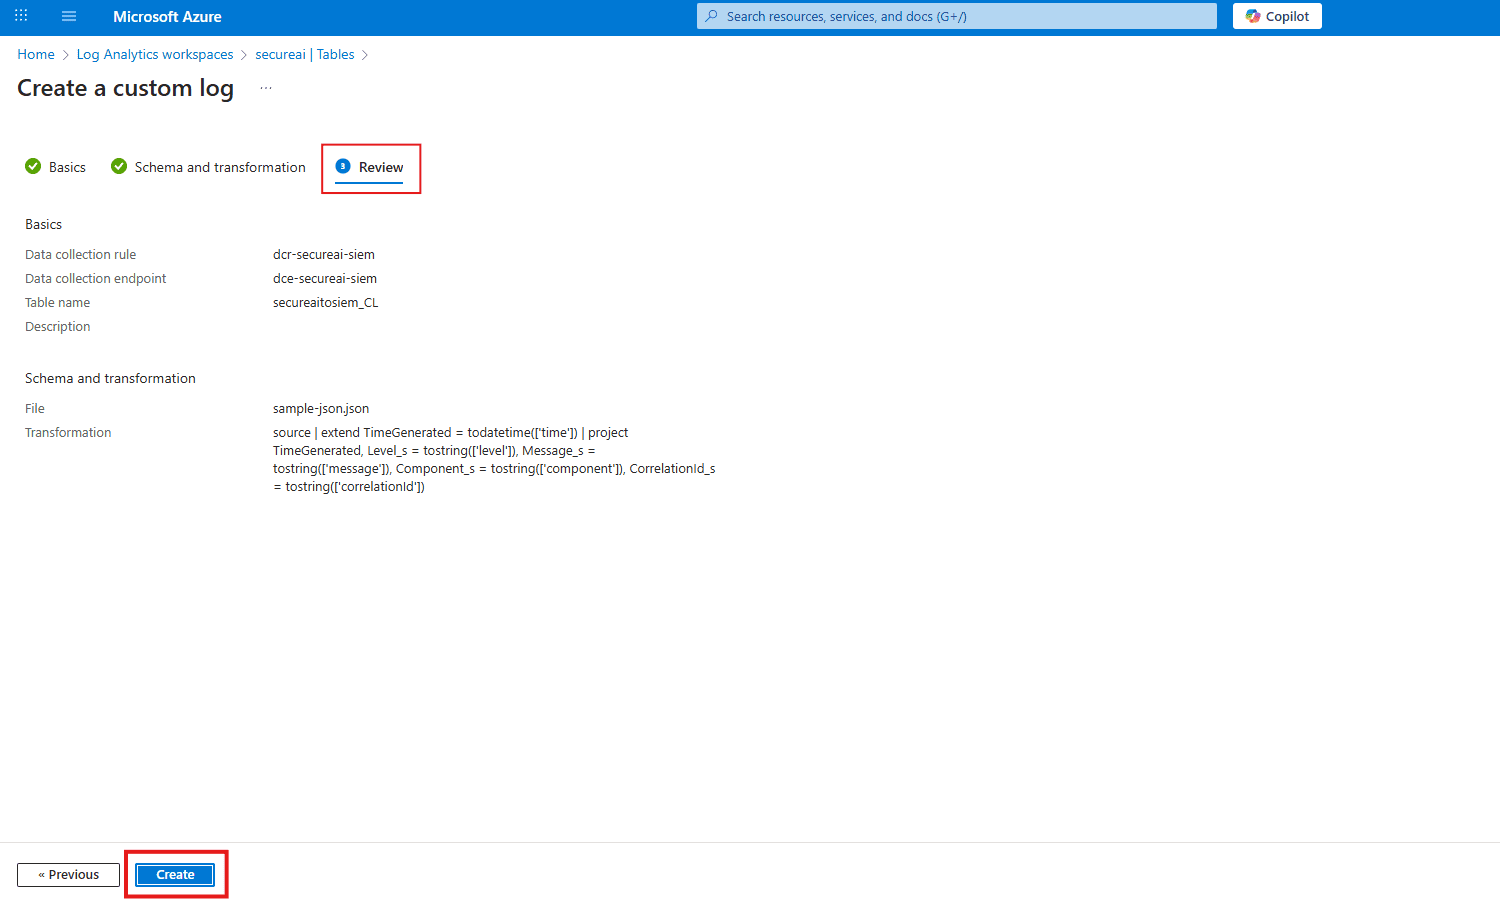
**다음: 검토 + 만들기**를 클릭한 다음 **만들기**를 클릭합니다.
## 3단계: ID를 인프라에 연결(권한)
이 중요한 단계는 방금 생성한 데이터 수집 규칙을 사용할 수 있는 권한을 애플리케이션에 부여합니다.
### A. 새 DCR로 이동
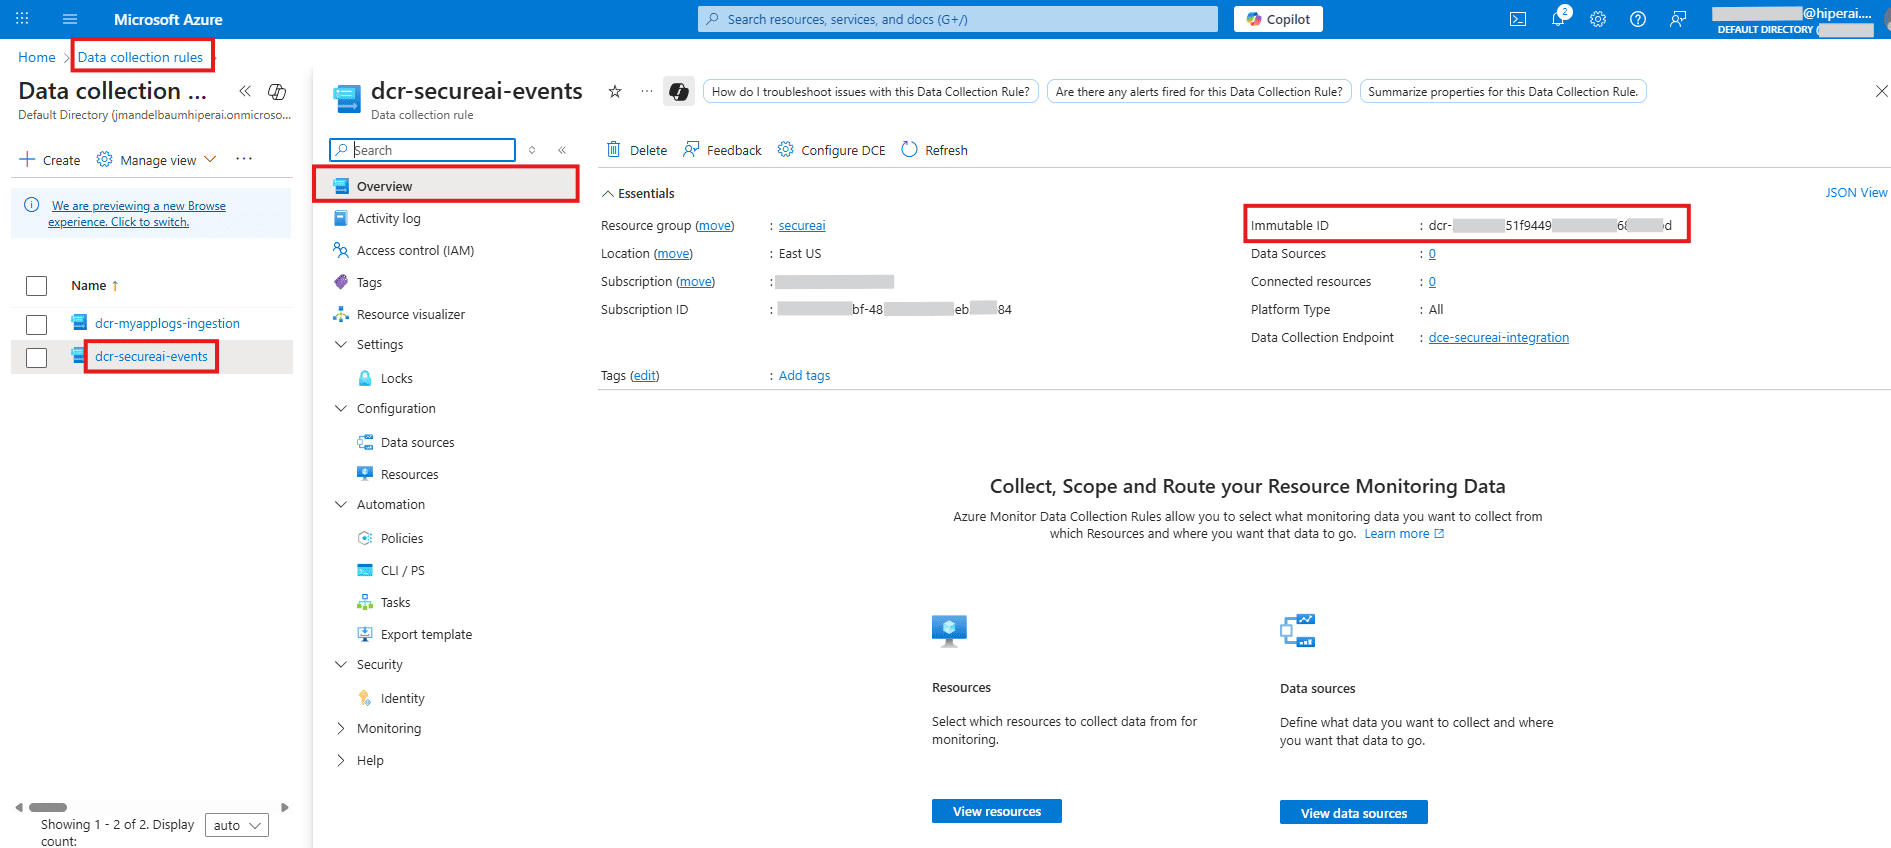
데이터 수집 규칙 `dcr-secureai-events`을 검색하여 열고 "개요"에서 변경할 수 없는 ID를 복사하고 통합을 위해 저장합니다.
### B. 역할 할당
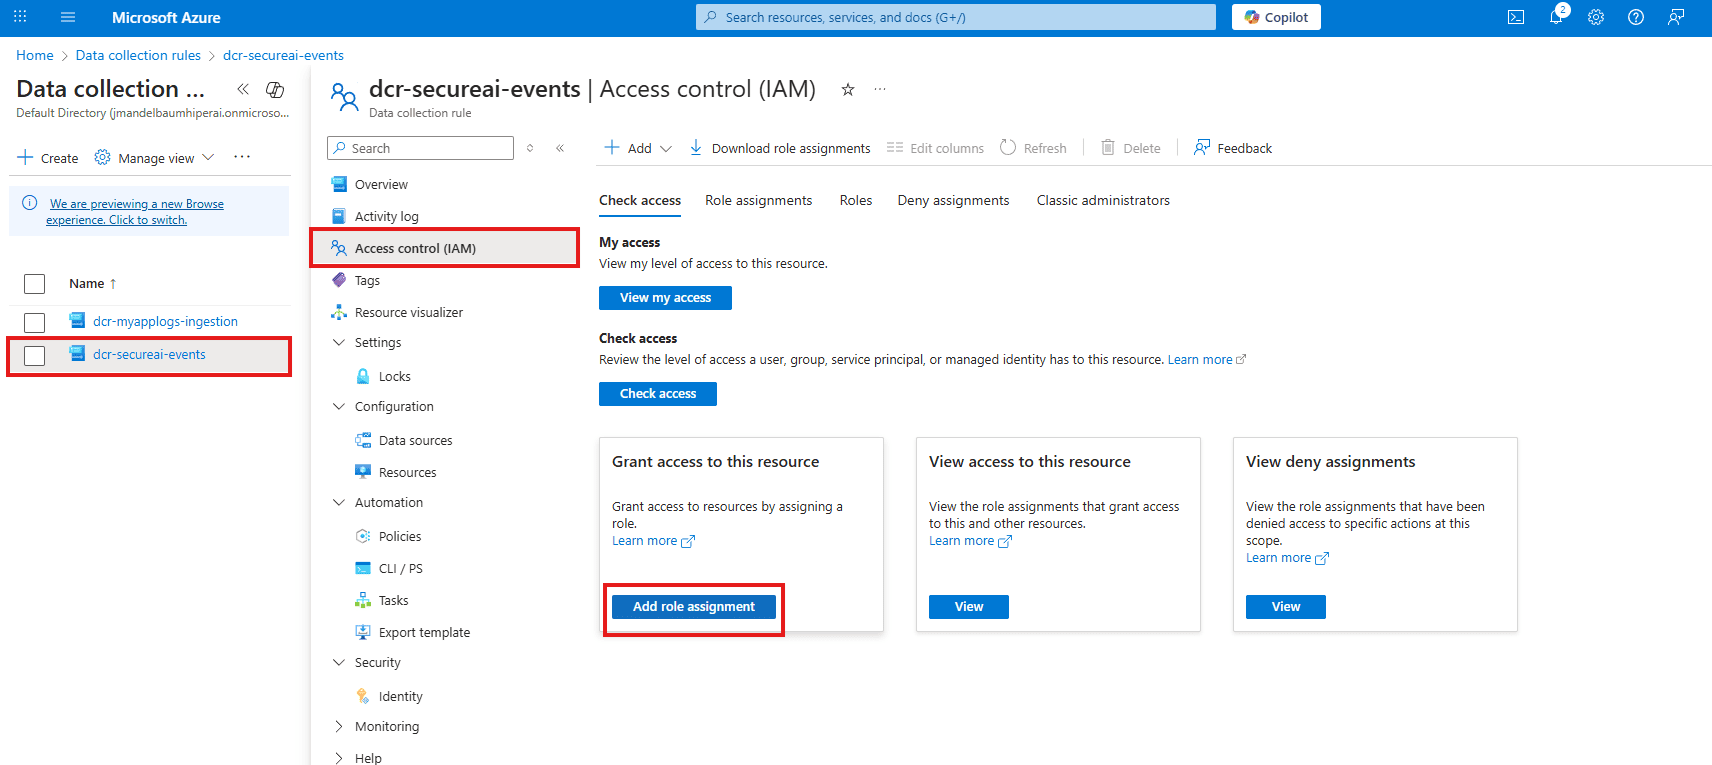
왼쪽 메뉴에서 \*\*액세스 제어(IAM)\*\*로 이동하여 **+ 추가** → **역할 할당 추가**를 클릭합니다.
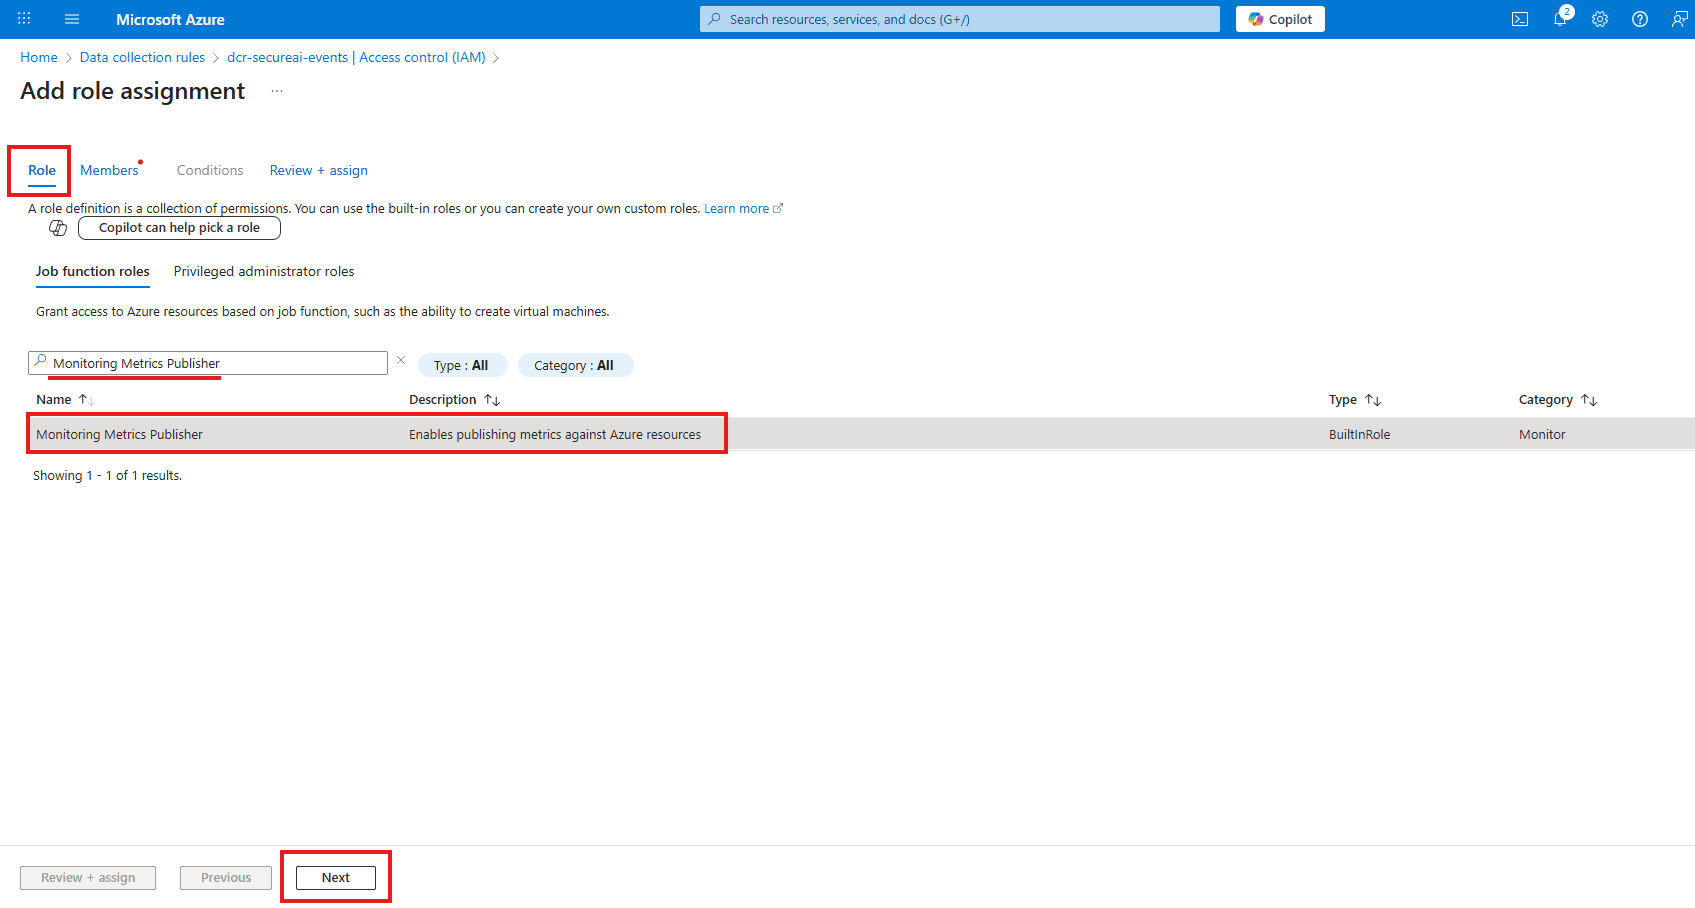
**역할**: **모니터링 지표 게시자**를 검색하고 선택합니다.
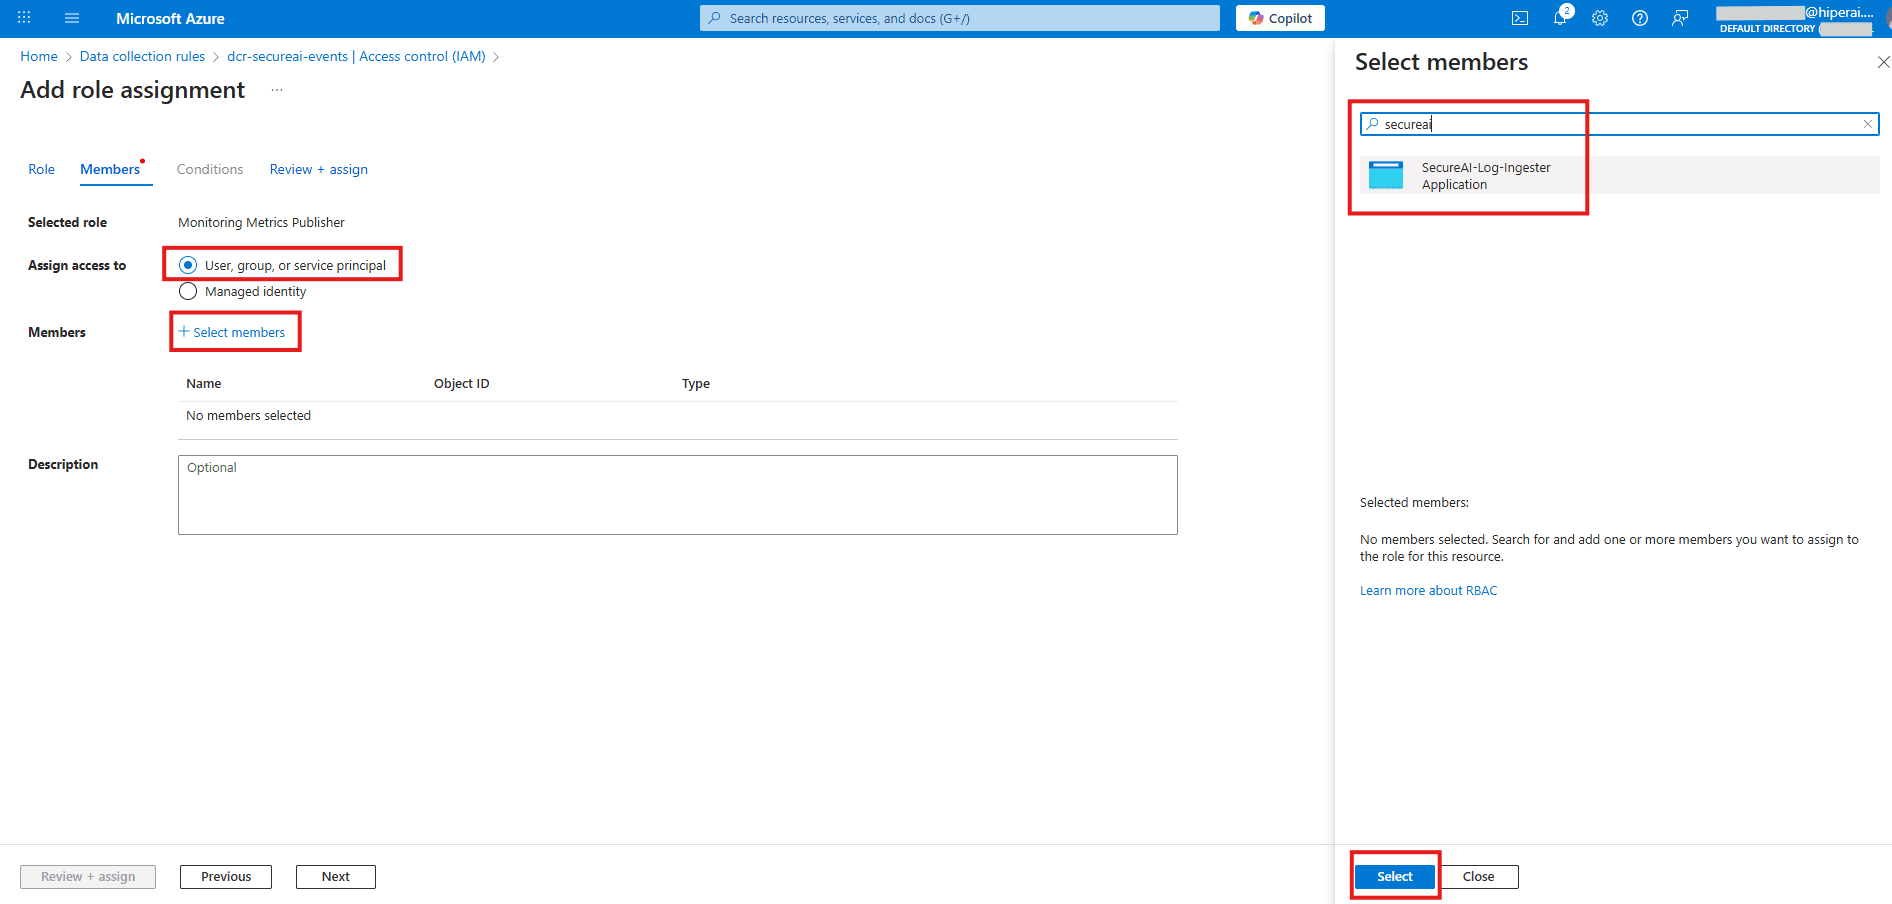
**회원**: **회원 선택**을 클릭하고 앱 등록 이름(`SecureAI-Log-Ingester`)을 검색하세요. 선택하세요.
**검토 + 할당**을 클릭합니다.
## 4단계: 정보 마무리 및 공유
거의 다 끝났습니다. 마지막 단계만 남았습니다.
### A. 정보 수집
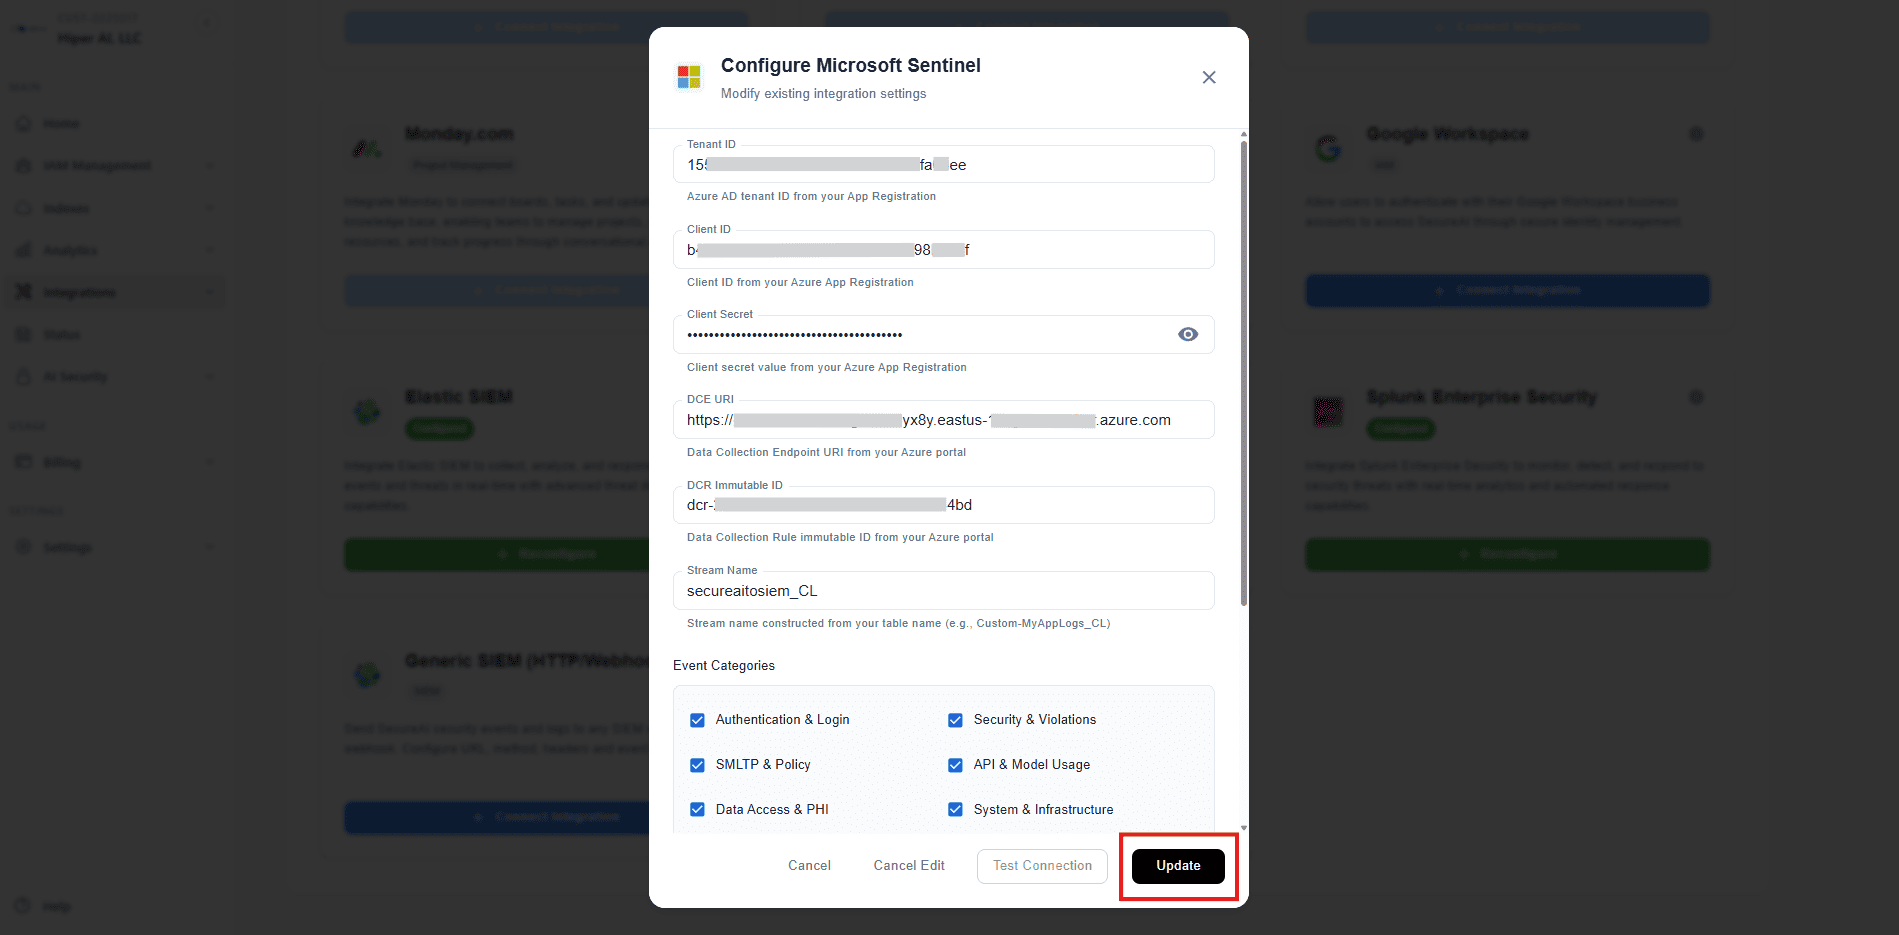
통합을 완료하려면 애플리케이션에 다음 6가지 정보가 필요합니다.
1. **테넌트 ID**: (1단계에서)
2. **클라이언트 ID**: (1단계에서)
3. **클라이언트 비밀번호**: (1단계에서)
4. **DCE URI**: (2A단계에서)
5. **DCR 불변 ID**: (DCR `dcr-secureai-events`로 이동하여 JSON 보기에서 복사하세요.)
6. **스트림 이름**: 구성된 값입니다. 형식은 `Custom-{TableName}`입니다. 우리의 경우에는 다음과 같습니다: `Custom-secureaitosiem_CL`
### B. 애플리케이션 구성
이 6개 값을 애플리케이션의 구성 설정에 입력하세요.
## 5단계: 통합 확인
SecureAI 애플리케이션에 통합 세부정보를 입력하면 연결이 올바르게 작동하는지 확인할 수 있습니다.
### A. 연결 테스트
애플리케이션 내에서 "연결 테스트" 버튼을 사용하세요. 그러면 Microsoft Sentinel 작업 영역으로 테스트 이벤트가 전송됩니다.
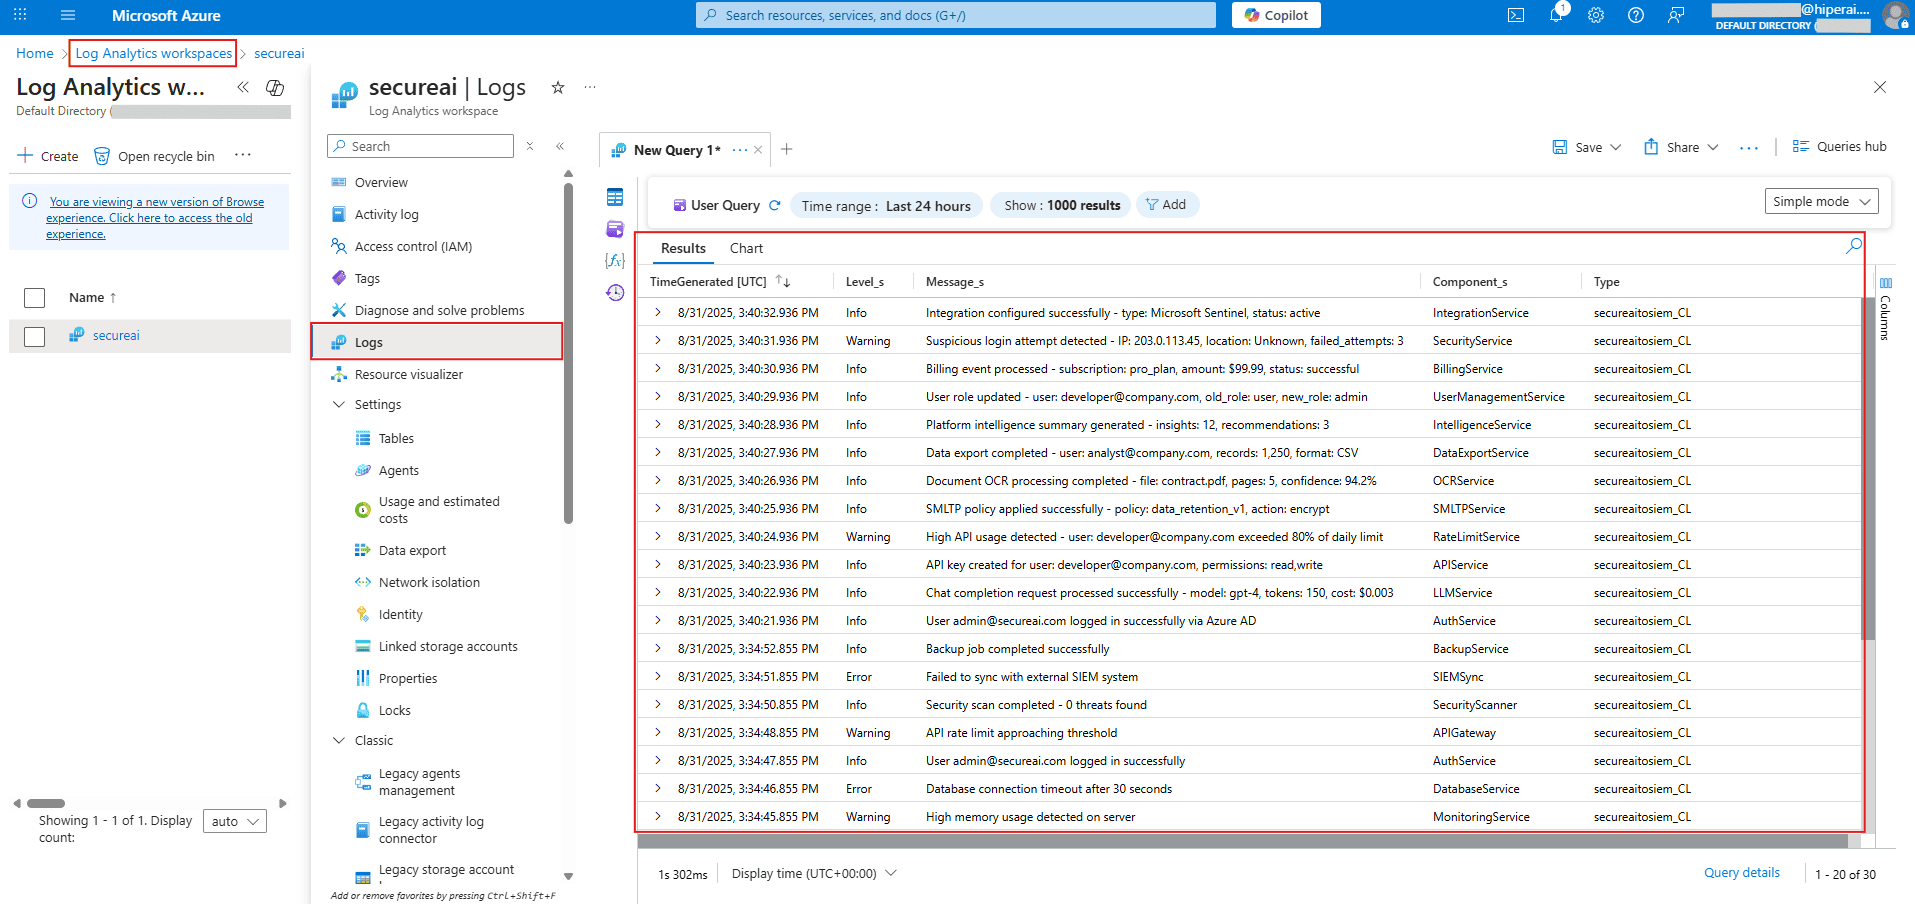
### B. Log Analytics에서 테스트 이벤트 찾기
이벤트가 Microsoft Sentinel에 도착했는지 확인하려면 Log Analytics 작업 영역으로 이동하여 **로그**를 클릭하세요.
다음 쿼리를 실행하여 수신 데이터를 확인하세요.
```kql theme={null}
secureaitosiem_CL
| order by TimeGenerated desc
```
모든 열(`TimeGenerated`, `Level_s`, `Message_s` 등)이 올바르게 채워진 로그 데이터가 표시되어야 합니다. 그렇다면 통합은 성공한 것입니다! ✅
**참고**: 네트워크 트래픽 및 시스템 로드에 따라 로그가 Microsoft Sentinel에 표시되는 데 최대 10분이 걸릴 수 있습니다.
## 완료!
이러한 단계를 통해 Microsoft Sentinel 인스턴스는 SecureAI 8와 통합되도록 완전히 구성됩니다.