> ## Documentation Index
> Fetch the complete documentation index at: https://docs.hiperai.com/llms.txt
> Use this file to discover all available pages before exploring further.
# Microsoft Sentinelの統合
> 統合ガイド: Azure Data Collection Rules (DCR) を介した Microsoft Sentinel と HiperAI の接続
# Microsoft Sentinel の統合
統合ガイド: Microsoft Sentinel と HiperAI の接続
このガイドでは、Azure Data Collection Rules (DCR) 経由で SecureAI からセキュリティ ログを受信するように Microsoft Sentinel を構成するために必要な手順について説明します。
## ステップ 1: アプリケーション ID を作成する (アプリの登録)
まず、Azure でアプリケーションの ID を作成し、アプリケーションが安全に認証できるようにします。
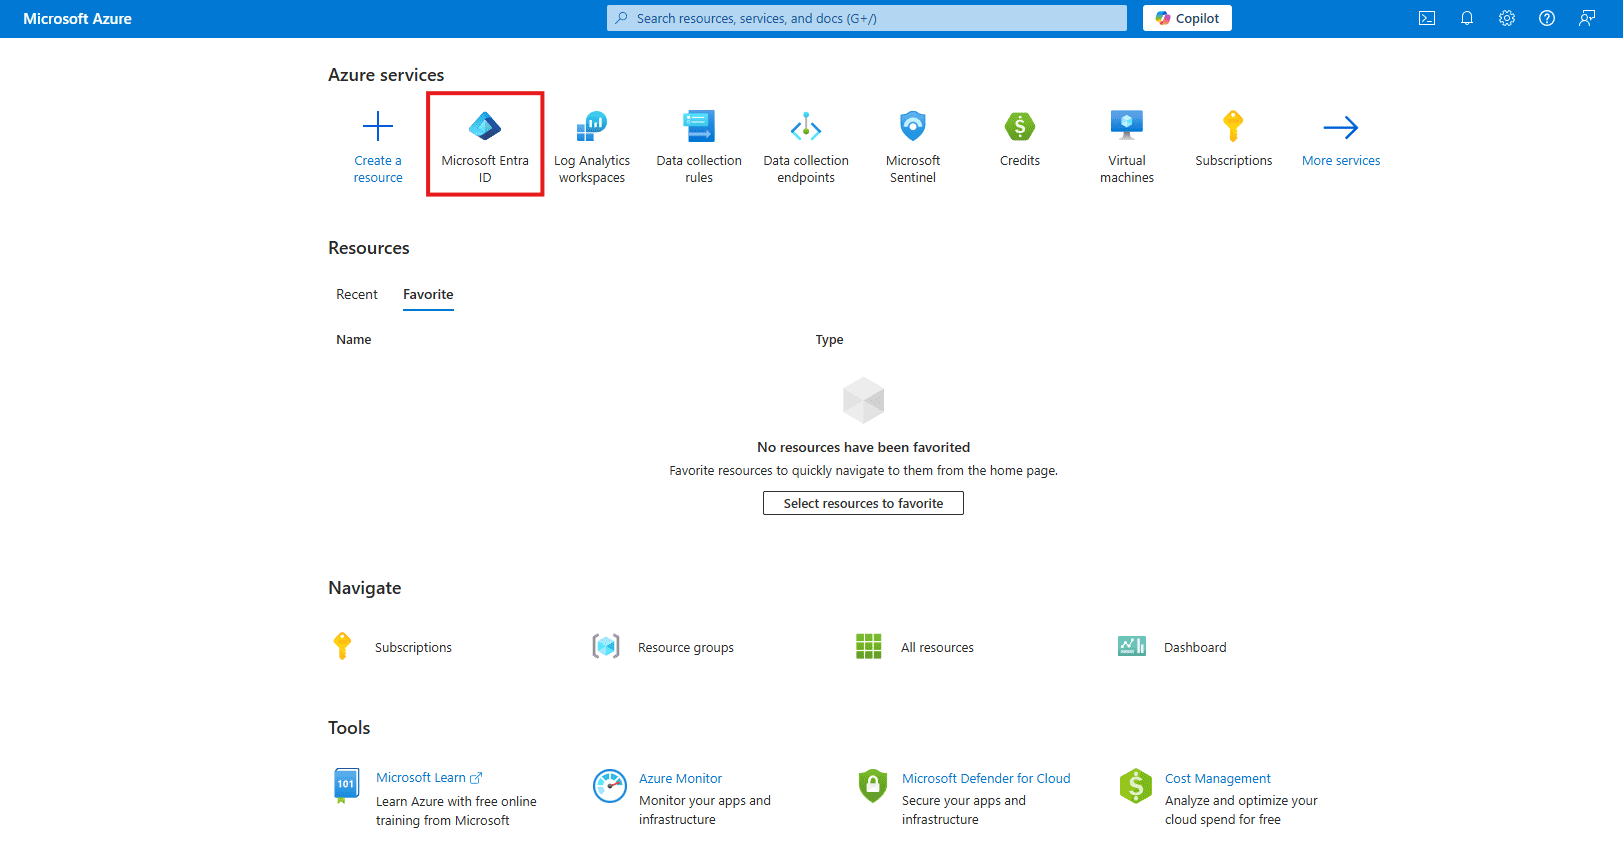
### A. Azure Active Directory に移動します。
Azure portal で、**Azure Active Directory** を検索して選択します。
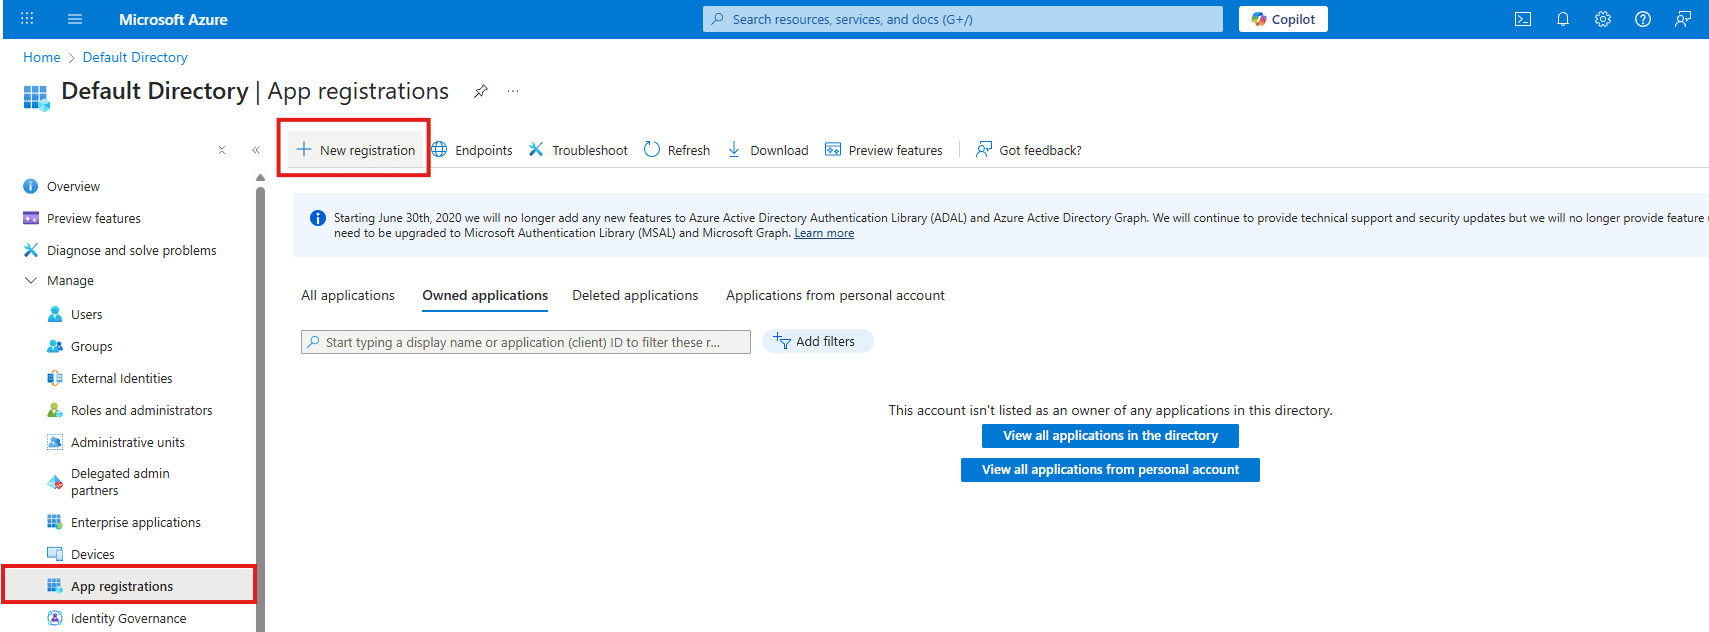
### B. 新規登録
左側のメニューで **アプリの登録** に移動し、**+ 新規登録** をクリックします。
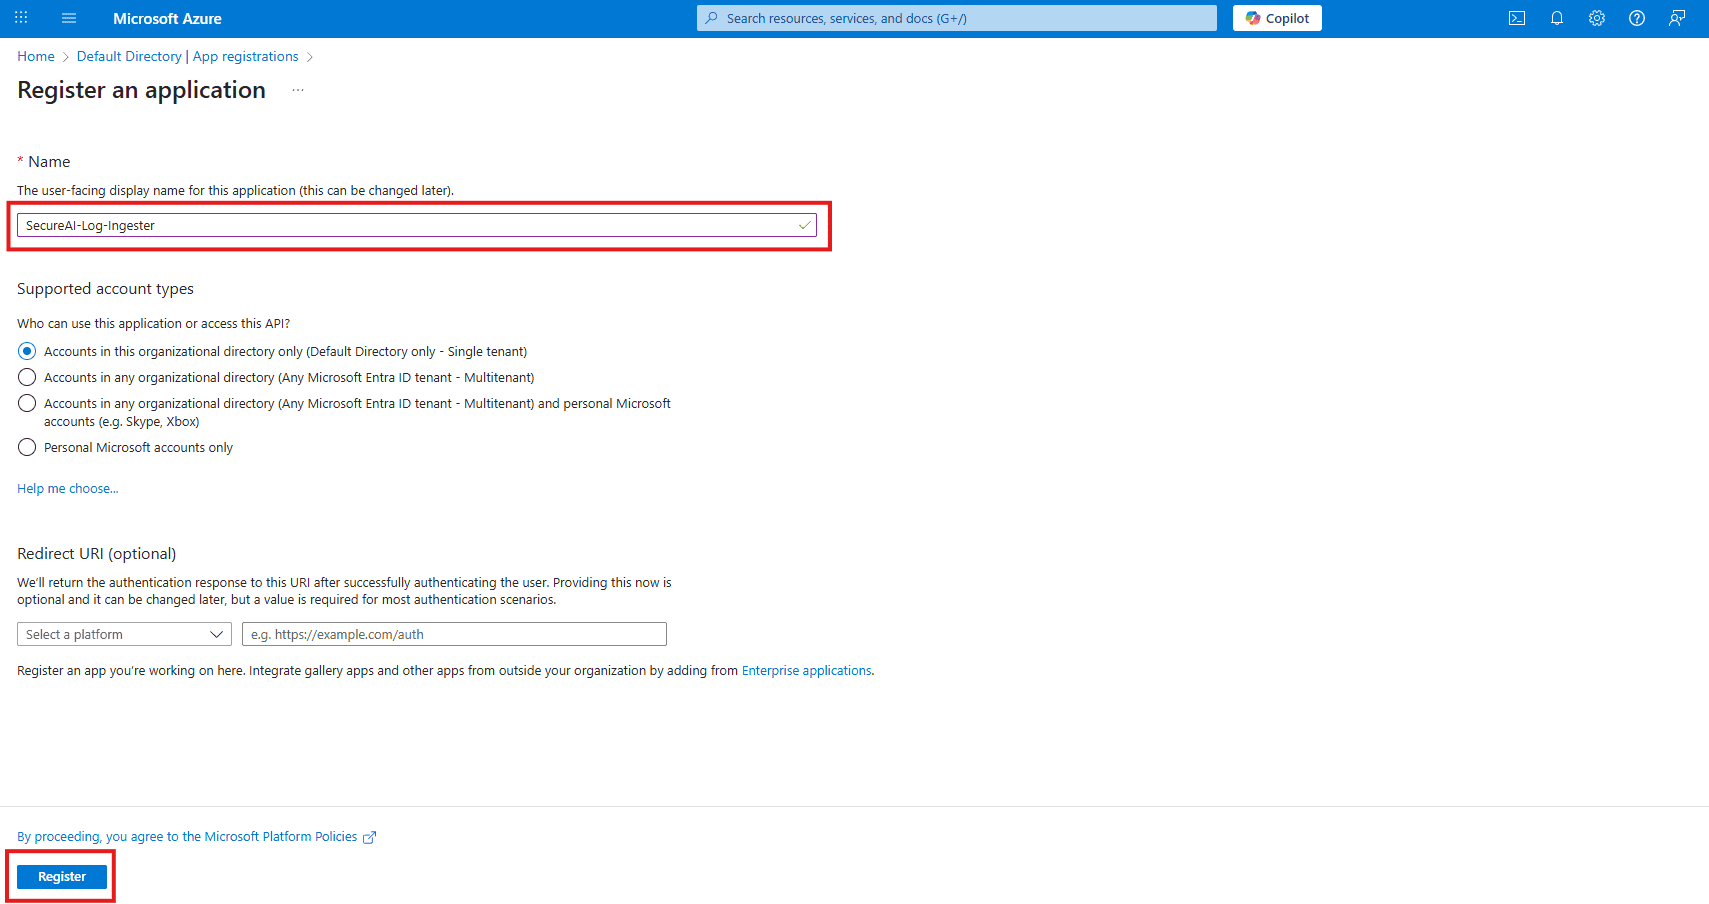
### C. アプリケーションに名前を付ける
`SecureAI-Log-Ingester` などの明確な名前を指定し、他のオプションはデフォルトのままにします。 \[**登録**] をクリックします。
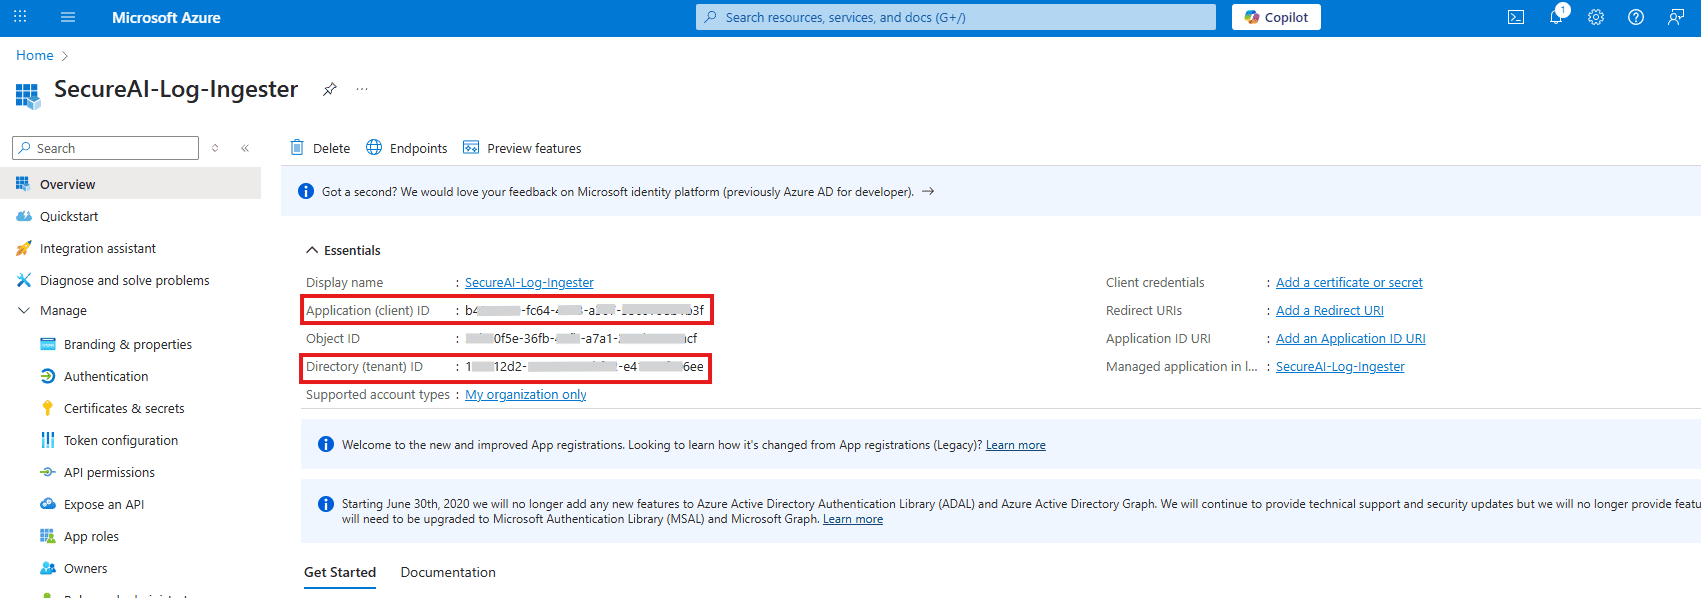
### D. ID をコピーする
新しいアプリケーションの概要ページから、次の値をコピーして安全に保存します。
* **アプリケーション (クライアント) ID**
* **ディレクトリ (テナント) ID**
### E. クライアント シークレットを作成する
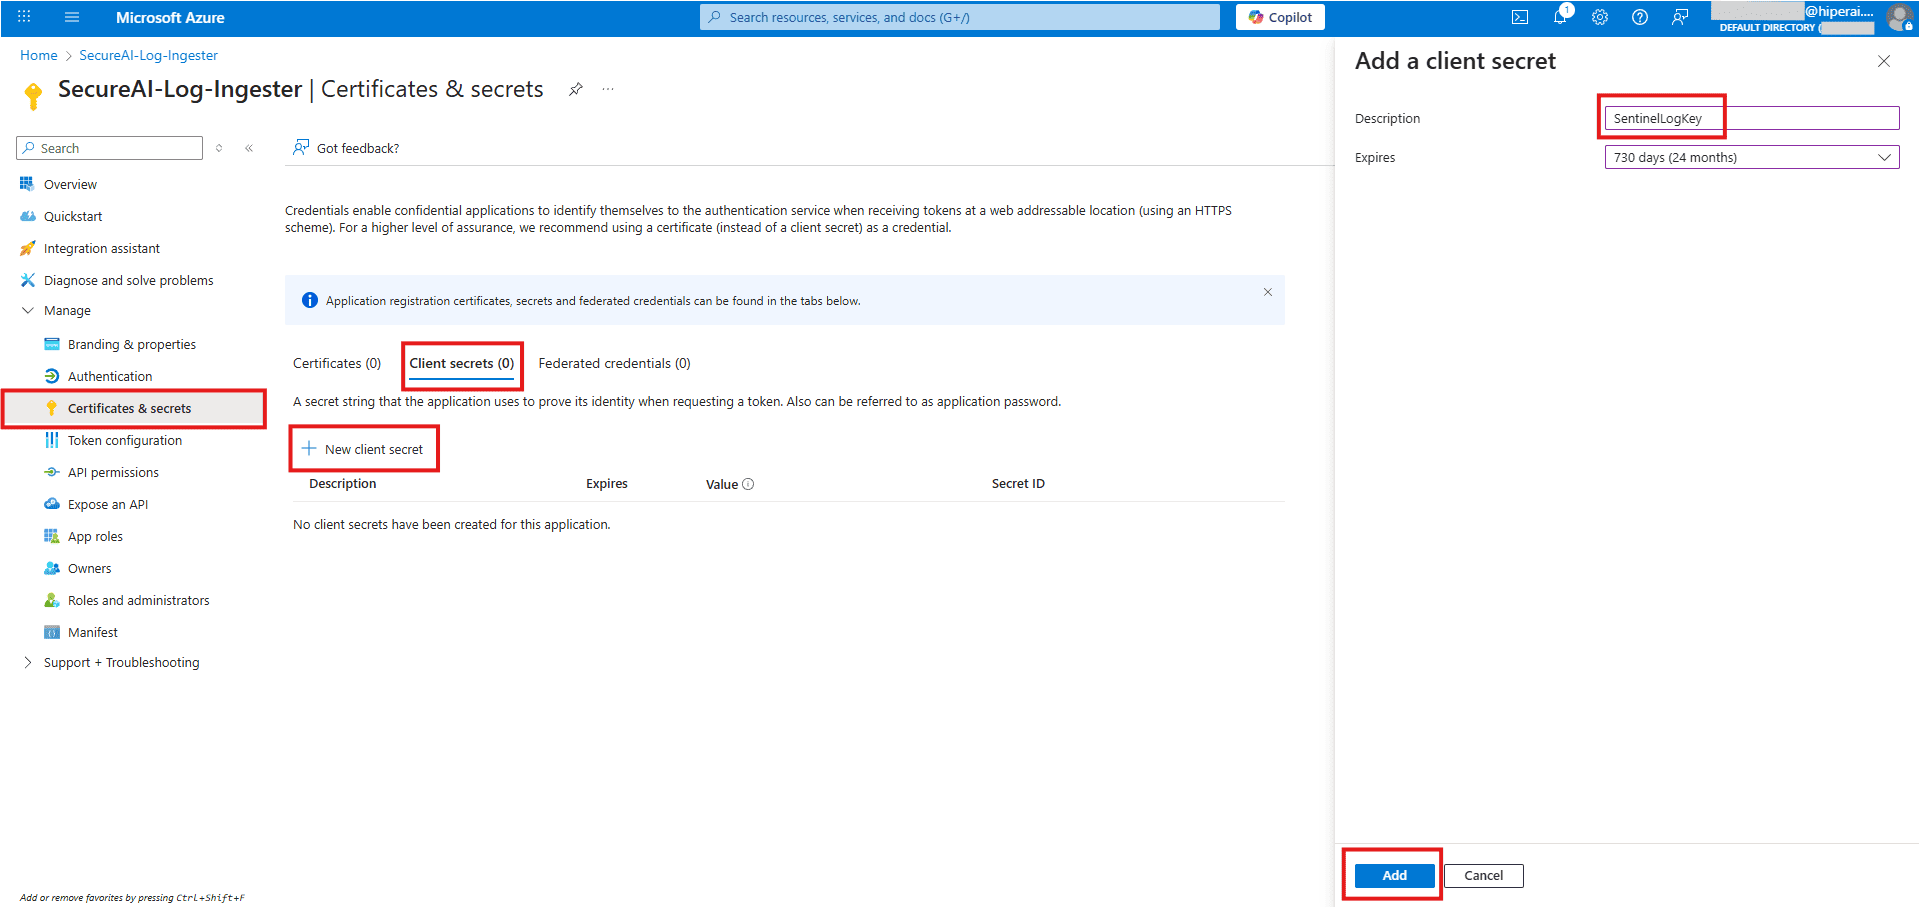
左側のメニューで \[**証明書とシークレット**] に移動し、\[**+ 新しいクライアント シークレット**] をクリックします。説明 (「SentinelLogKey」など) を入力し、**追加** をクリックします。
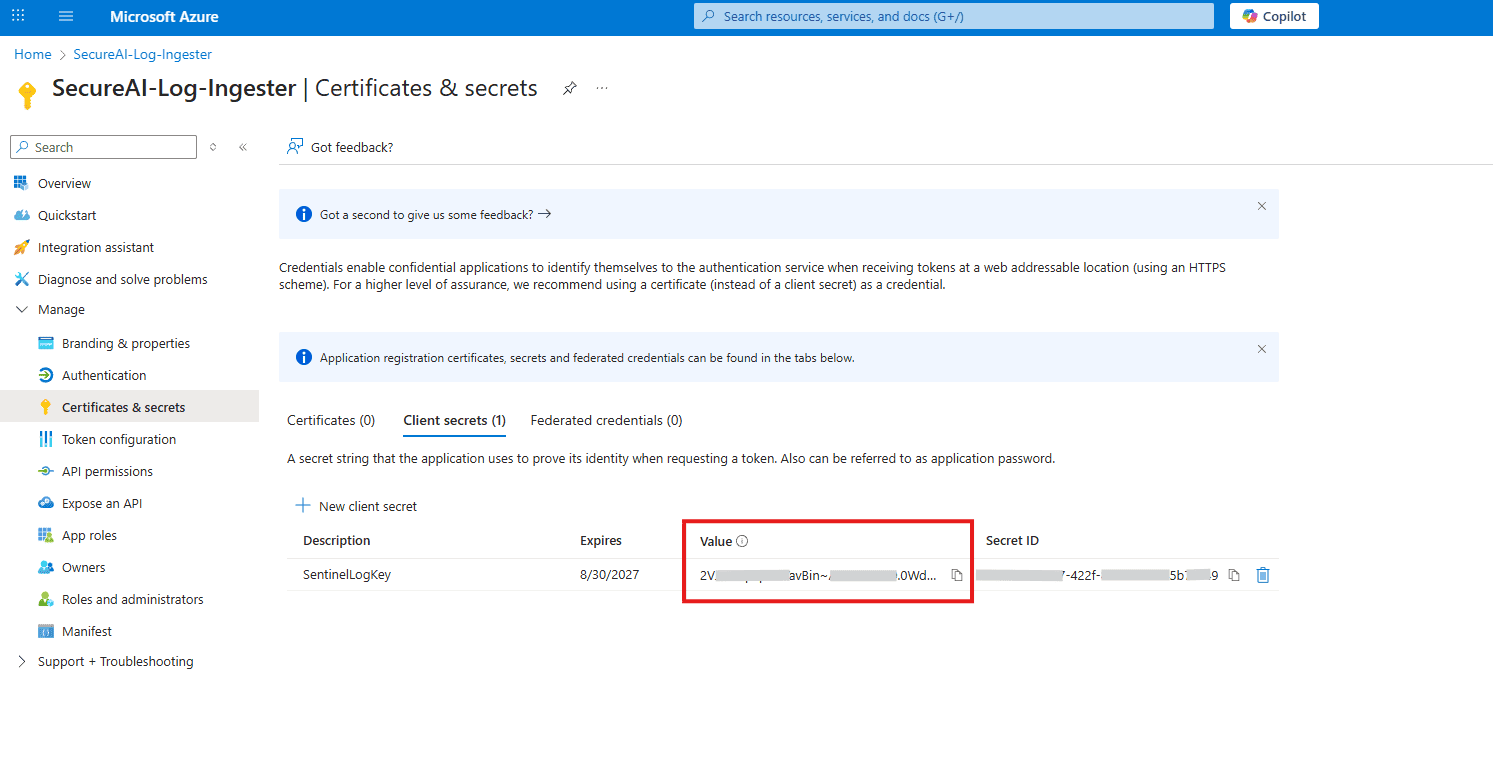
**重要なステップ**: シークレットの**値**をすぐにコピーします。それが完全に見えるのは今回だけです。他の ID と一緒に安全に保管してください。
## ステップ 2: Azure インジェスト インフラストラクチャを作成する
次に、ログの「経路」と「ストレージ」を構築します。
### A. データ収集エンドポイント (DCE) を作成する
#### 1. サービスを見つける
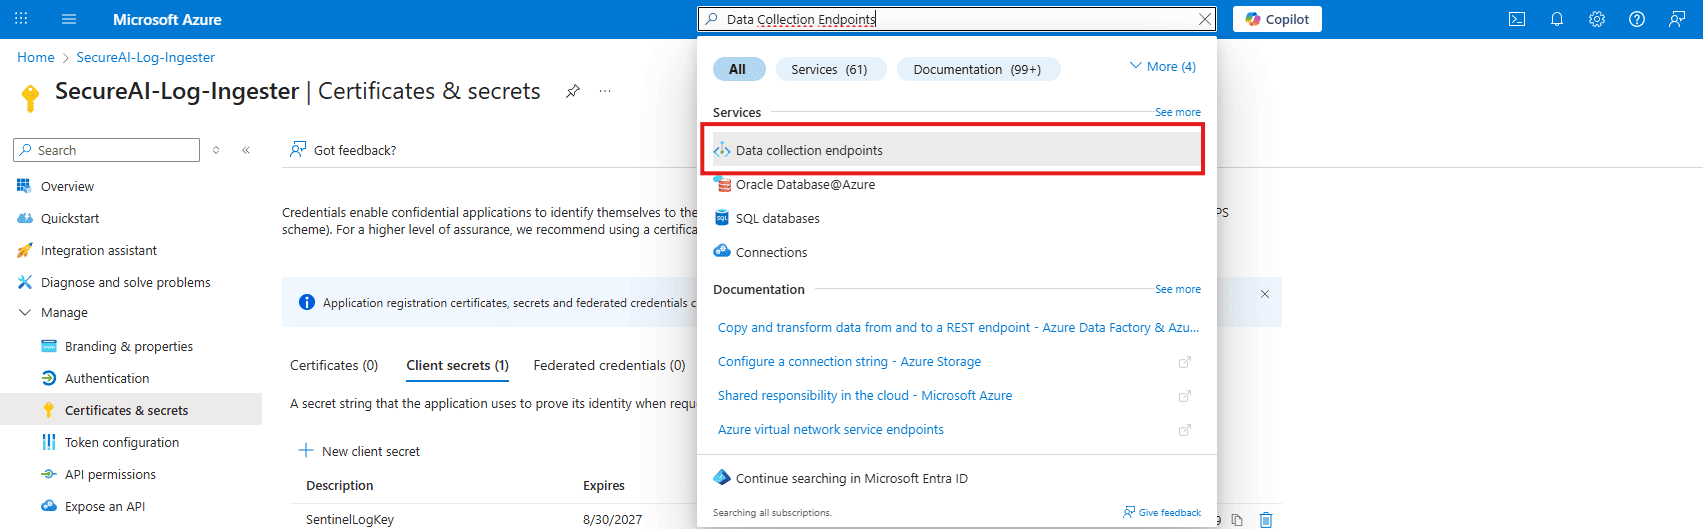
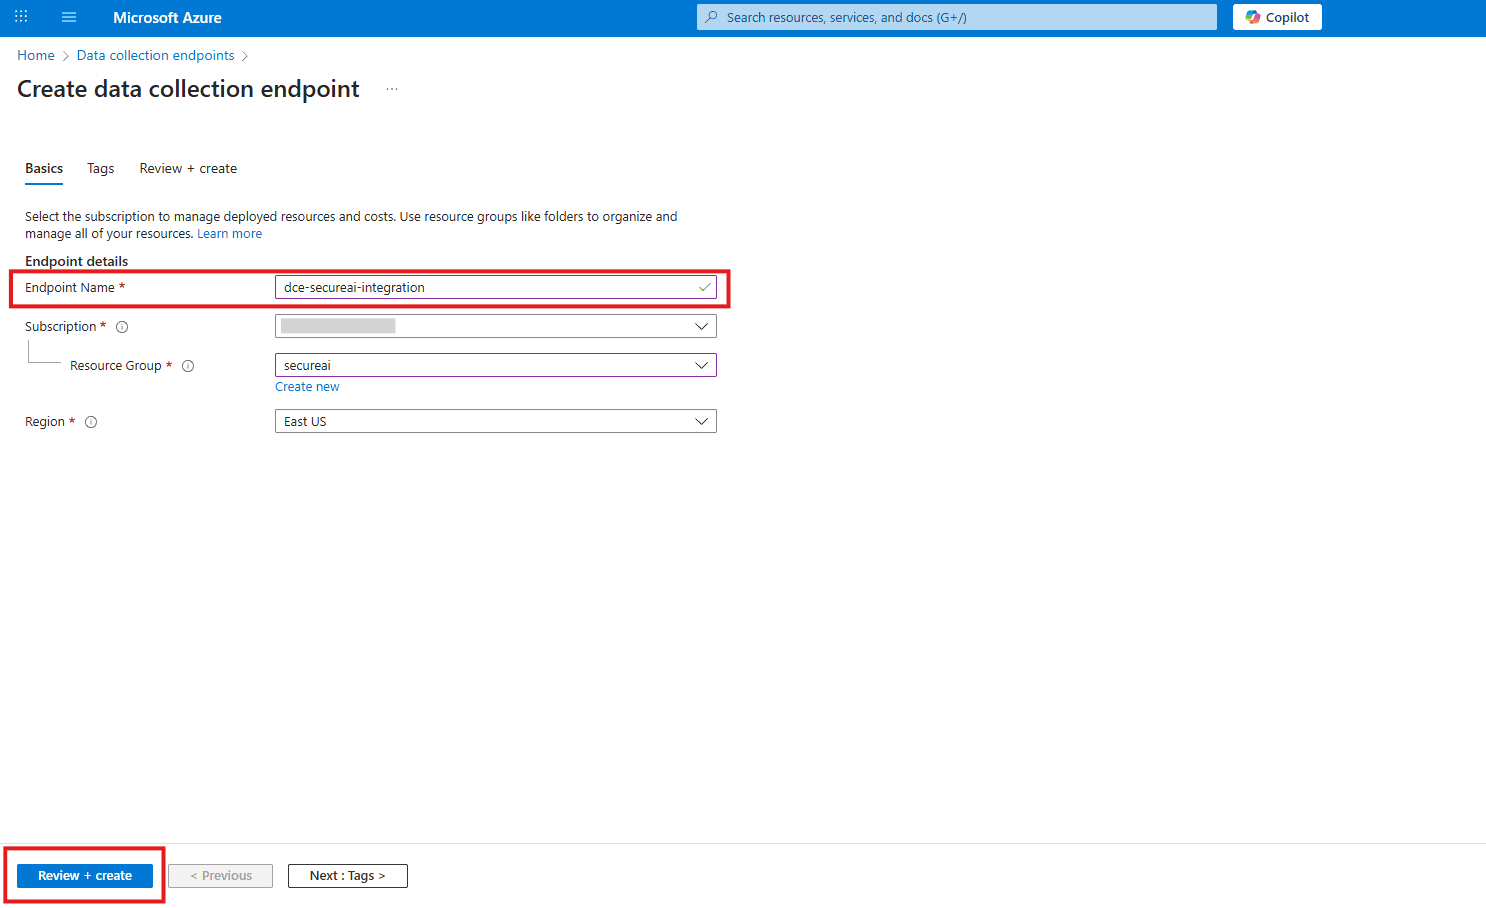
Azure の検索バーで、**データ コレクション エンドポイント** を検索して選択します。
#### 2. 新しい DCE を作成する
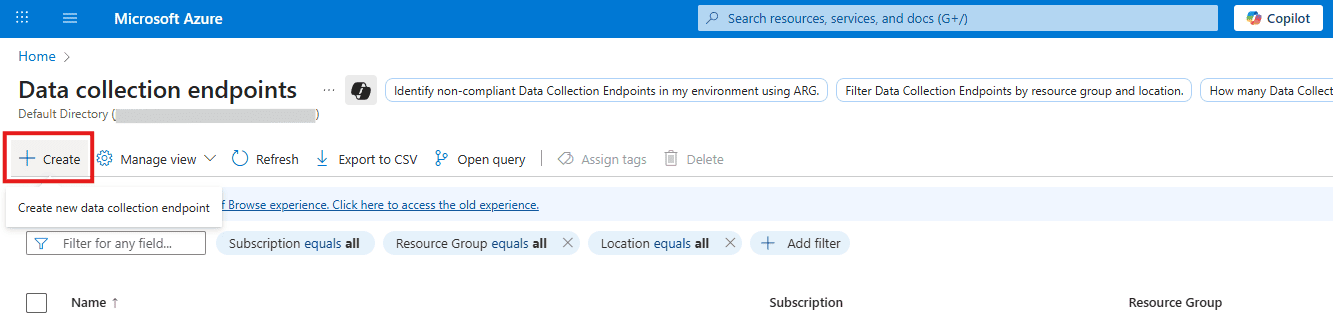
\[**+作成**] をクリックします。
#### 3. DCE を設定する
* **名前**: `dce-secureai-integration`
* **リージョン**: Log Analytics ワークスペースと同じリージョンを選択します
* \[**レビューと作成**] をクリックし、次に \[**作成**] をクリックします。
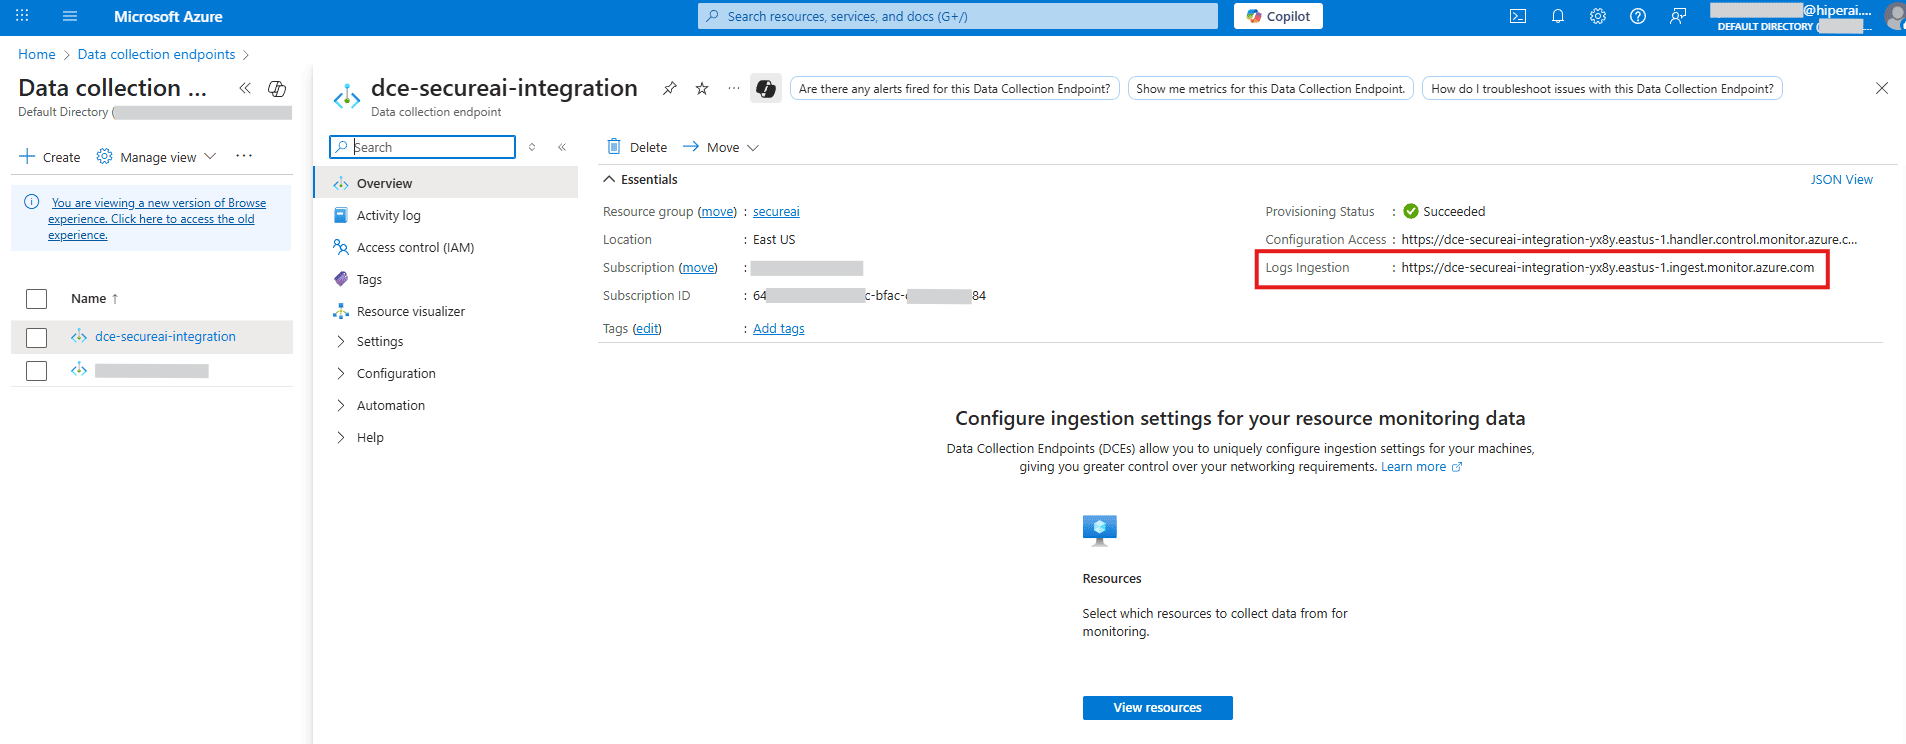
#### 4. URI をコピーします。
デプロイされたら、リソースに移動します。概要ページで、**ログ取り込み URI** をコピーして保存します。
### B. カスタム テーブルとデータ収集ルール (DCR) を作成する
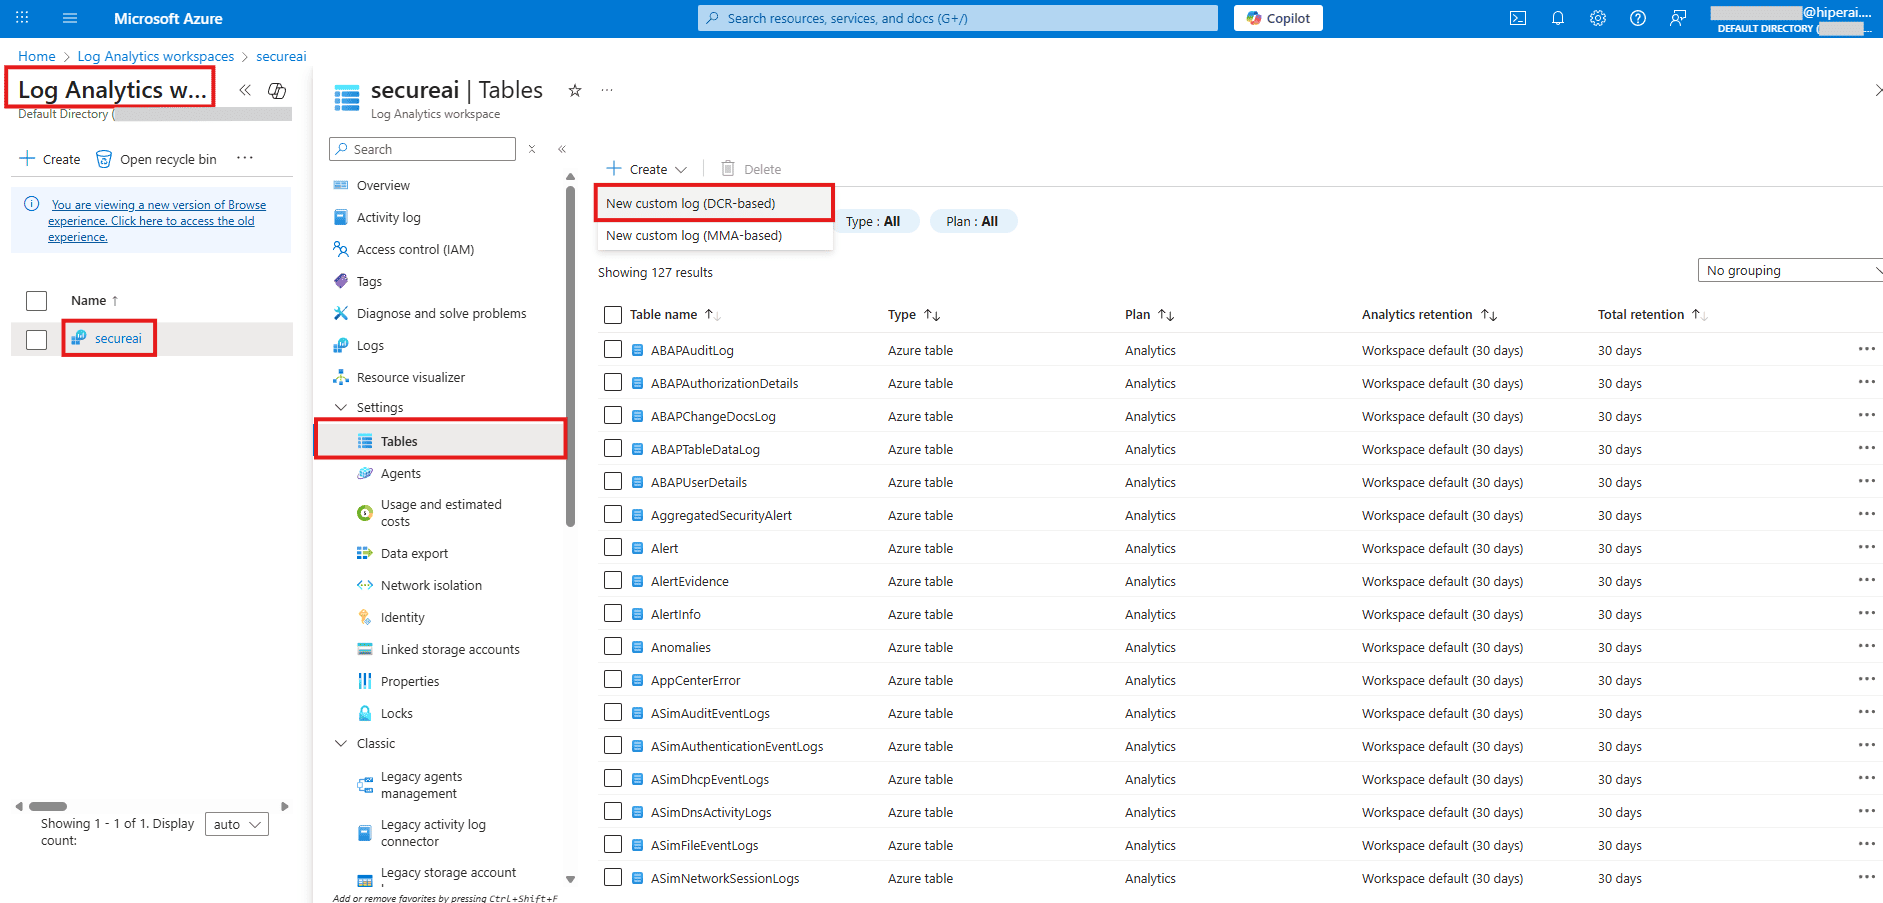
#### 1. Log Analytics に移動します
**Log Analytics ワークスペース**に移動します。
#### 2. カスタムテーブルの作成
左側のメニューで、\[**テーブル**]、\[**+作成**] の順にクリックし、\[**新しいカスタム ログ (DCR ベース)**] を選択します。
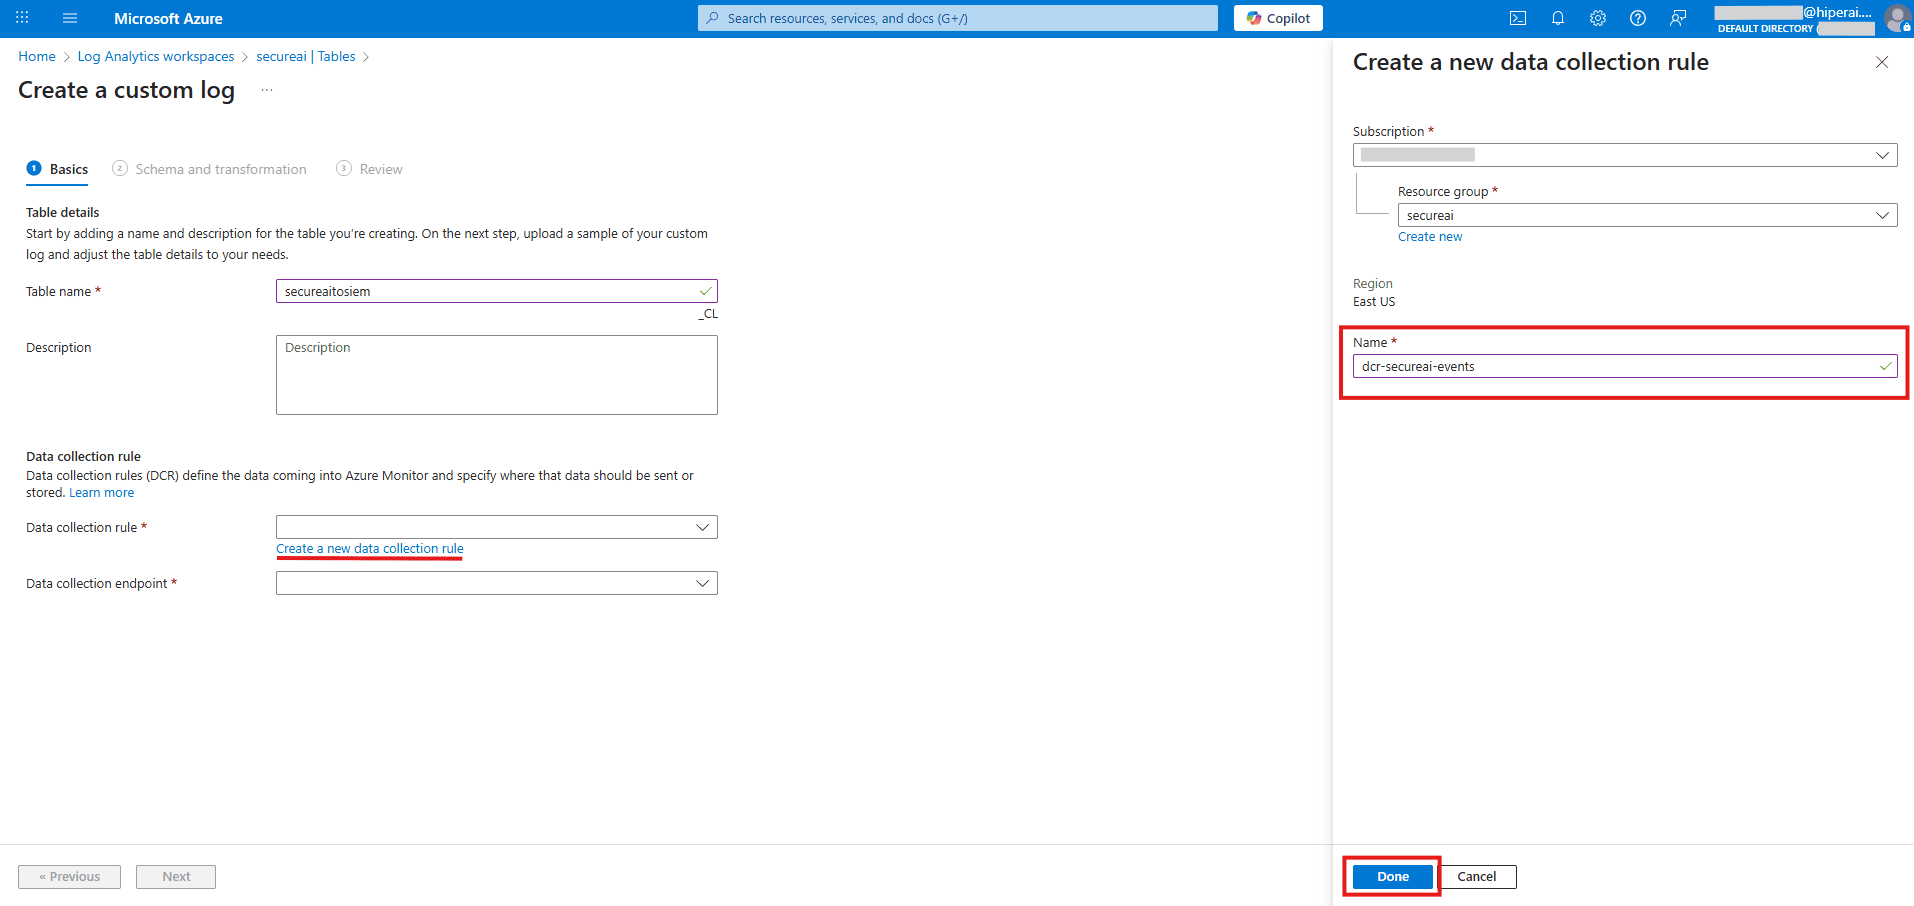
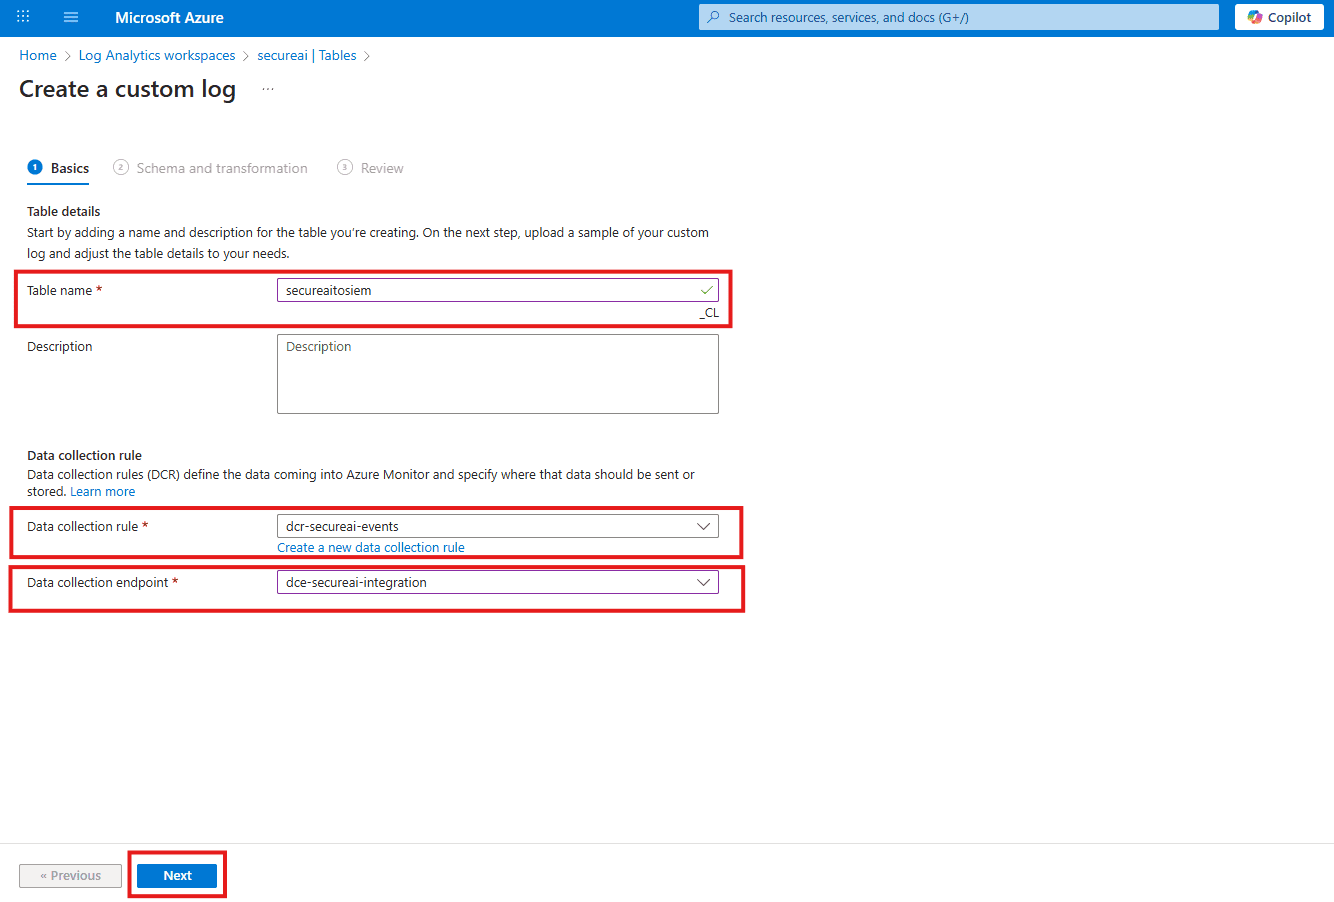
#### 3.「基本」タブ
* **テーブル名**: `secureaitosiem` (Azure によって自動的に `_CL` が追加され、完全な名前が `secureaitosiem_CL` になります)
* **データ収集ルール**: \[新規作成...] を選択し、`dcr-secureai-events` という名前を付けます。
* **データ収集エンドポイント**: 前に作成した DCE (`dce-secureai-integration`) を選択します。
* \[**次へ: スキーマと変換**] をクリックします。
#### 4.「スキーマと変換」タブ
**サンプル ファイルをアップロードします**: システムからプロンプトが表示されます。次の内容を含む `.json` ファイルを作成し、アップロードします。
```json theme={null}
[
{
"time": "2025-08-30T21:34:29.013Z",
"level": "Info",
"message": "SecureAI platform started successfully",
"component": "SystemService",
"correlationId": "test-001"
},
{
"time": "2025-08-30T21:34:30.013Z",
"level": "Warning",
"message": "High memory usage detected on server",
"component": "MonitoringService",
"correlationId": "test-002"
},
{
"time": "2025-08-30T21:34:31.013Z",
"level": "Error",
"message": "Database connection timeout after 30 seconds",
"component": "DatabaseService",
"correlationId": "test-003"
},
{
"time": "2025-08-30T21:34:32.013Z",
"level": "Info",
"message": "User admin@secureai.com logged in successfully",
"component": "AuthService",
"correlationId": "test-004"
},
{
"time": "2025-08-30T21:34:33.013Z",
"level": "Warning",
"message": "API rate limit approaching threshold",
"component": "APIGateway",
"correlationId": "test-005"
},
{
"time": "2025-08-30T21:34:34.013Z",
"level": "Info",
"message": "Security scan completed - 0 threats found",
"component": "SecurityScanner",
"correlationId": "test-006"
},
{
"time": "2025-08-30T21:34:35.013Z",
"level": "Error",
"message": "Failed to sync with external SIEM system",
"component": "SIEMSync",
"correlationId": "test-007"
},
{
"time": "2025-08-30T21:34:36.013Z",
"level": "Info",
"message": "Backup job completed successfully",
"component": "BackupService",
"correlationId": "test-008"
}
]
```
**サンプル ファイルのダウンロード**: 完全なサンプル JSON ファイルをダウンロードして直接使用することもできます。
📥サンプル.json
#### 5. 変換を適用する
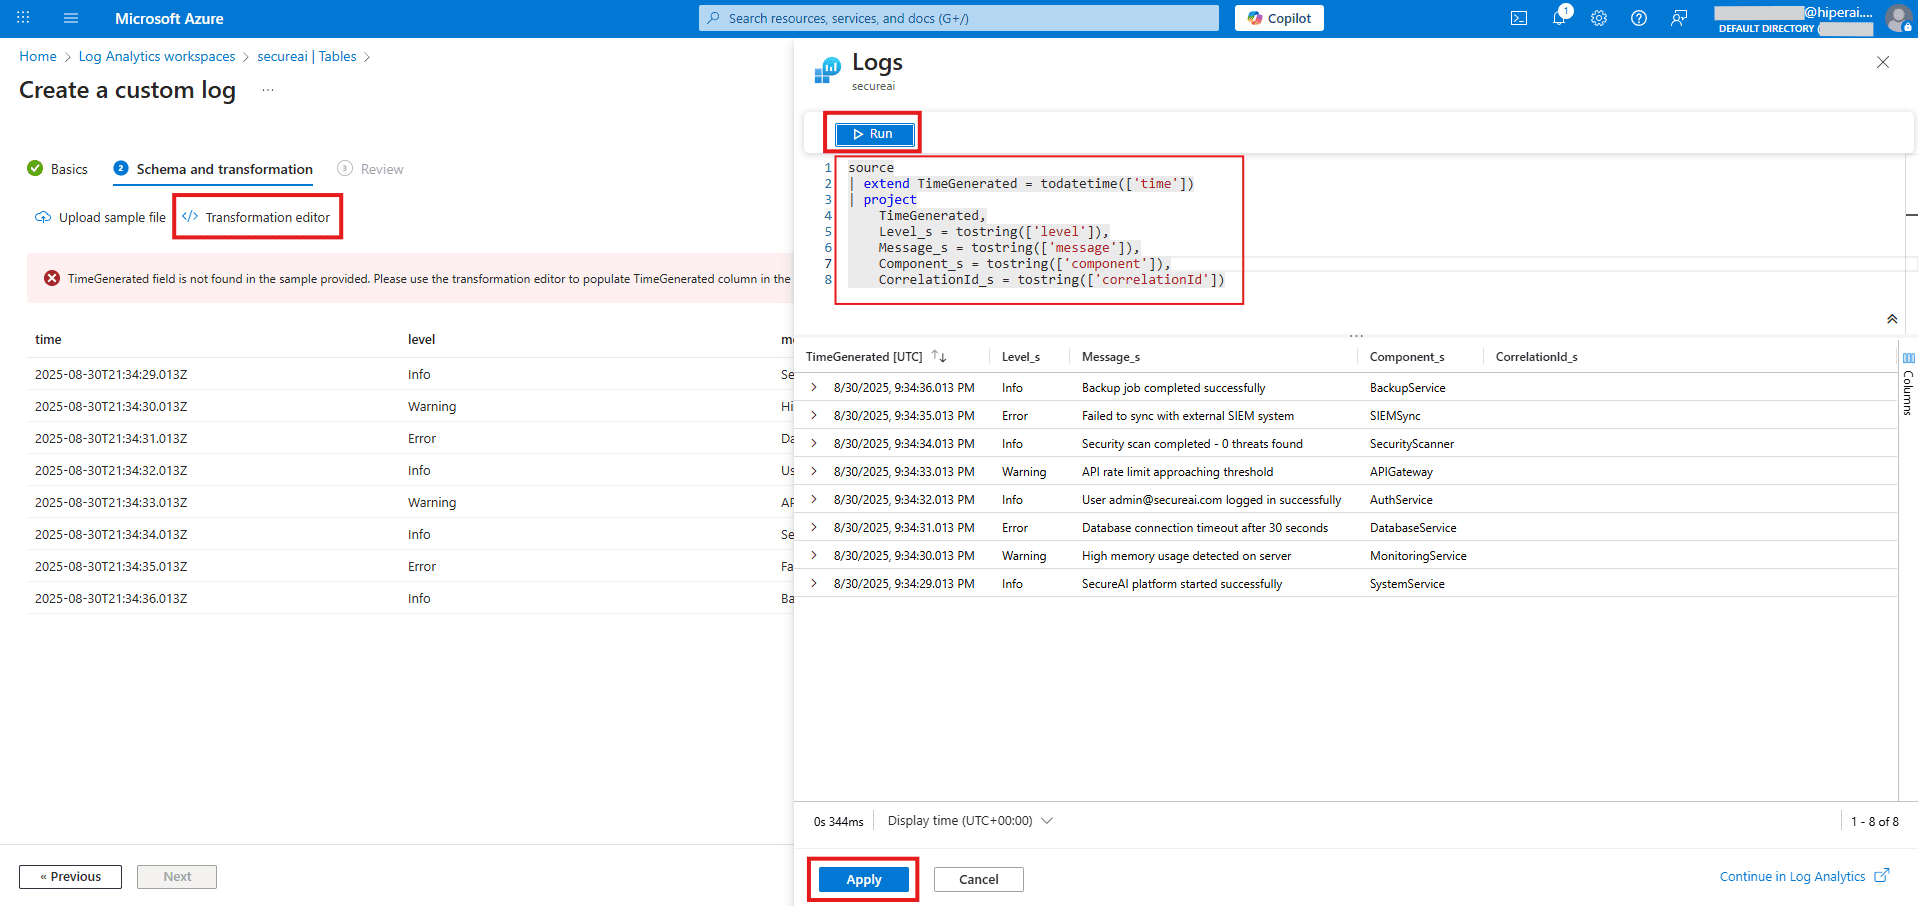
システムは、TimeGenerated フィールドに関する警告を表示する場合があります。 \[**変換エディタ**] ボタンをクリックし、既存のコンテンツをすべて削除し、次の完全な KQL クエリを貼り付けます。
```kql theme={null}
source
| extend TimeGenerated = todatetime(['time'])
| project
TimeGenerated,
Level_s = tostring(['level']),
Message_s = tostring(['message']),
Component_s = tostring(['component']),
CorrelationId_s = tostring(['correlationId'])
```
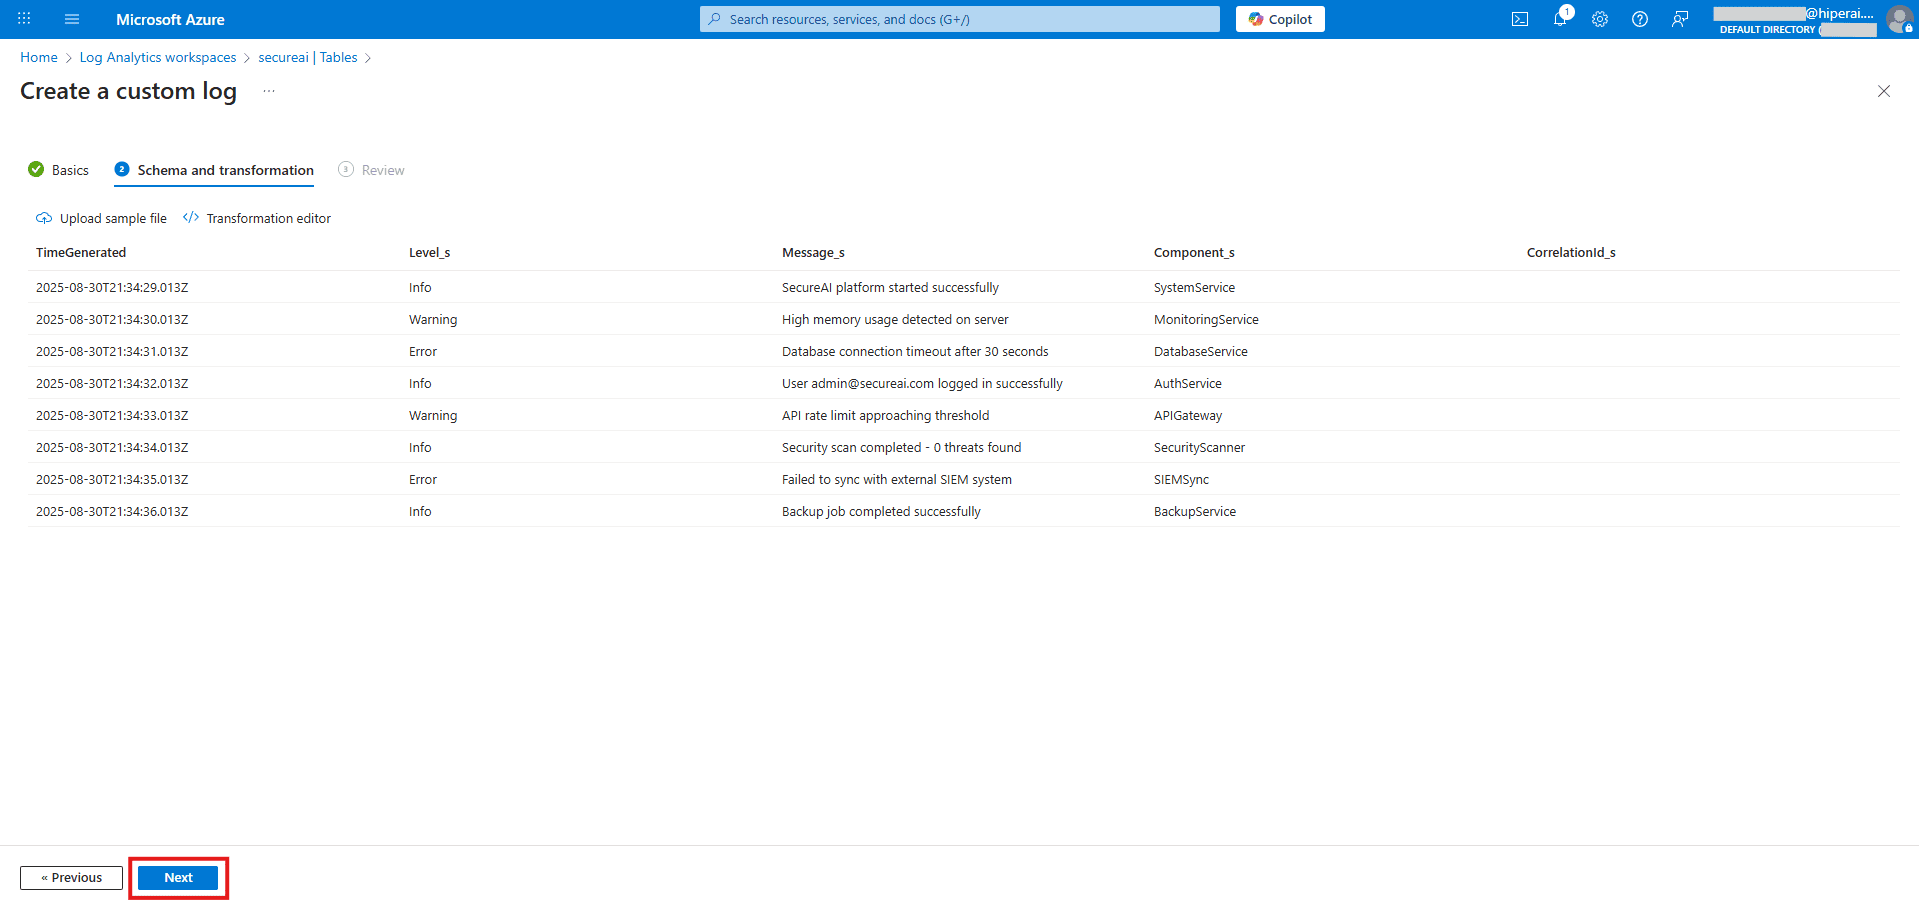
**適用**をクリックします。すべての正しい列とデータ型を含むテーブルのプレビューが表示されるはずです。
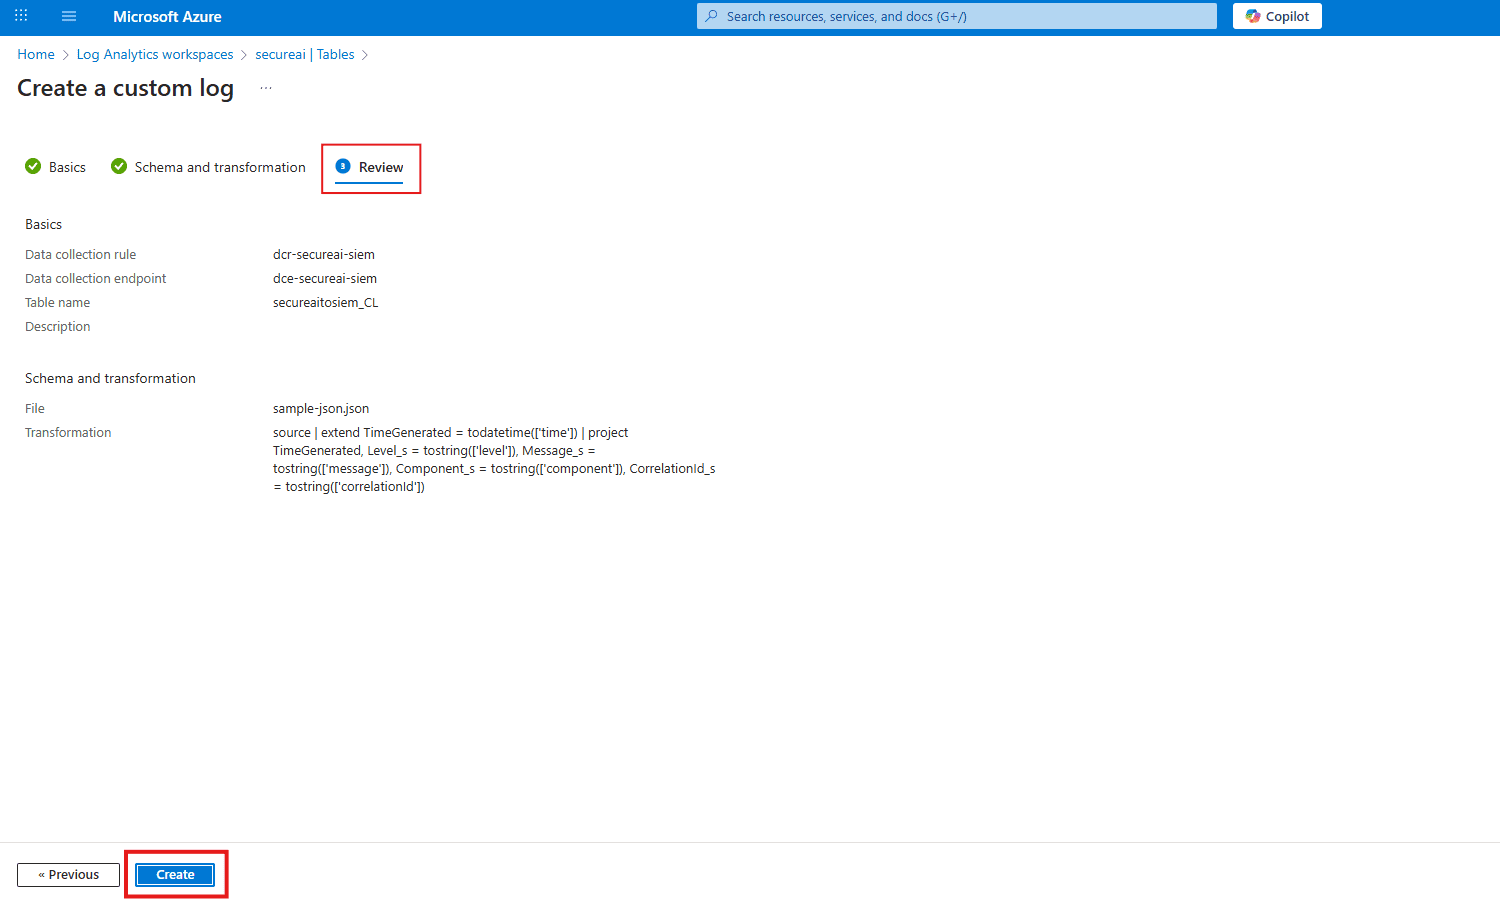
#### 6. 作成を完了する
\[**次へ: レビューと作成**] をクリックし、次に \[**作成**] をクリックします。
## ステップ 3: ID をインフラストラクチャに接続する (権限)
この重要な手順により、作成したばかりのデータ収集ルールを使用するためのアクセス許可がアプリケーションに付与されます。
### A. 新しい DCR に移動します。
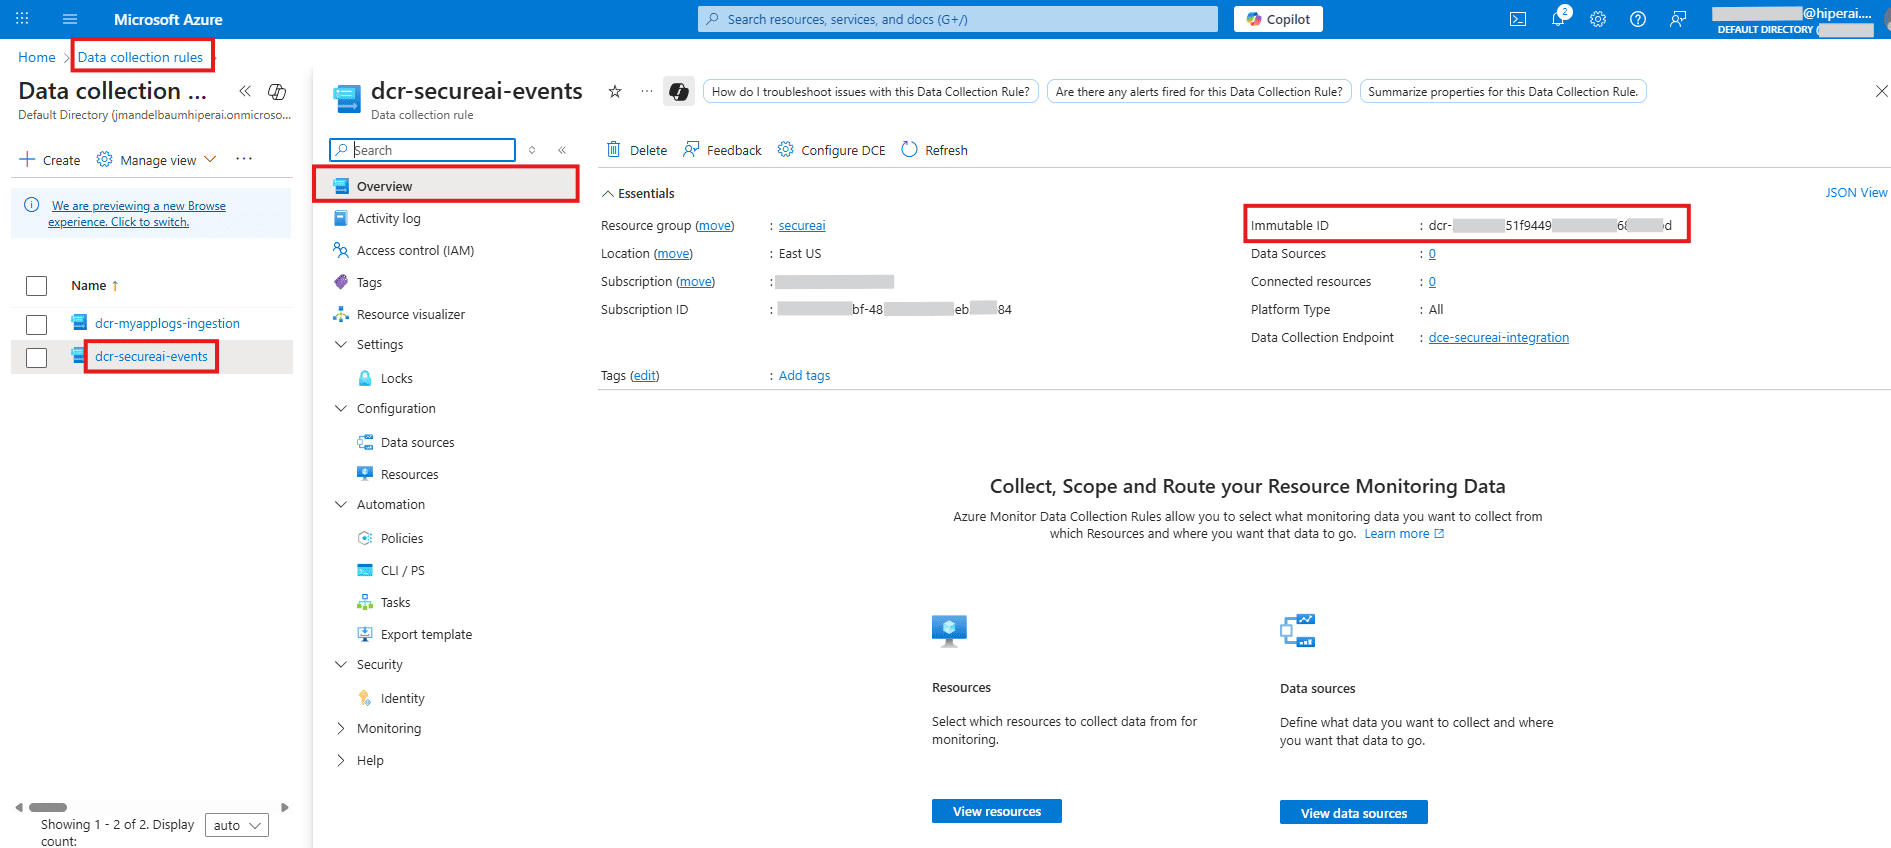
データ収集ルール `dcr-secureai-events` を検索して開き、「概要」で不変 ID をコピーし、統合用に保存します。
### B. 役割を割り当てる
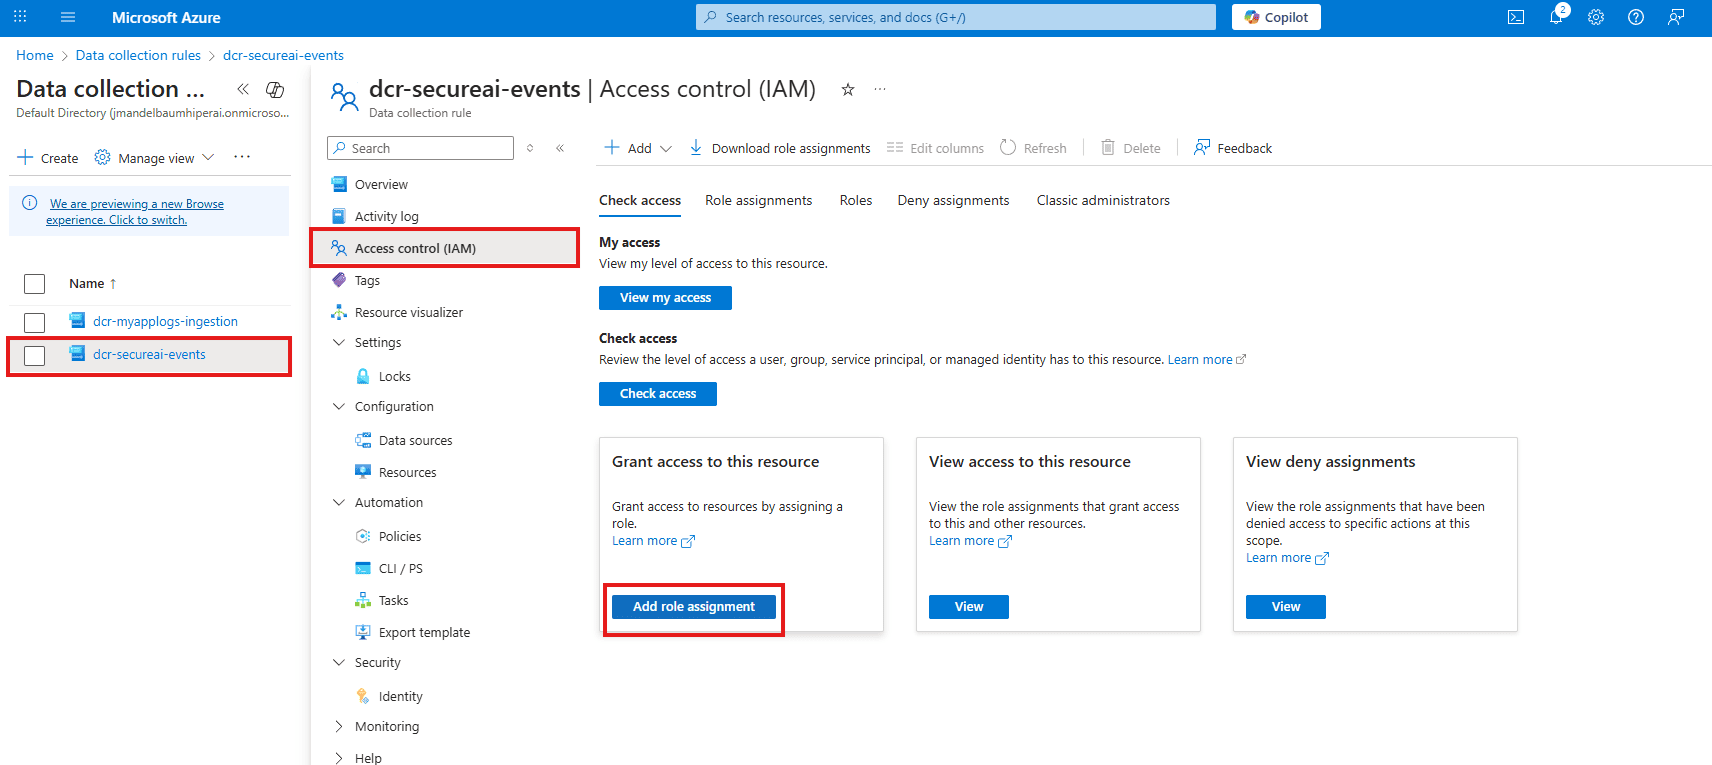
左側のメニューで、**アクセス制御 (IAM)** に移動し、**+ 追加** → **役割の割り当てを追加** をクリックします。
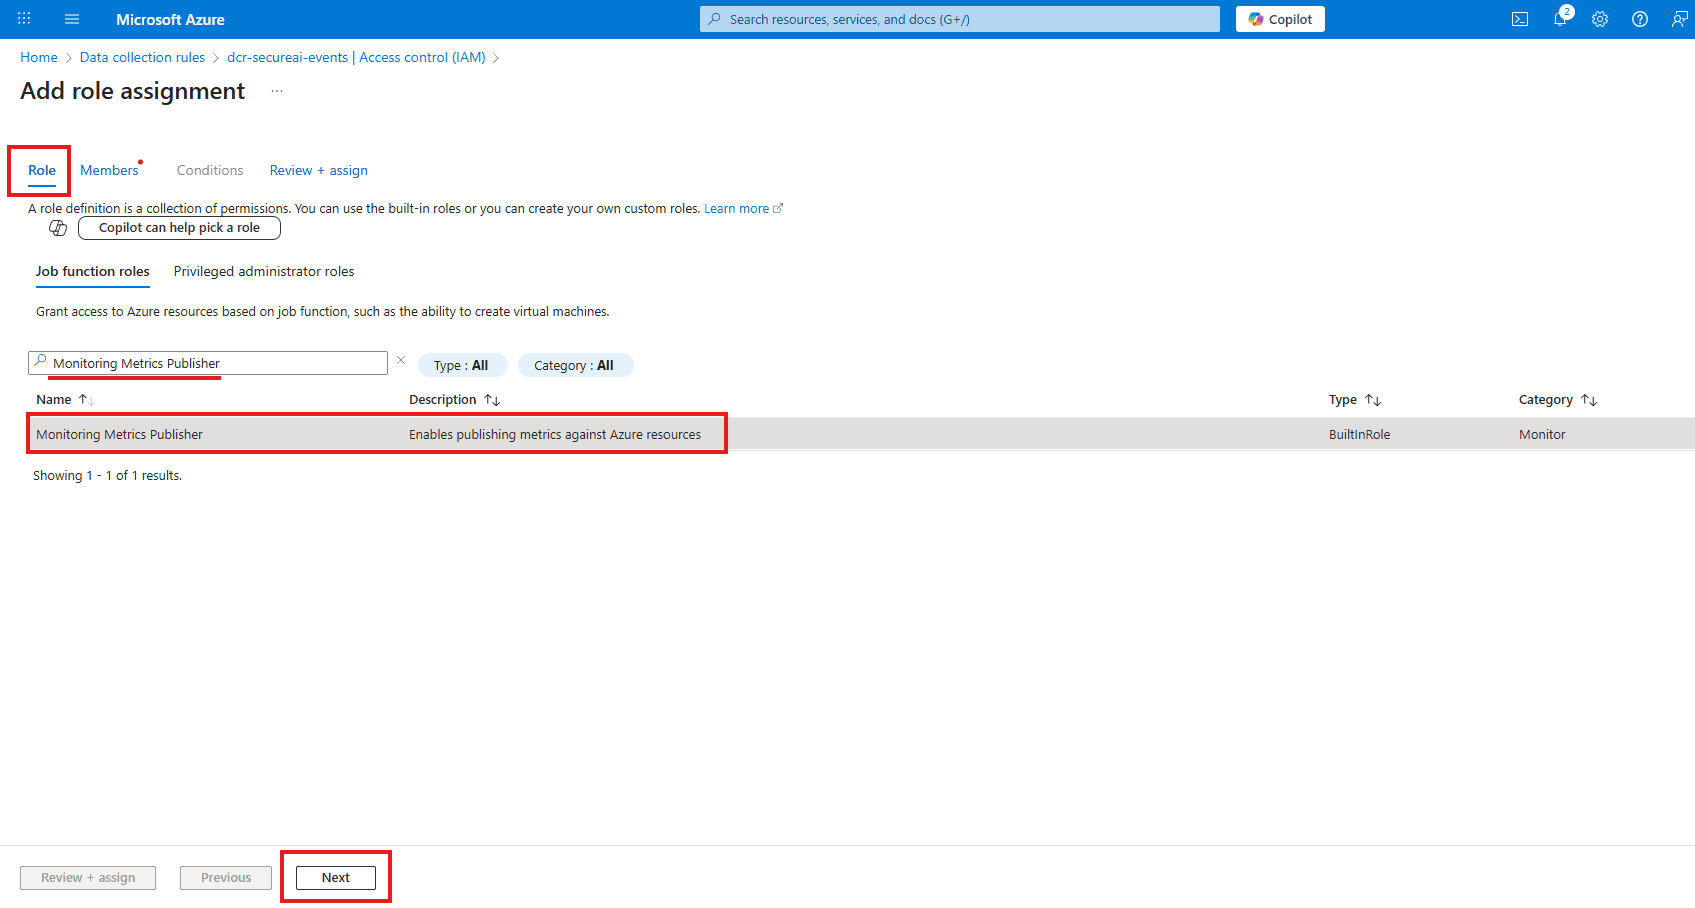
**ロール**: **Monitoring Metrics Publisher** を検索して選択します。
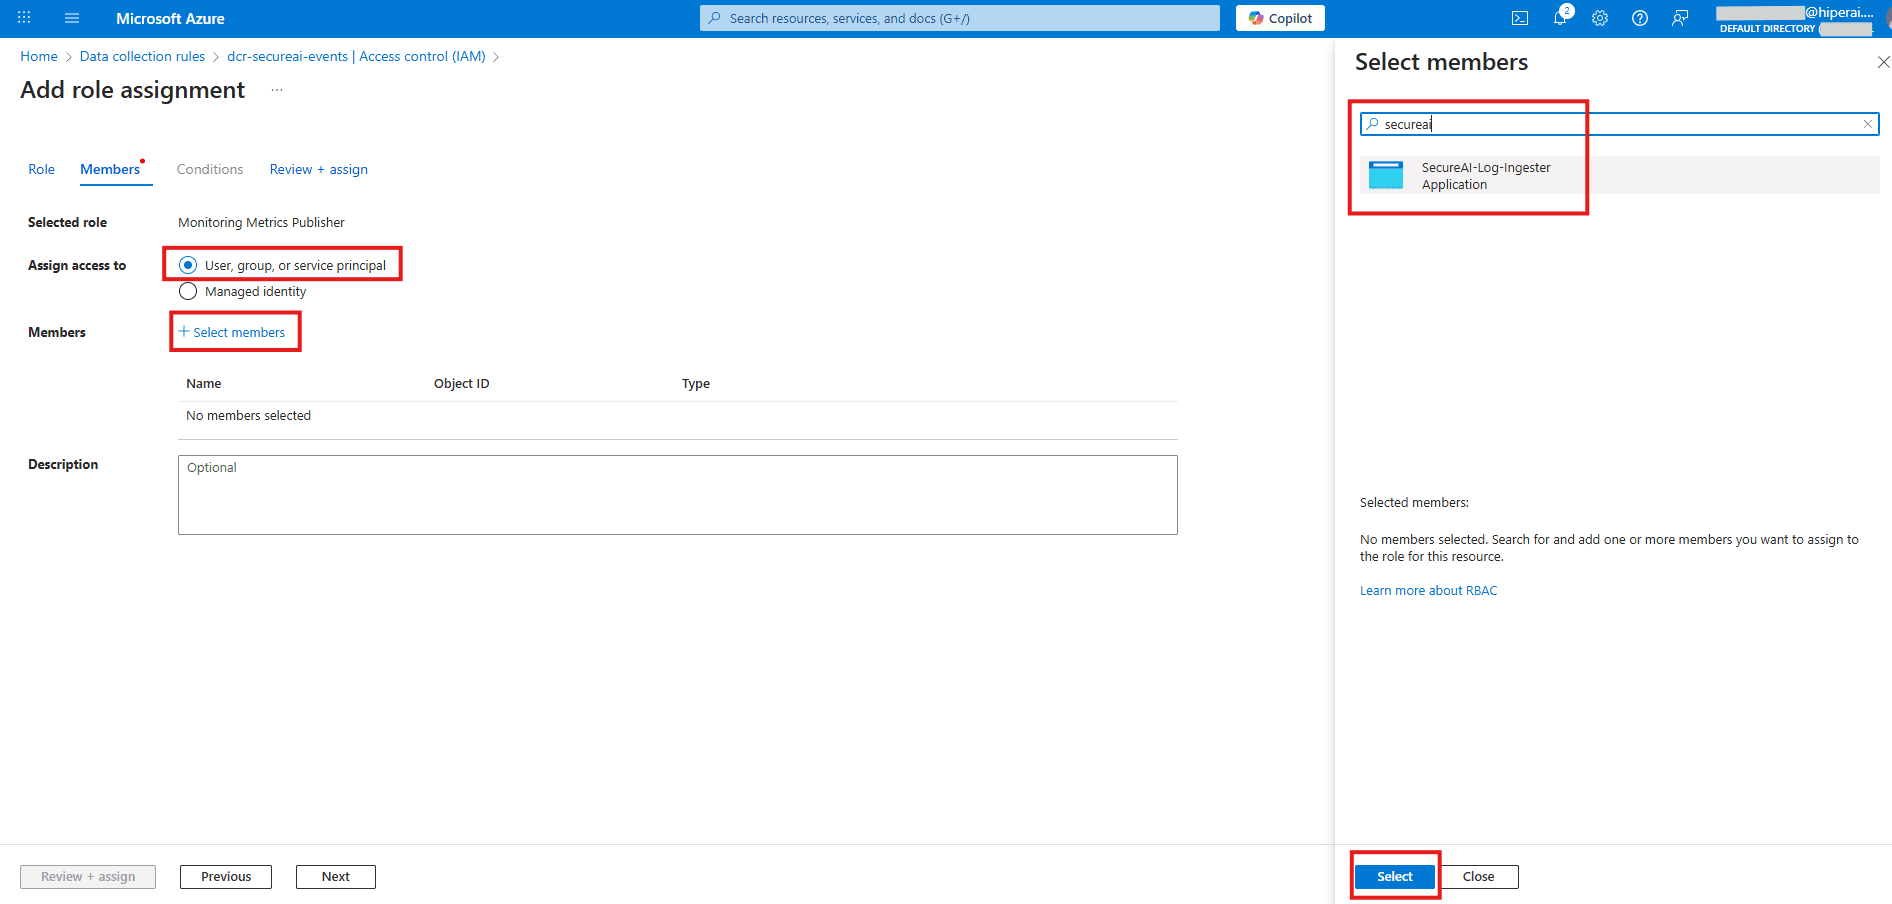
**メンバー**: **メンバーの選択** をクリックし、アプリ登録名 (`SecureAI-Log-Ingester`) を検索します。それを選択してください。
\[**レビューと割り当て**] をクリックします。
## ステップ 4: 情報を最終決定して共有する
これでほぼ完了です。最後のステップだけです。
### A. 情報を収集する
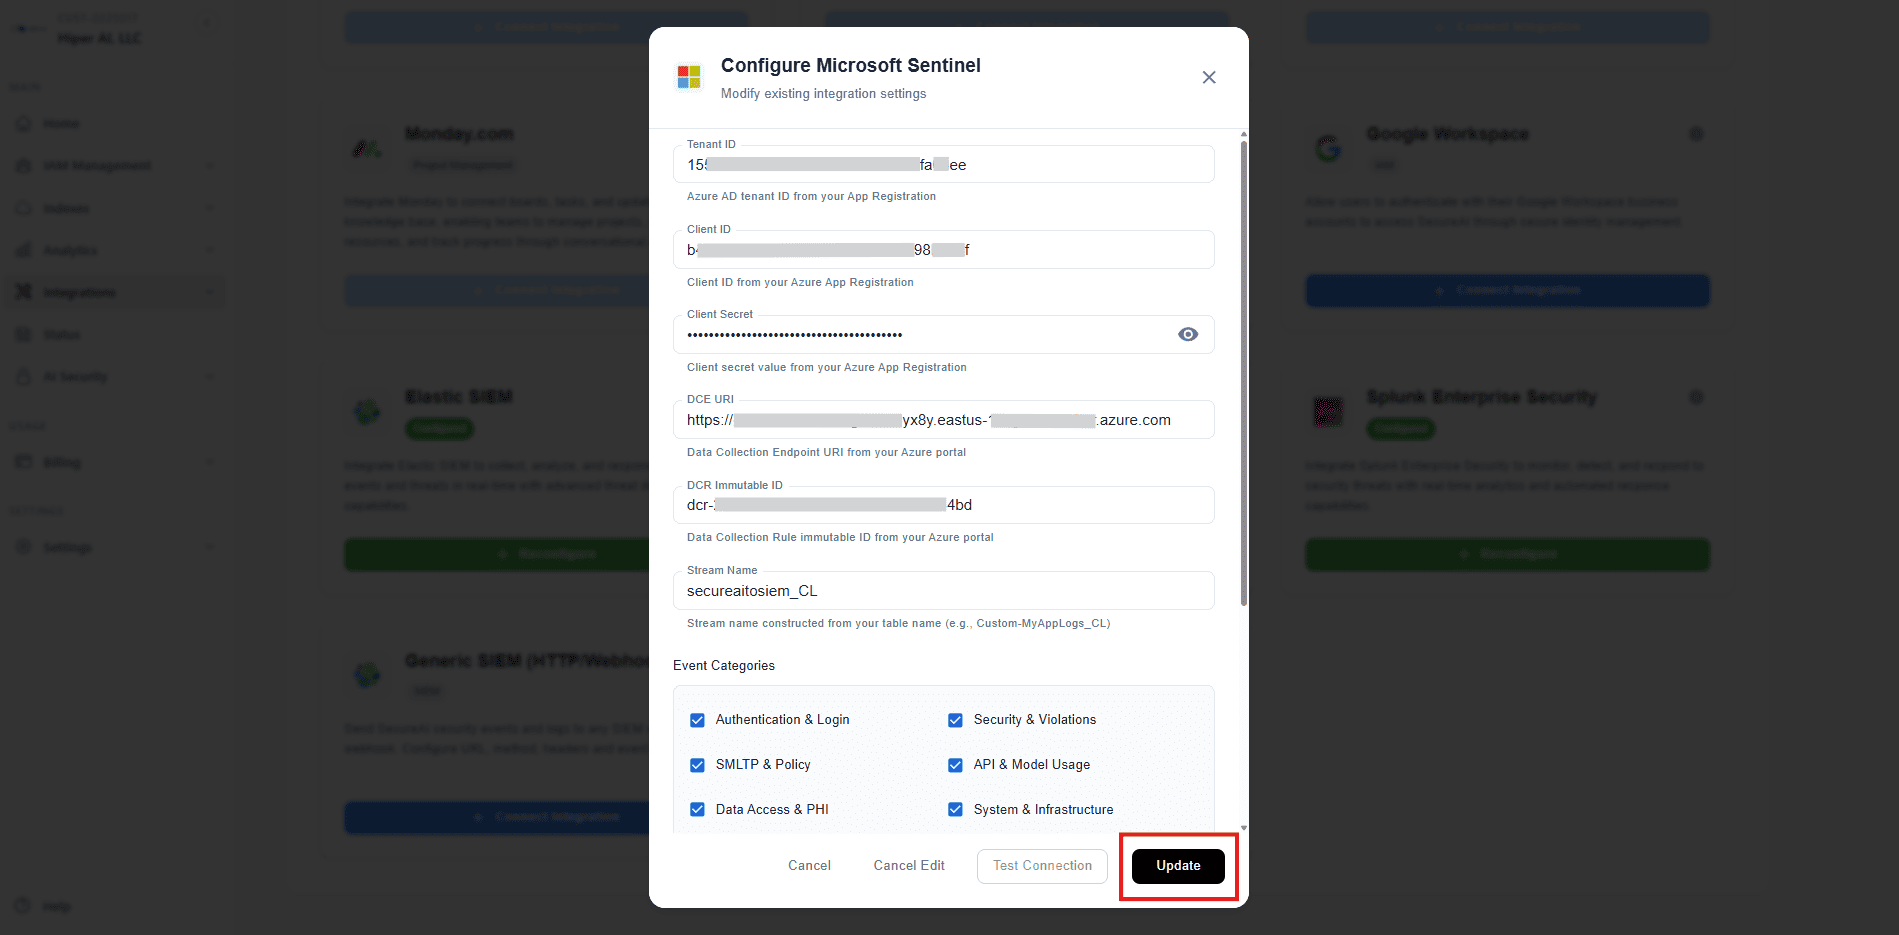
統合を完了するには、アプリケーションには次の 6 つの情報が必要です。
1. **テナント ID**: (ステップ 1 より)
2. **クライアント ID**: (ステップ 1 より)
3. **クライアント シークレット**: (ステップ 1 より)
4. **DCE URI**: (ステップ 2A より)
5. **DCR 不変 ID**: (DCR `dcr-secureai-events` に移動し、これを JSON ビューからコピーします)
6. **ストリーム名**: これは構築された値です。形式は `Custom-{TableName}` です。私たちの場合、それは次のようになります: `Custom-secureaitosiem_CL`
### B. アプリケーションの構成
これら 6 つの値をアプリケーションの構成設定に入力します。
## ステップ 5: 統合を確認する
SecureAI アプリケーションに統合の詳細を入力すると、接続が正しく機能していることを確認できます。
### A. 接続をテストする
アプリケーション内の「接続のテスト」ボタンを使用します。これにより、テスト イベントが Microsoft Sentinel ワークスペースに送信されます。
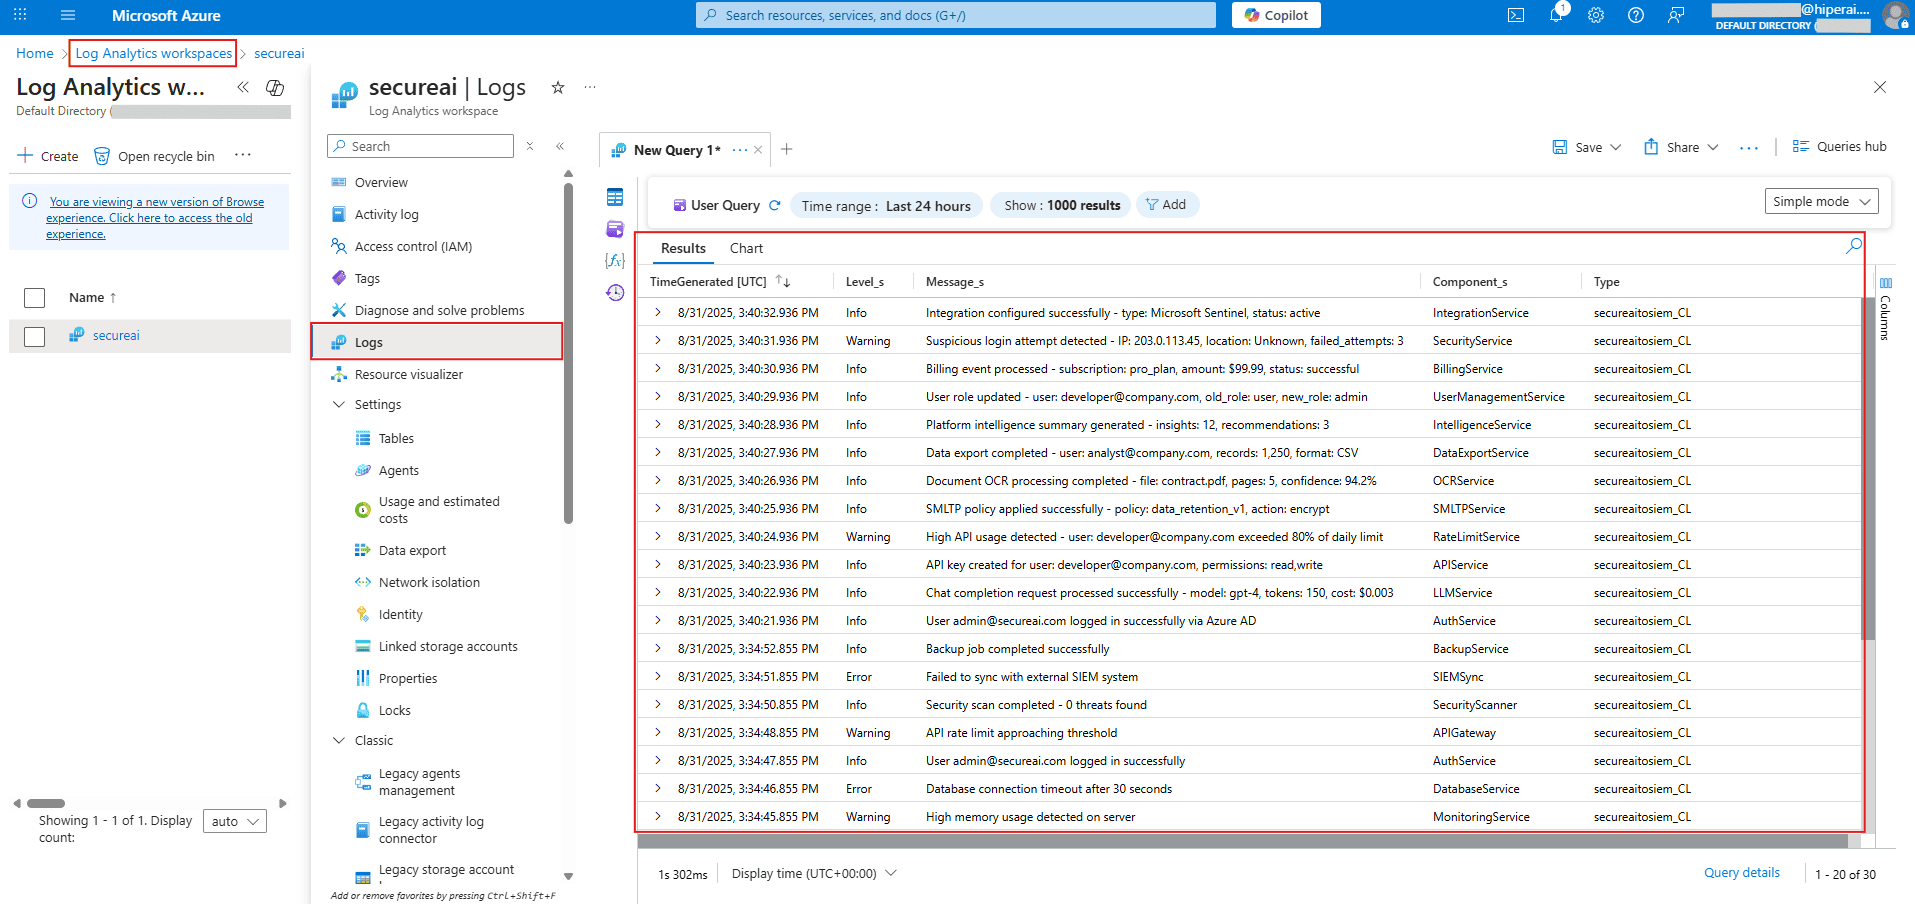
### B. Log Analytics でテスト イベントを見つける
イベントが Microsoft Sentinel に到着したかどうかを確認するには、Log Analytics ワークスペースに移動し、**ログ** をクリックします。
次のクエリを実行して、受信データを確認します。
```kql theme={null}
secureaitosiem_CL
| order by TimeGenerated desc
```
すべての列 (`TimeGenerated`、`Level_s`、`Message_s` など) が正しく設定されたログ データが表示されるはずです。そうであれば、統合は成功です。 ✅
**注意**: ネットワーク トラフィックとシステム負荷によっては、Microsoft Sentinel にログが表示されるまでに最大 10 分かかる場合があります。
## 完了しました!
これらの手順により、Microsoft Sentinel インスタンスは SecureAI と統合するように完全に構成されました 😎。