> ## Documentation Index
> Fetch the complete documentation index at: https://docs.hiperai.com/llms.txt
> Use this file to discover all available pages before exploring further.
# Microsoft Sentinel Integration
> Integration Guide: Connecting Microsoft Sentinel with HiperAI via Azure Data Collection Rules (DCR)
# Microsoft Sentinel Integration
Integration Guide: Connecting Microsoft Sentinel with HiperAI
This guide describes the necessary steps to configure Microsoft Sentinel to receive security logs from SecureAI via Azure Data Collection Rules (DCR).
## Step 1: Create the Application Identity (App Registration)
First, we'll create an identity for your application in Azure, allowing it to authenticate securely.
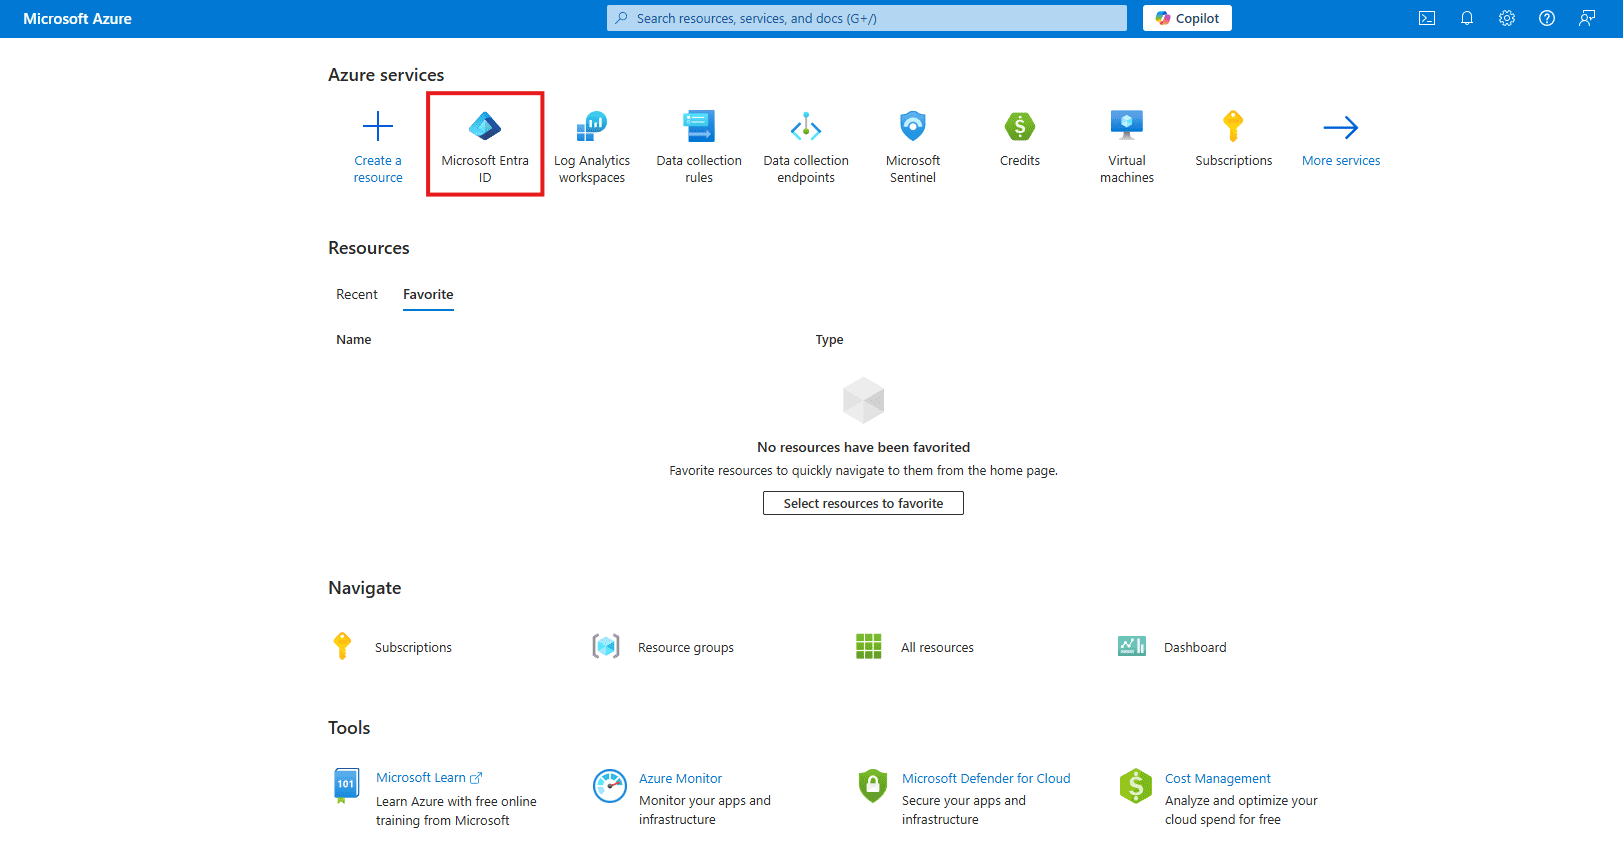
### A. Go to Azure Active Directory
In the Azure portal, search for and select **Azure Active Directory**.
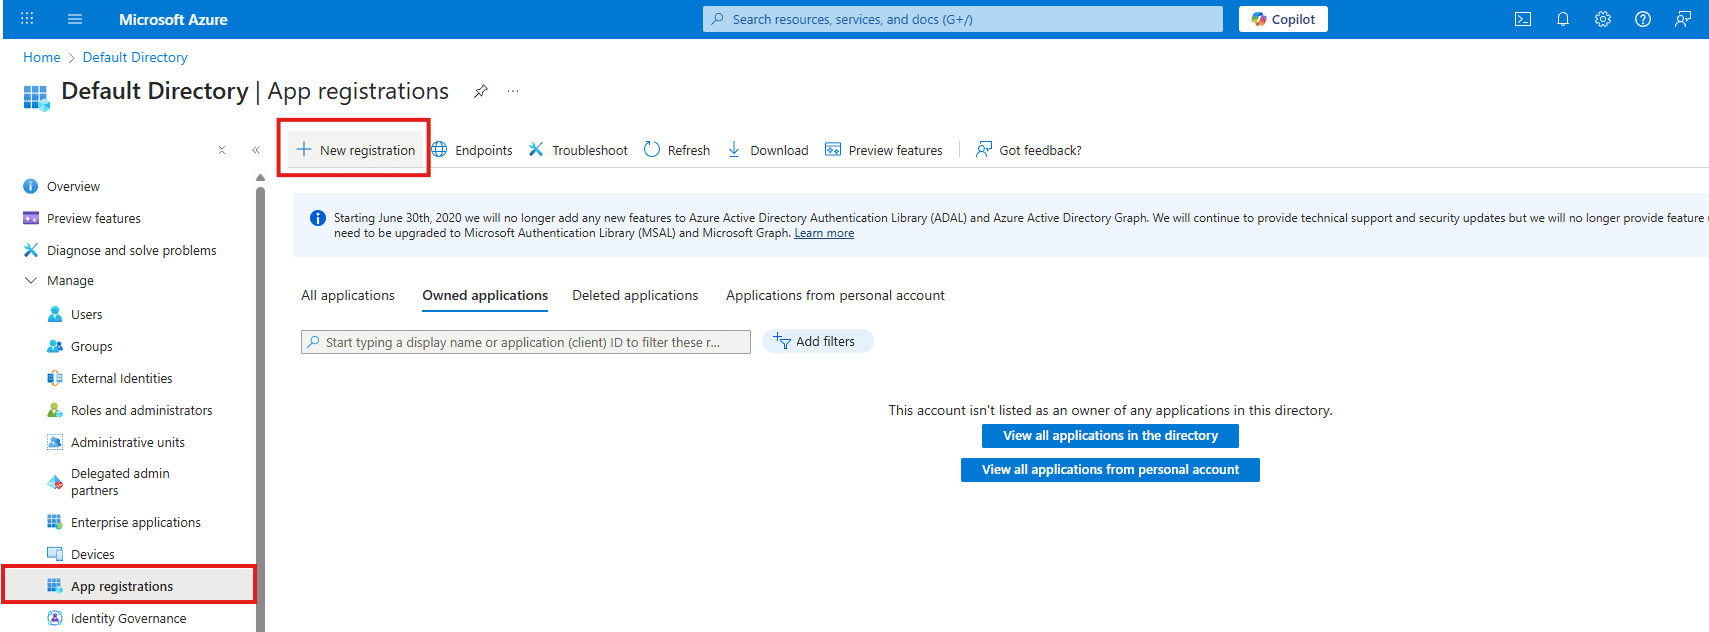
### B. New Registration
On the left menu, navigate to **App registrations** and click **+ New registration**.
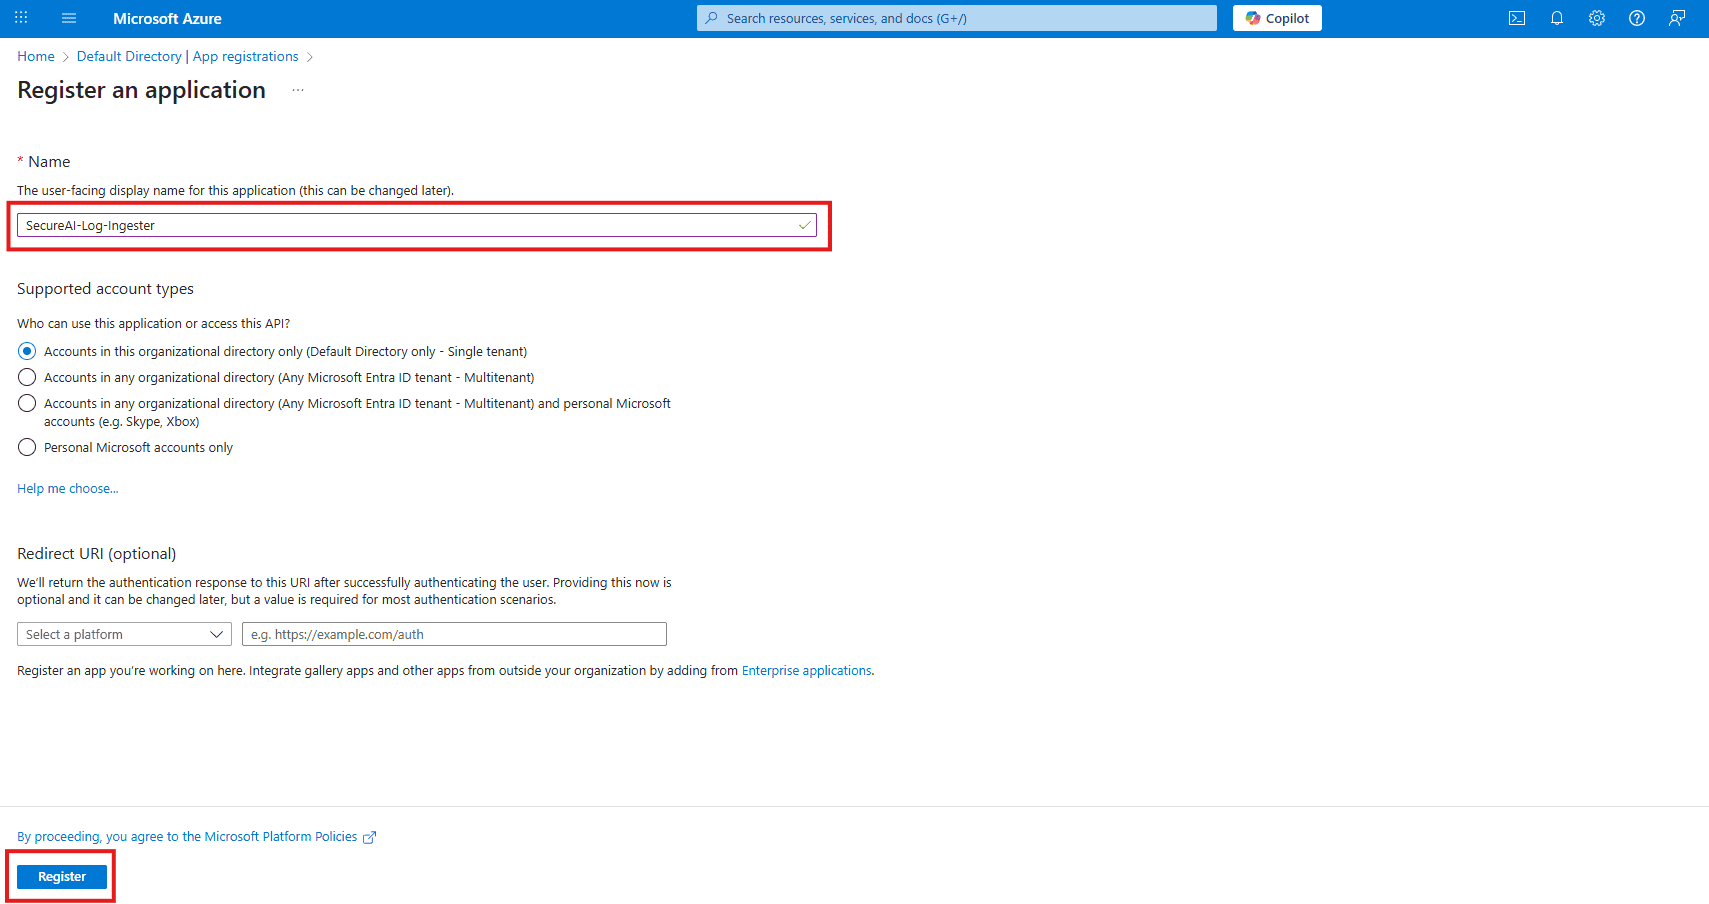
### C. Name the Application
Provide a clear name, such as `SecureAI-Log-Ingester` and leave the other options as their defaults. Click **Register**.
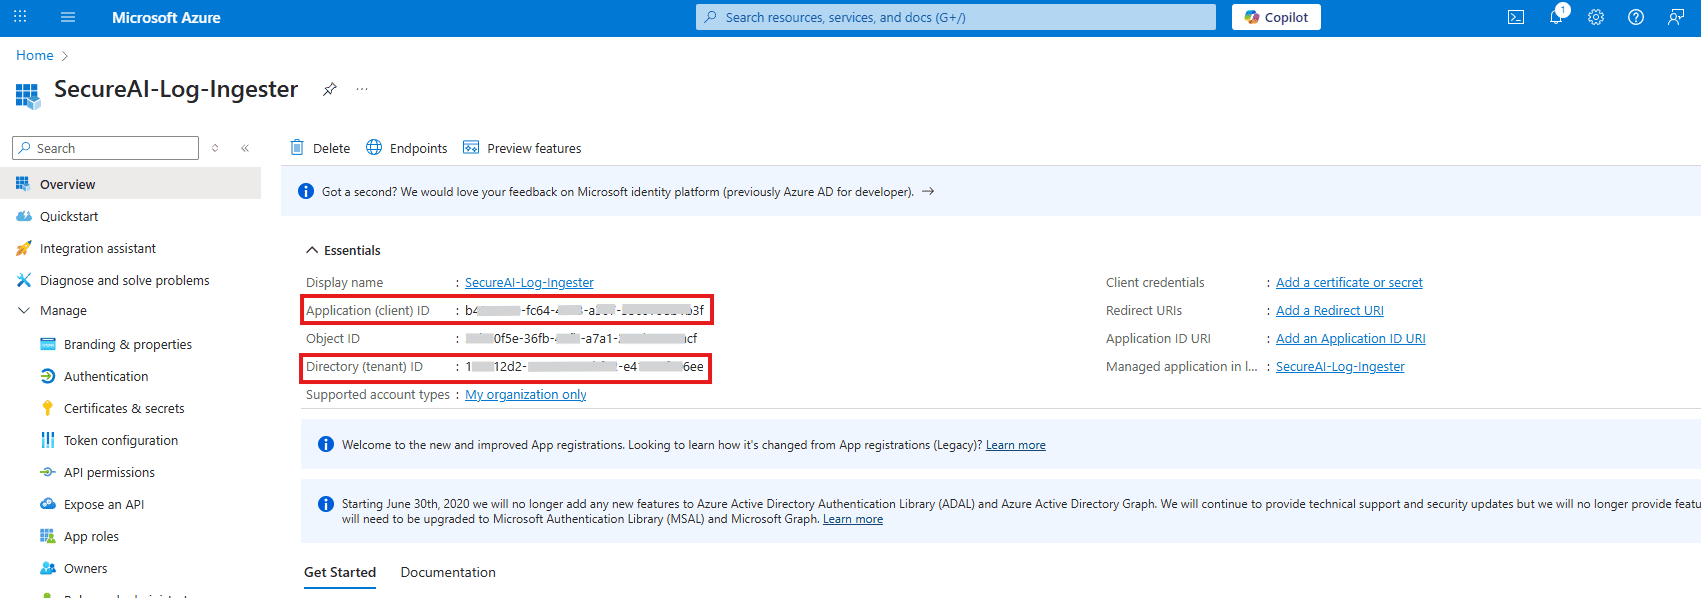
### D. Copy the IDs
From the new application's Overview page, copy and securely store the following values:
* **Application (client) ID**
* **Directory (tenant) ID**
### E. Create the Client Secret
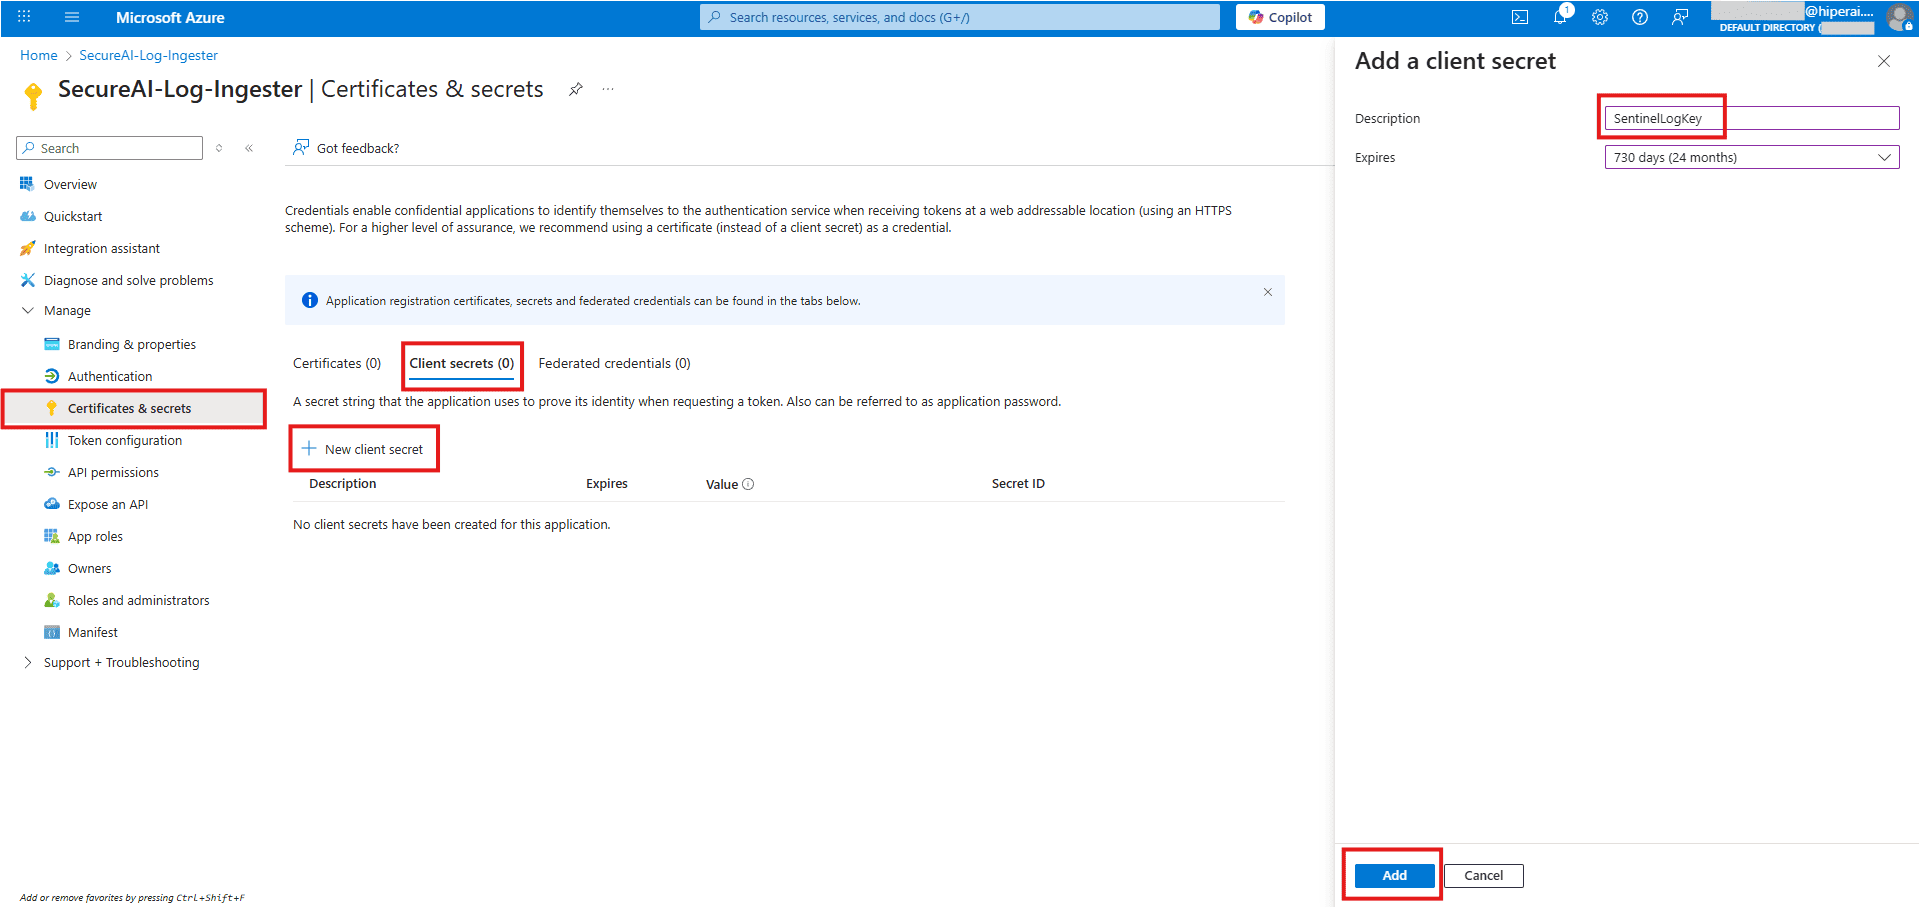
On the left menu, go to **Certificates & secrets** and click **+ New client secret**. Provide a description (e.g., "SentinelLogKey") and click **Add**.
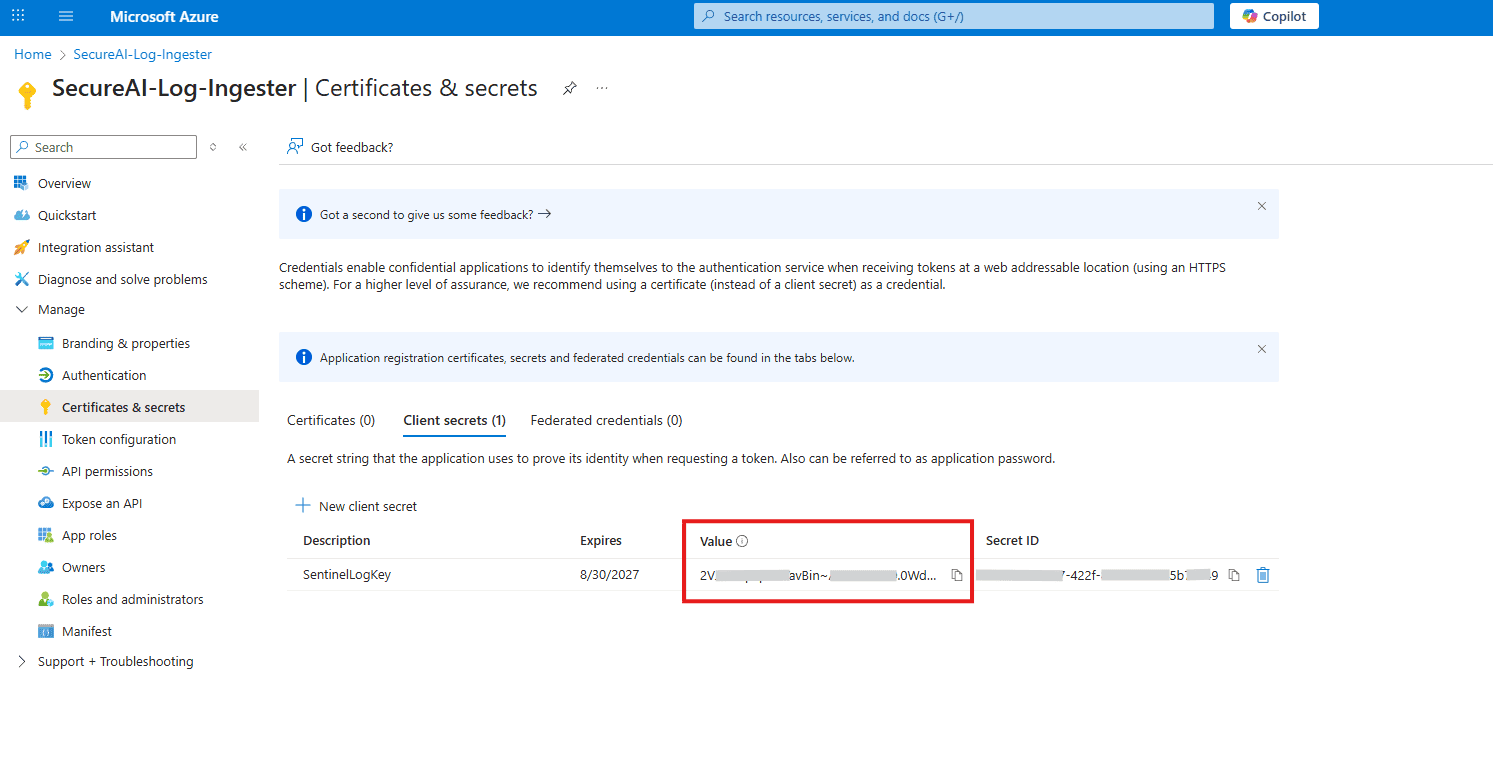
**CRITICAL STEP**: Immediately copy the secret's **Value**. This is the only time it will be fully visible. Store it securely with the other IDs.
## Step 2: Create the Azure Ingestion Infrastructure
Now, we will build the "pathway" and "storage" for your logs.
### A. Create the Data Collection Endpoint (DCE)
#### 1. Find the Service
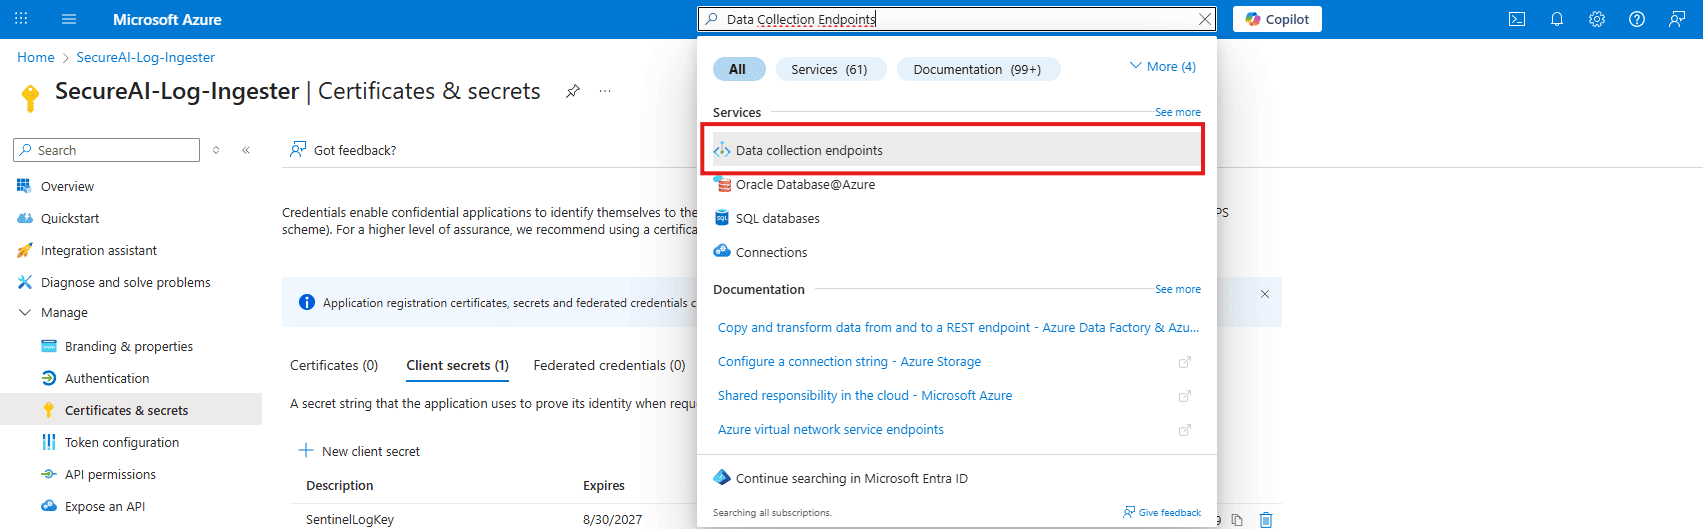
In the Azure search bar, search for and select **Data Collection Endpoints**.
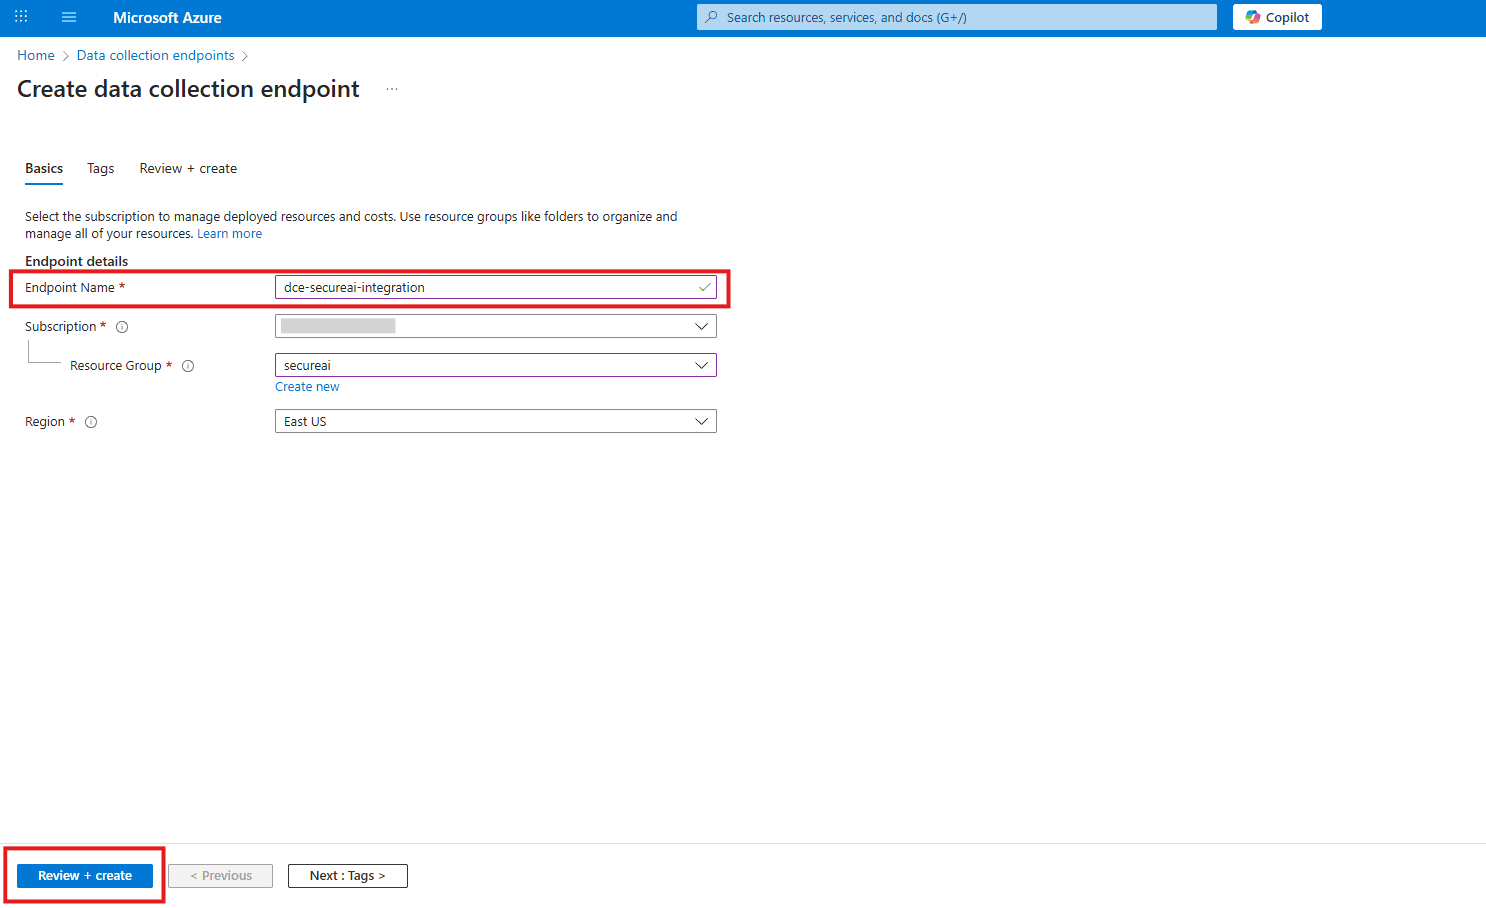
#### 2. Create a New DCE
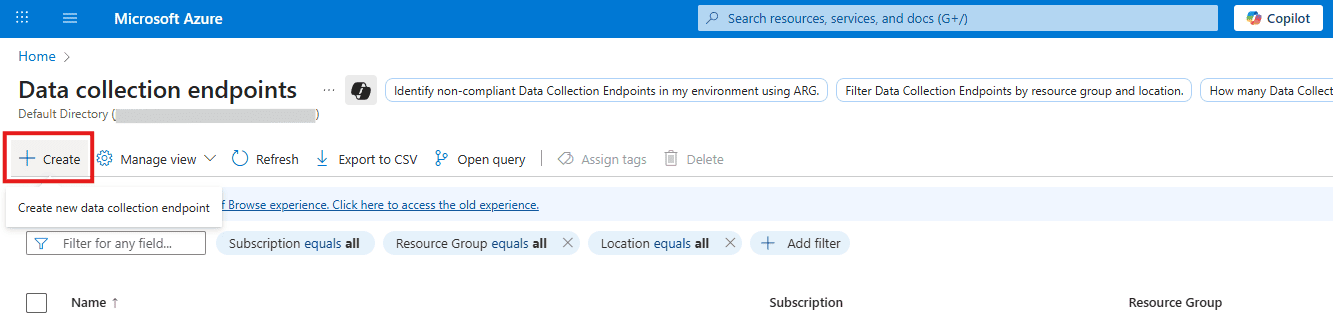
Click **+ Create**.
#### 3. Configure the DCE
* **Name**: `dce-secureai-integration`
* **Region**: Choose the same region as your Log Analytics Workspace
* Click **Review + create**, and then **Create**
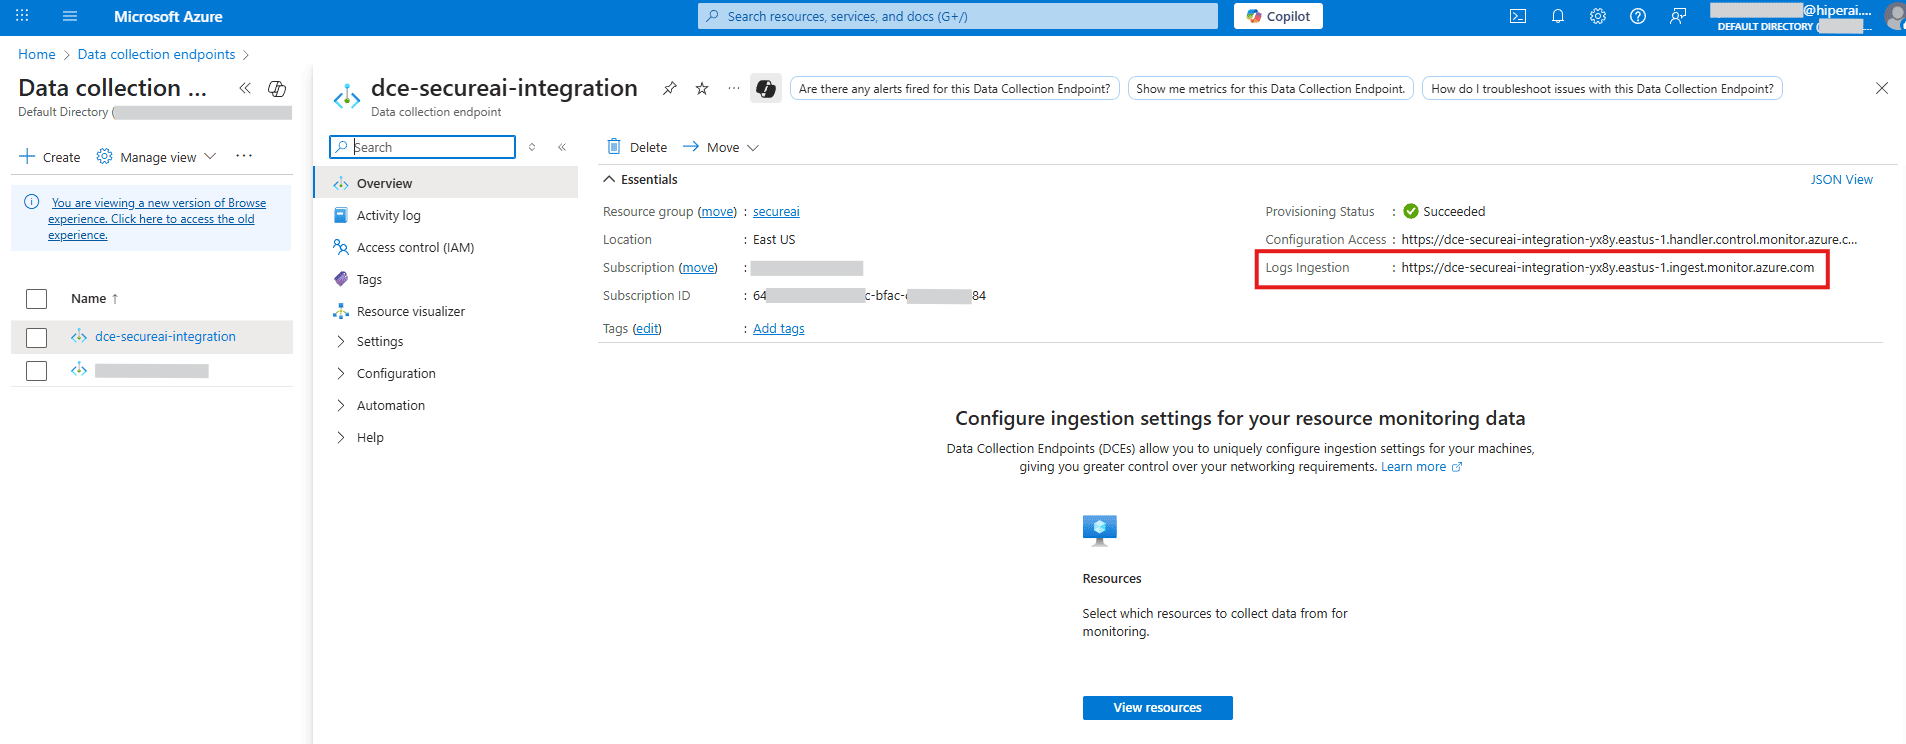
#### 4. Copy the URI
Once deployed, navigate to the resource. On its Overview page, copy the **Logs ingestion URI** and save it.
### B. Create the Custom Table and Data Collection Rule (DCR)
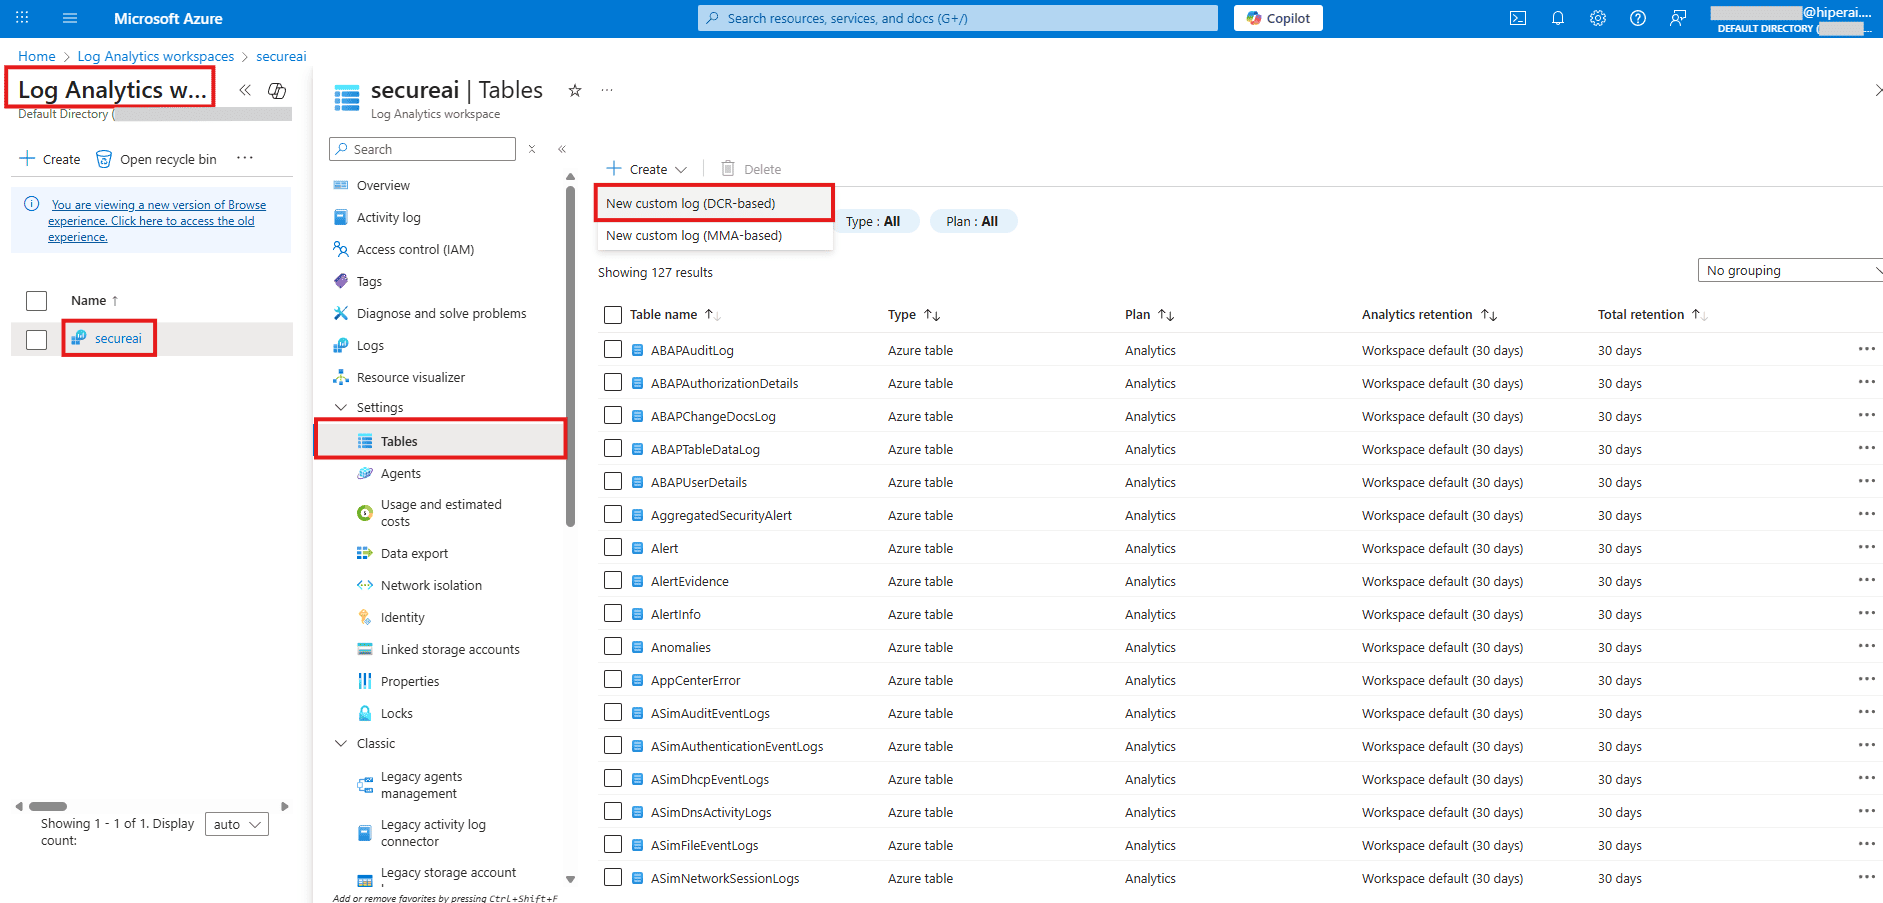
#### 1. Go to Log Analytics
Navigate to your **Log Analytics Workspace**.
#### 2. Create a Custom Table
On the left menu, click **Tables**, then **+ Create**, and select **New custom log (DCR-based)**.
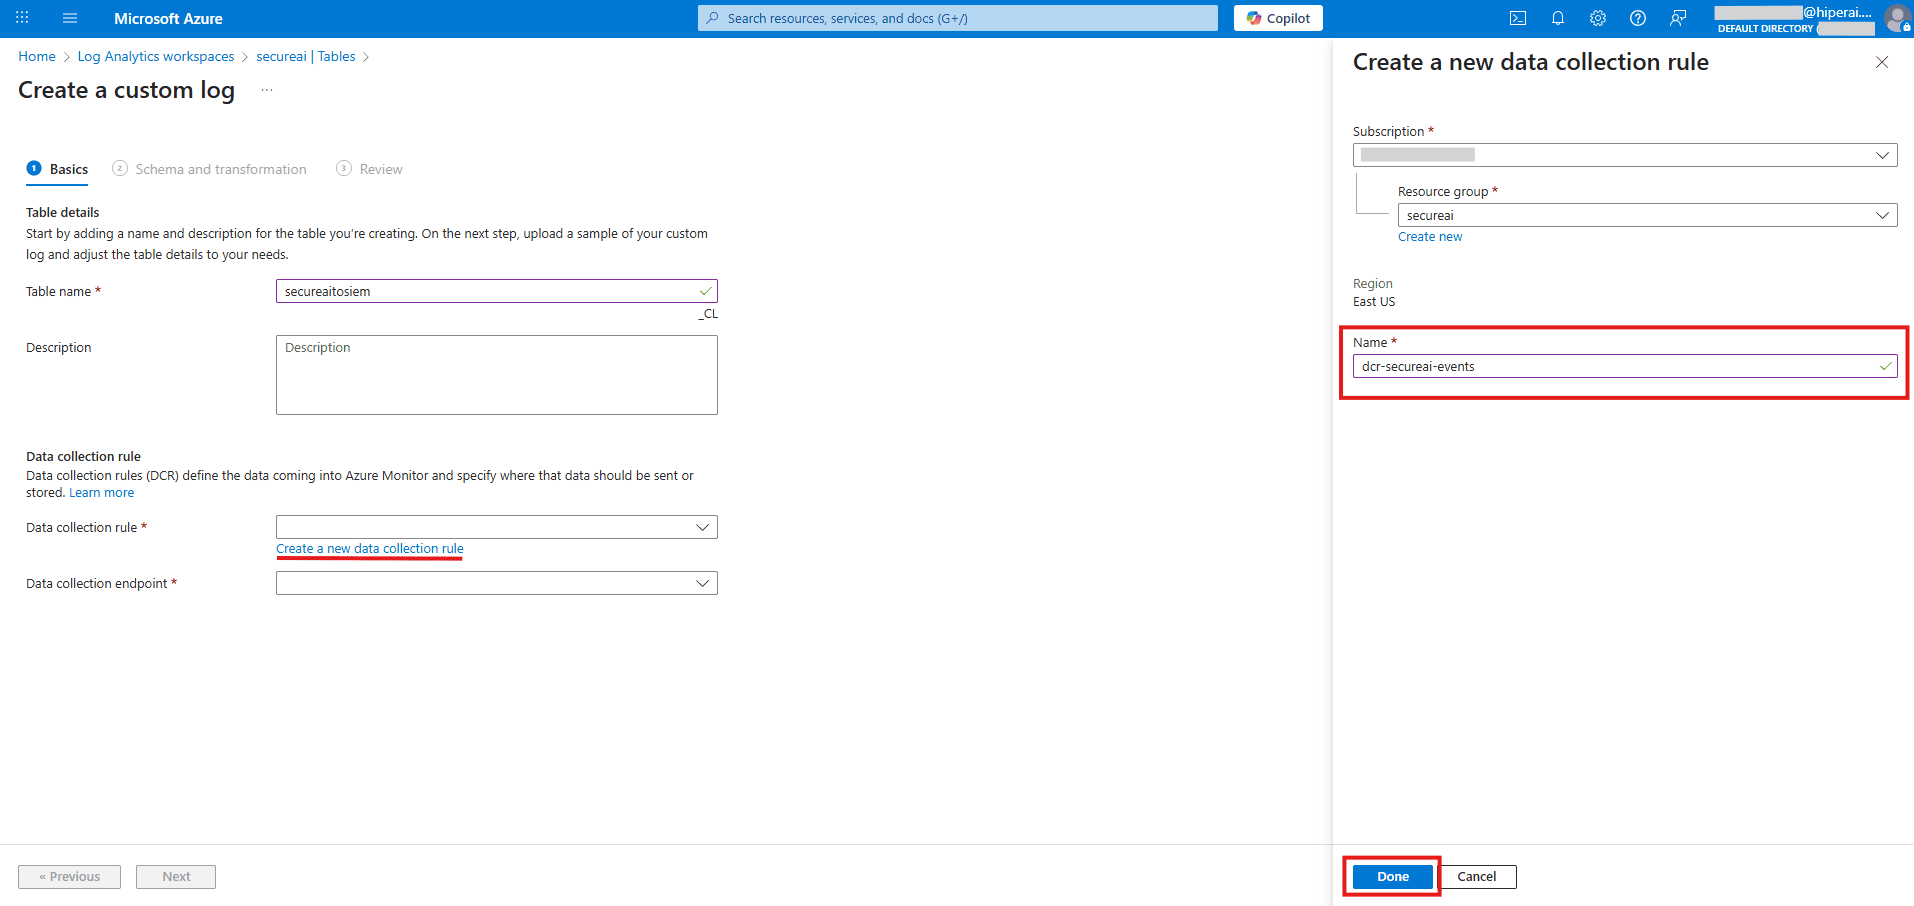
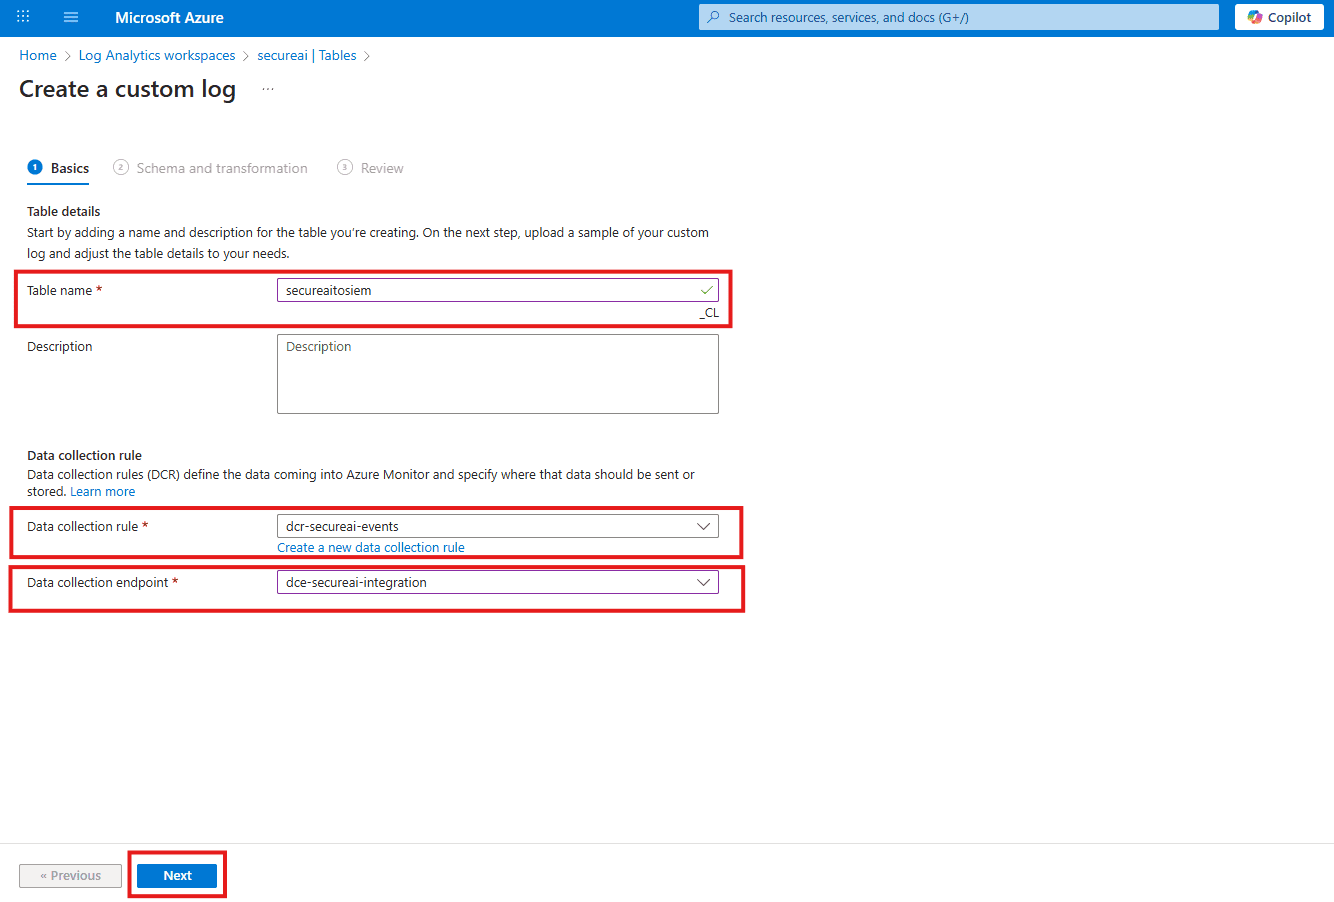
#### 3. "Basics" Tab
* **Table name**: `secureaitosiem` (Azure will automatically append `_CL`, making the full name `secureaitosiem_CL`)
* **Data collection rule**: Select "Create a new\..." and name it `dcr-secureai-events`
* **Data collection endpoint**: Select the DCE you created earlier (`dce-secureai-integration`)
* Click **Next: Schema and transformation**
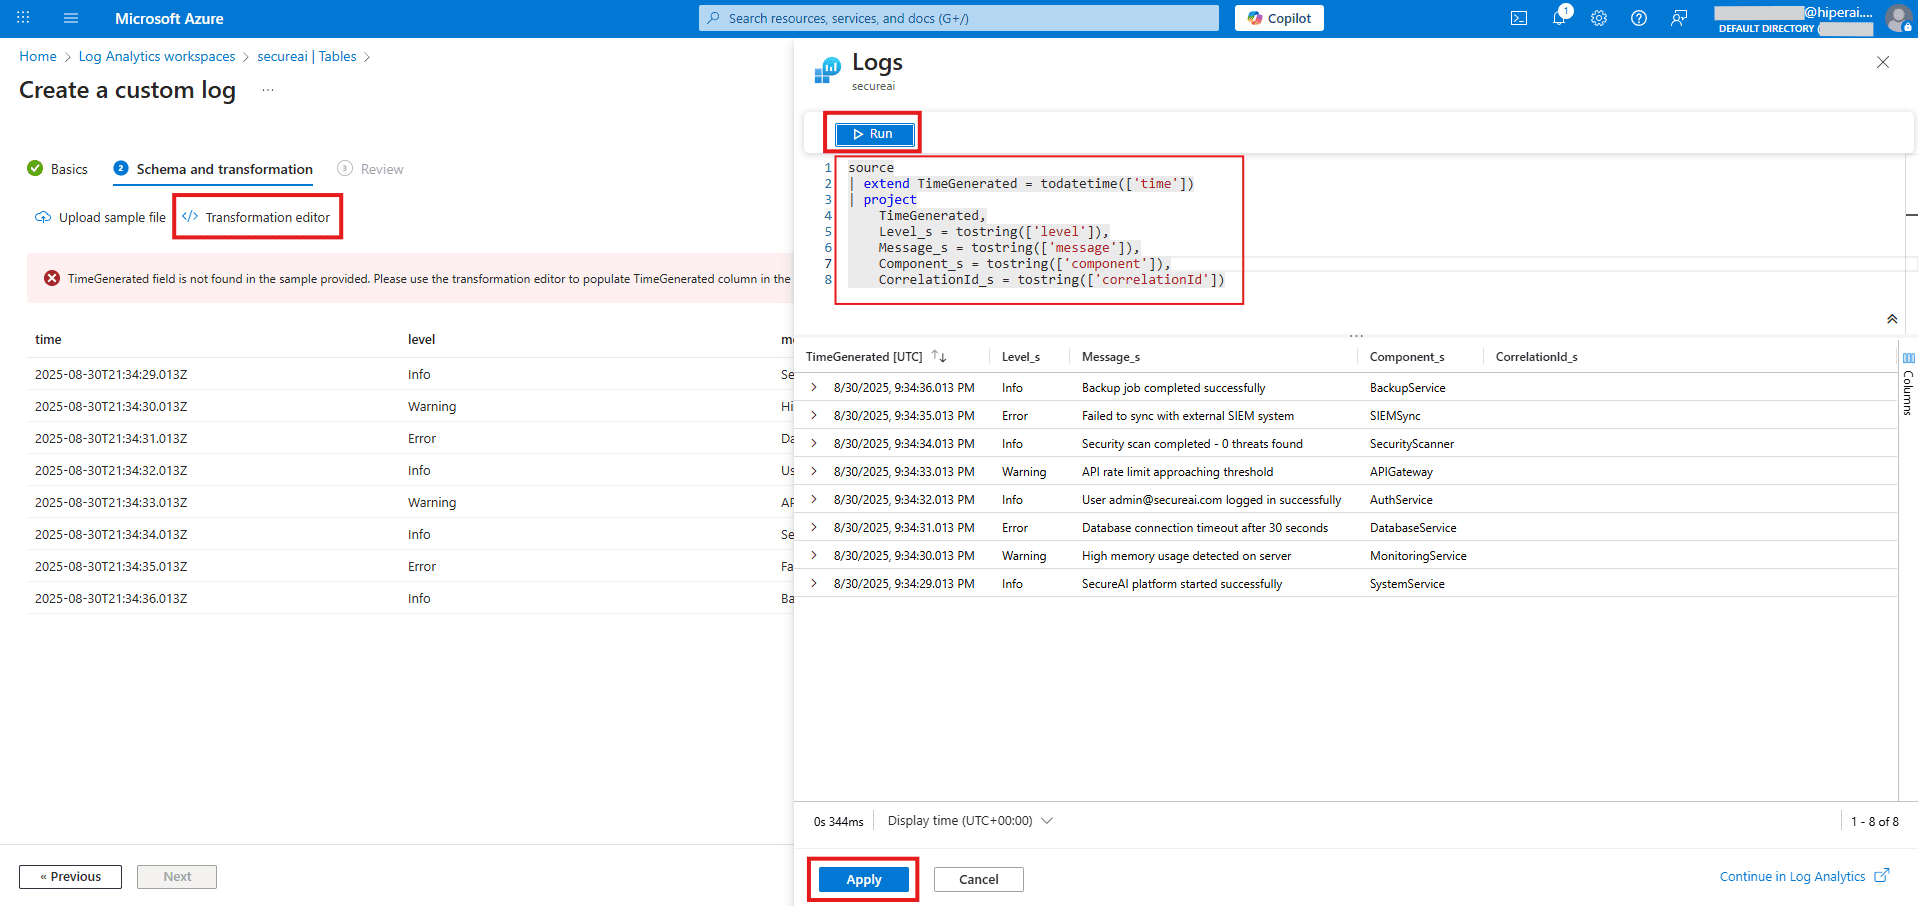
#### 4. "Schema and transformation" Tab
**Upload a sample file**: The system will prompt you. Create a `.json` file with the following content and upload it:
```json theme={null}
[
{
"time": "2025-08-30T21:34:29.013Z",
"level": "Info",
"message": "SecureAI platform started successfully",
"component": "SystemService",
"correlationId": "test-001"
},
{
"time": "2025-08-30T21:34:30.013Z",
"level": "Warning",
"message": "High memory usage detected on server",
"component": "MonitoringService",
"correlationId": "test-002"
},
{
"time": "2025-08-30T21:34:31.013Z",
"level": "Error",
"message": "Database connection timeout after 30 seconds",
"component": "DatabaseService",
"correlationId": "test-003"
},
{
"time": "2025-08-30T21:34:32.013Z",
"level": "Info",
"message": "User admin@secureai.com logged in successfully",
"component": "AuthService",
"correlationId": "test-004"
},
{
"time": "2025-08-30T21:34:33.013Z",
"level": "Warning",
"message": "API rate limit approaching threshold",
"component": "APIGateway",
"correlationId": "test-005"
},
{
"time": "2025-08-30T21:34:34.013Z",
"level": "Info",
"message": "Security scan completed - 0 threats found",
"component": "SecurityScanner",
"correlationId": "test-006"
},
{
"time": "2025-08-30T21:34:35.013Z",
"level": "Error",
"message": "Failed to sync with external SIEM system",
"component": "SIEMSync",
"correlationId": "test-007"
},
{
"time": "2025-08-30T21:34:36.013Z",
"level": "Info",
"message": "Backup job completed successfully",
"component": "BackupService",
"correlationId": "test-008"
}
]
```
**Download Sample File**: You can also download the complete sample JSON file to use directly:
📥 sample.json
#### 5. Apply the Transformation
The system may show a warning about the TimeGenerated field. Click the **Transformation editor** button, delete all existing content, and paste the following complete KQL query:
```kql theme={null}
source
| extend TimeGenerated = todatetime(['time'])
| project
TimeGenerated,
Level_s = tostring(['level']),
Message_s = tostring(['message']),
Component_s = tostring(['component']),
CorrelationId_s = tostring(['correlationId'])
```
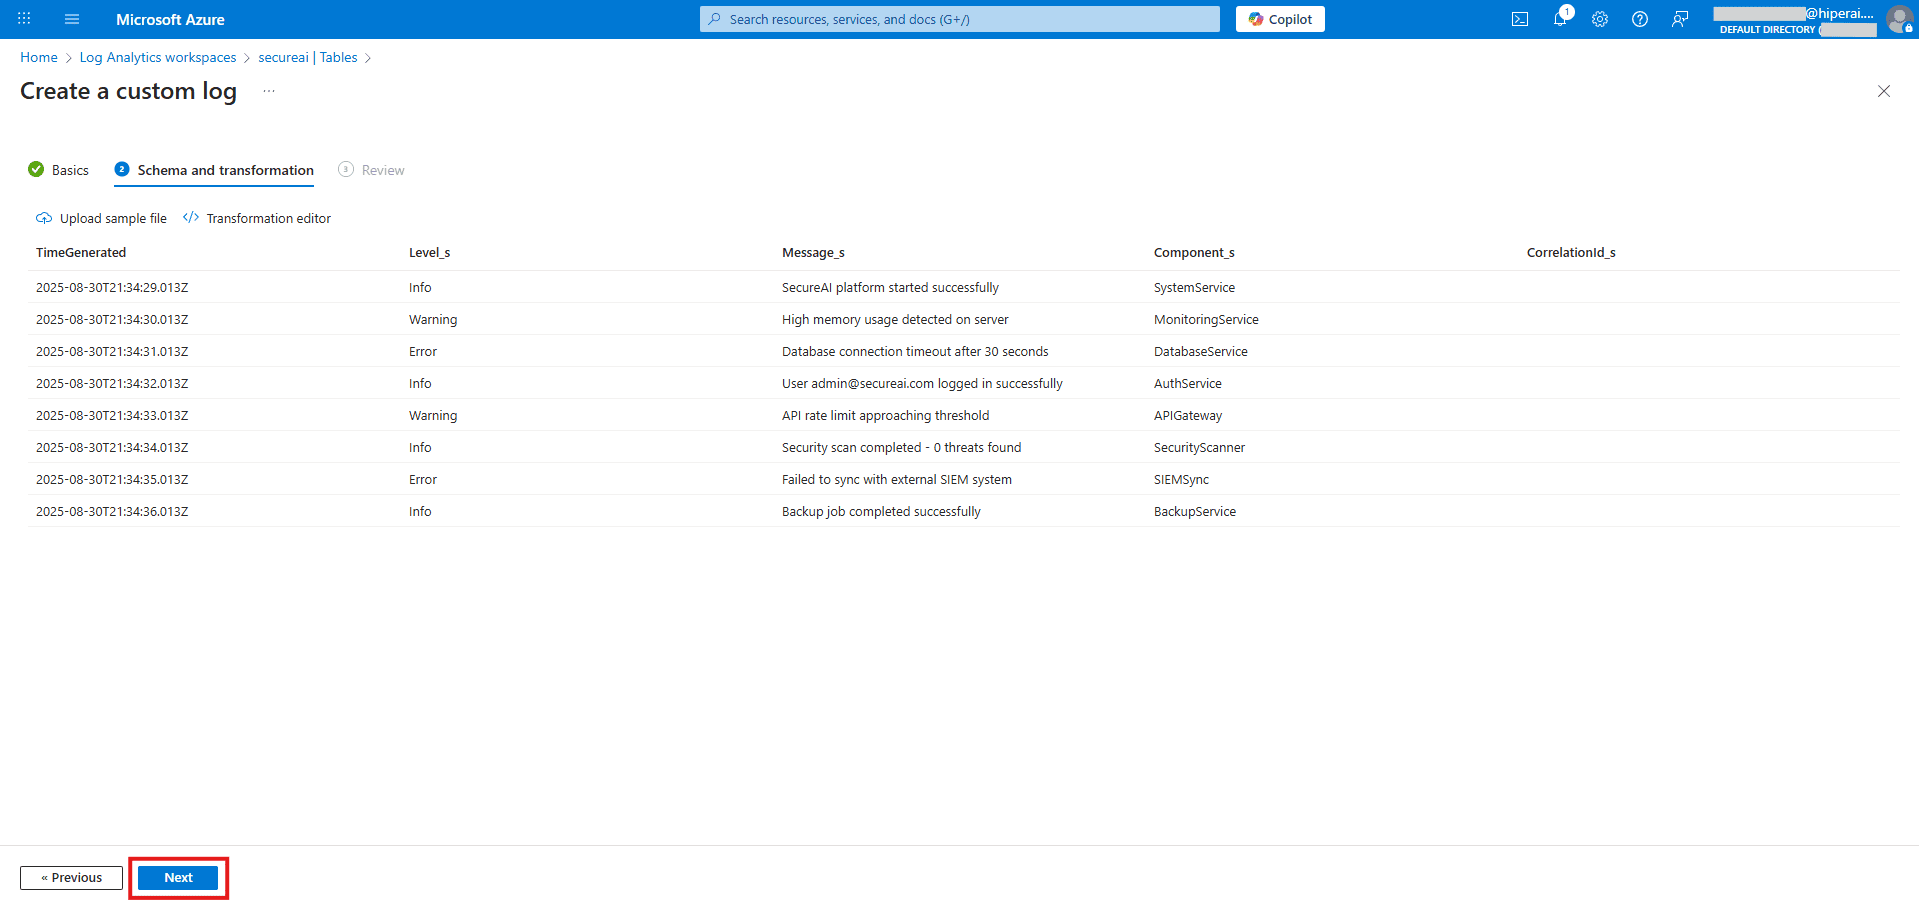
Click **Apply**. You should see a preview of the table with all the correct columns and data types.
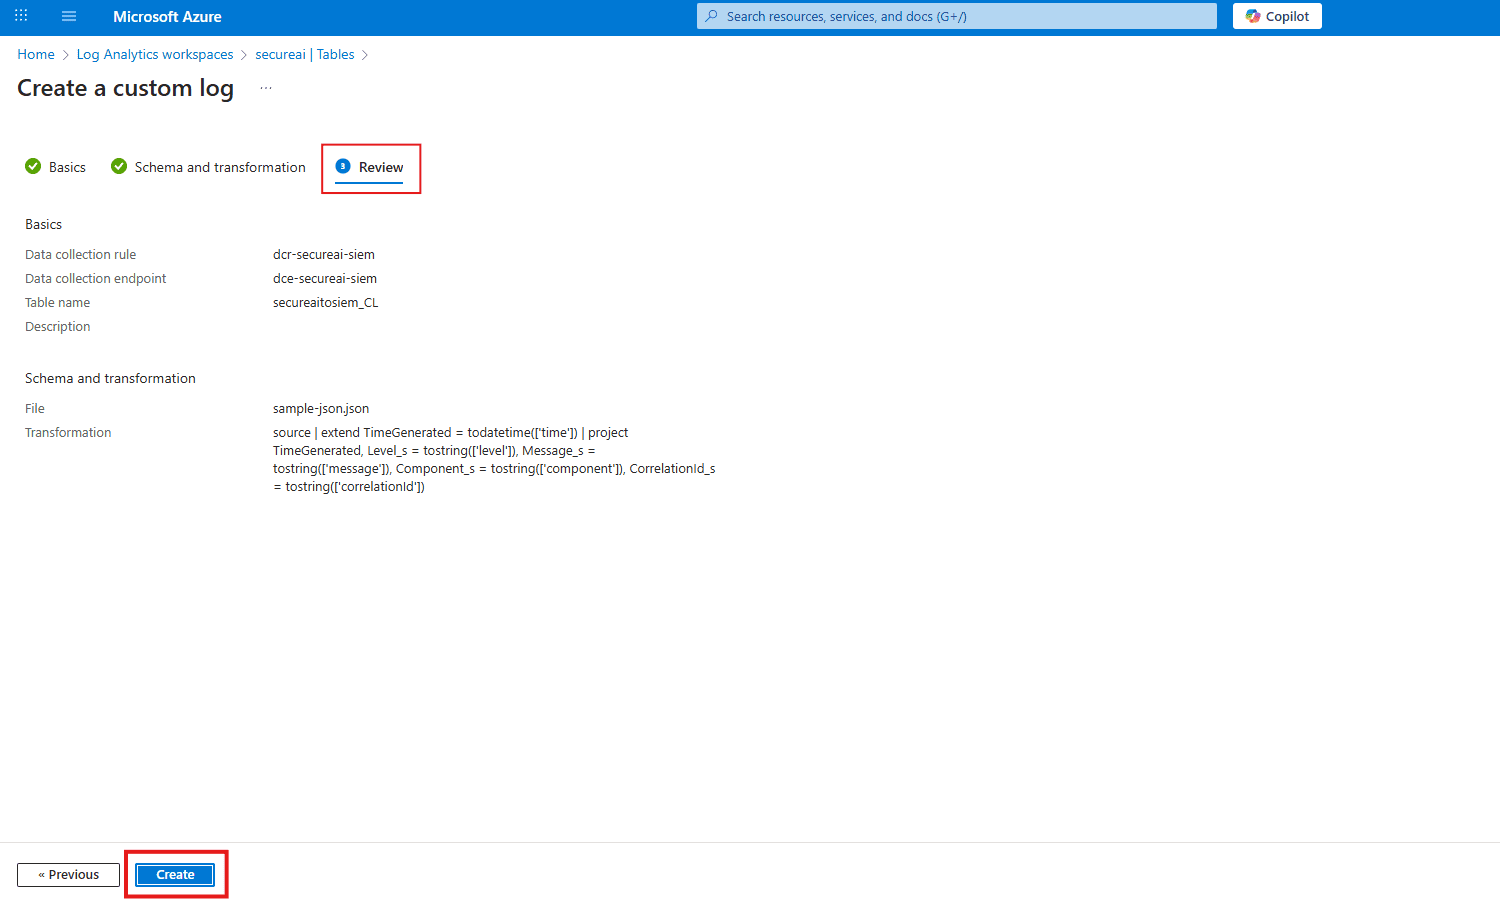
#### 6. Finalize Creation
Click **Next: Review + create** and then **Create**.
## Step 3: Connect the Identity to the Infrastructure (Permissions)
This crucial step grants our application permission to use the data collection rule we just created.
### A. Go to your new DCR
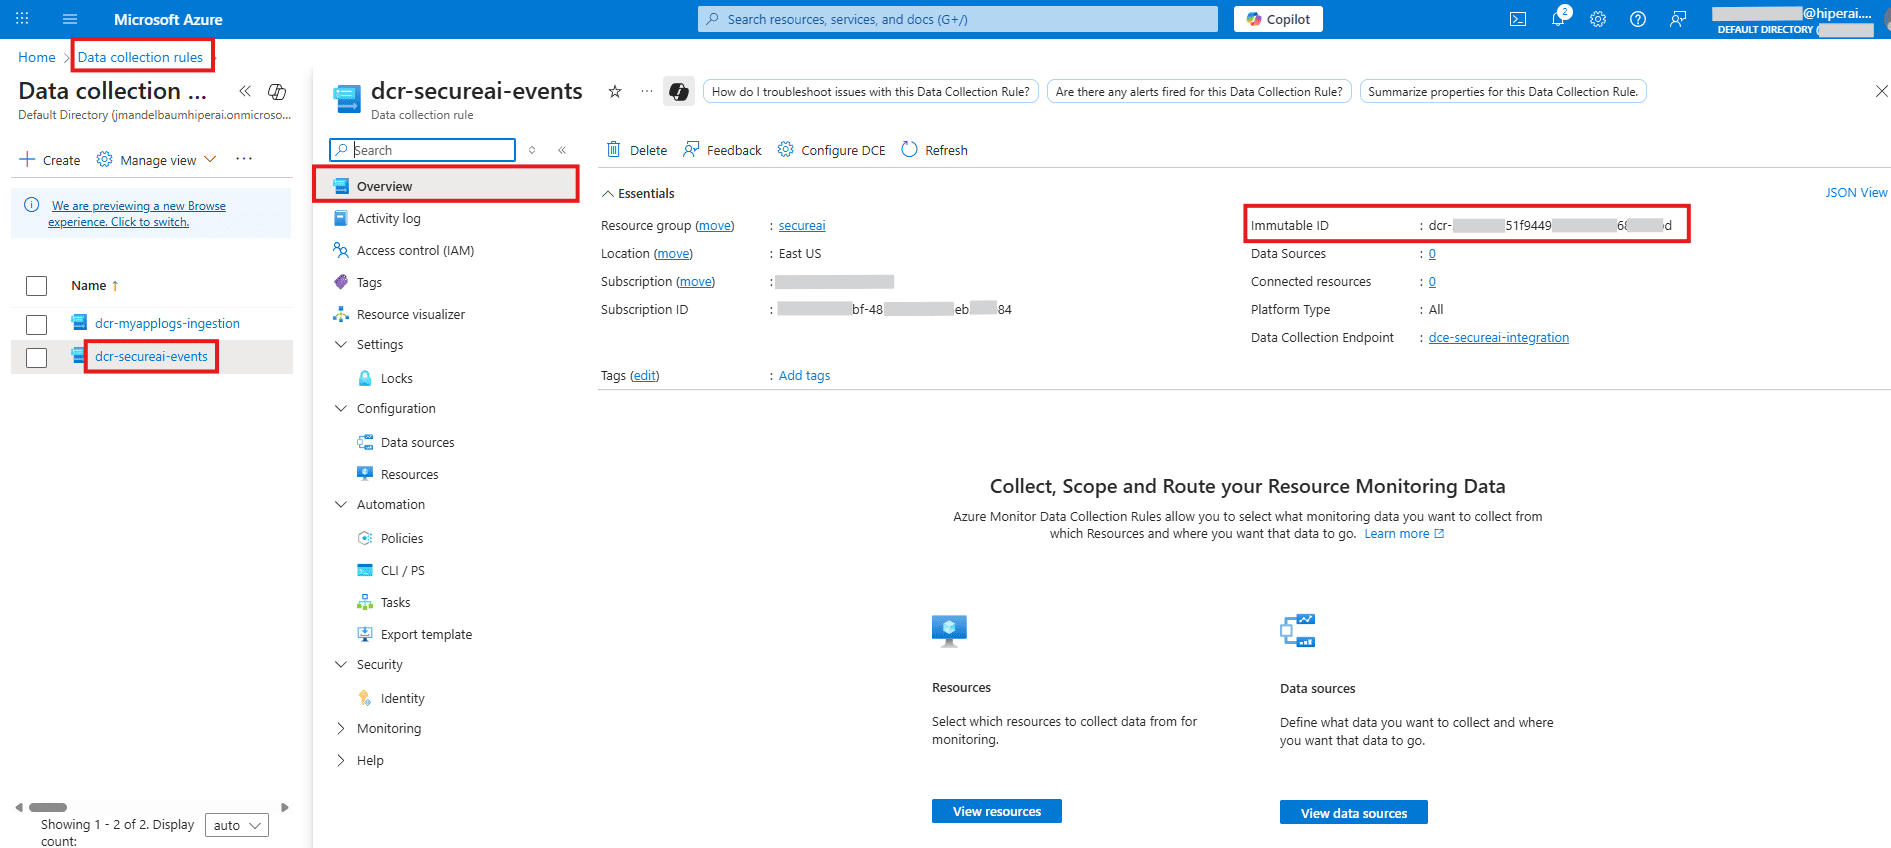
Search for and open your Data Collection Rule, `dcr-secureai-events` and in "Overview", copy the immutable ID and save it for integration.
### B. Assign the Role
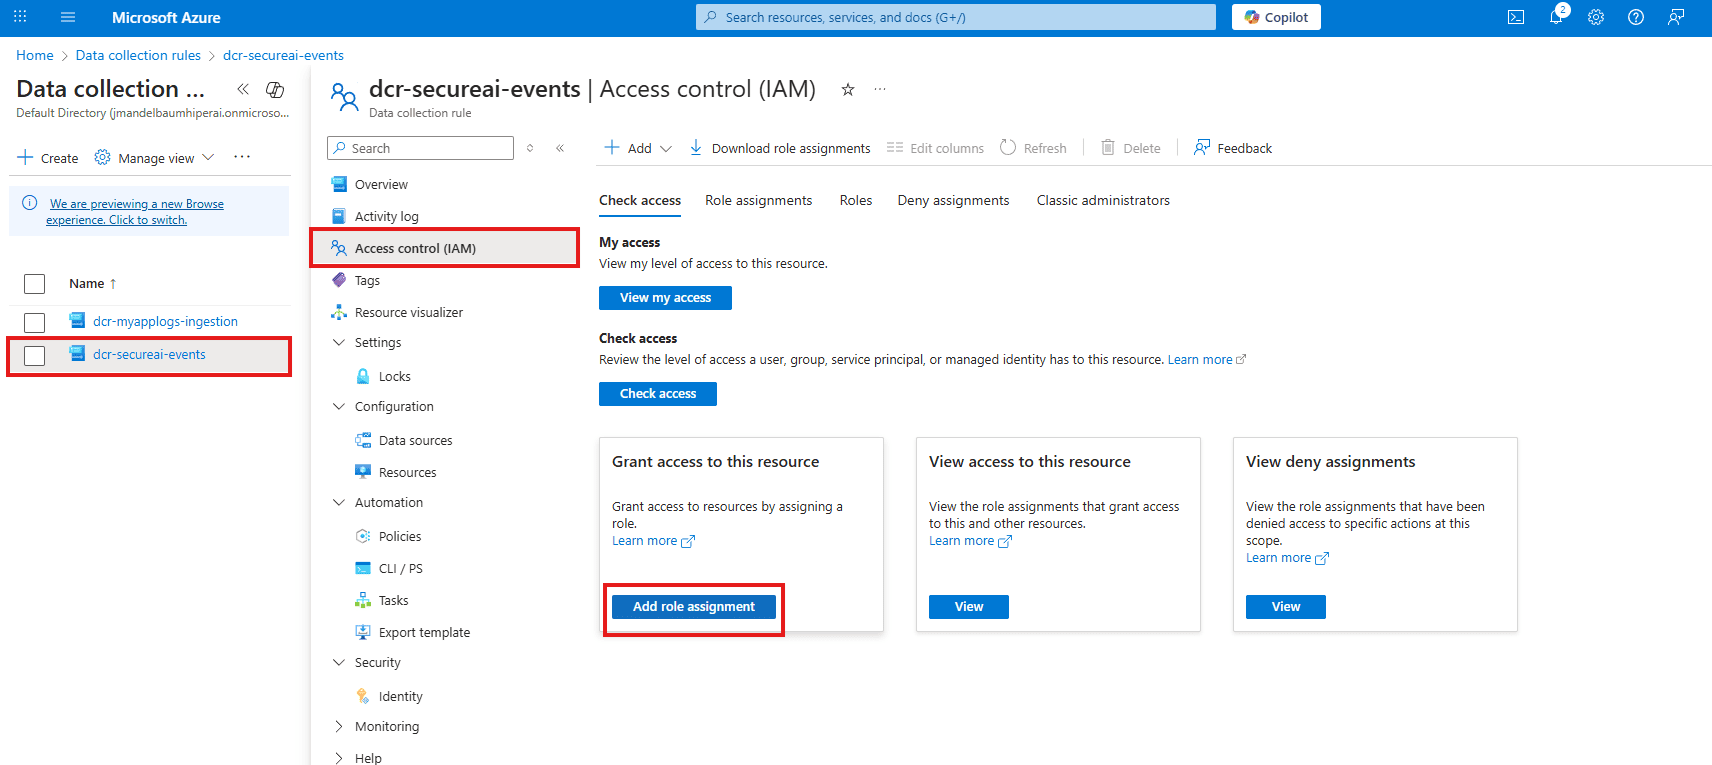
On the left menu, go to **Access control (IAM)** and click **+ Add** → **Add role assignment**.
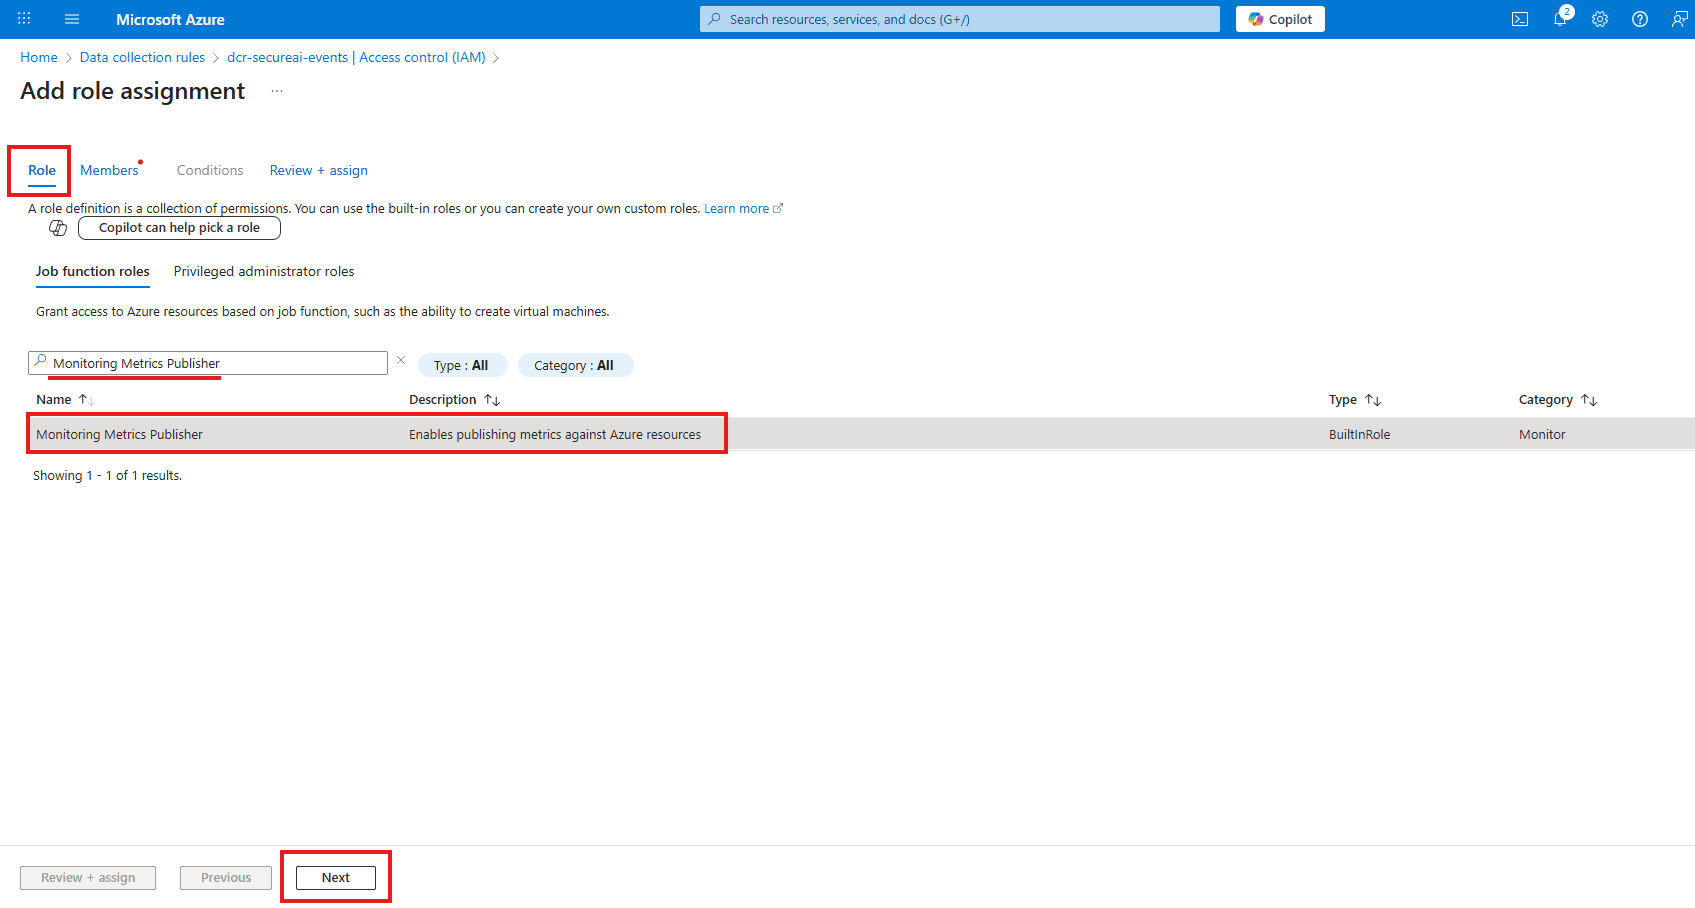
**Role**: Search for and select **Monitoring Metrics Publisher**.
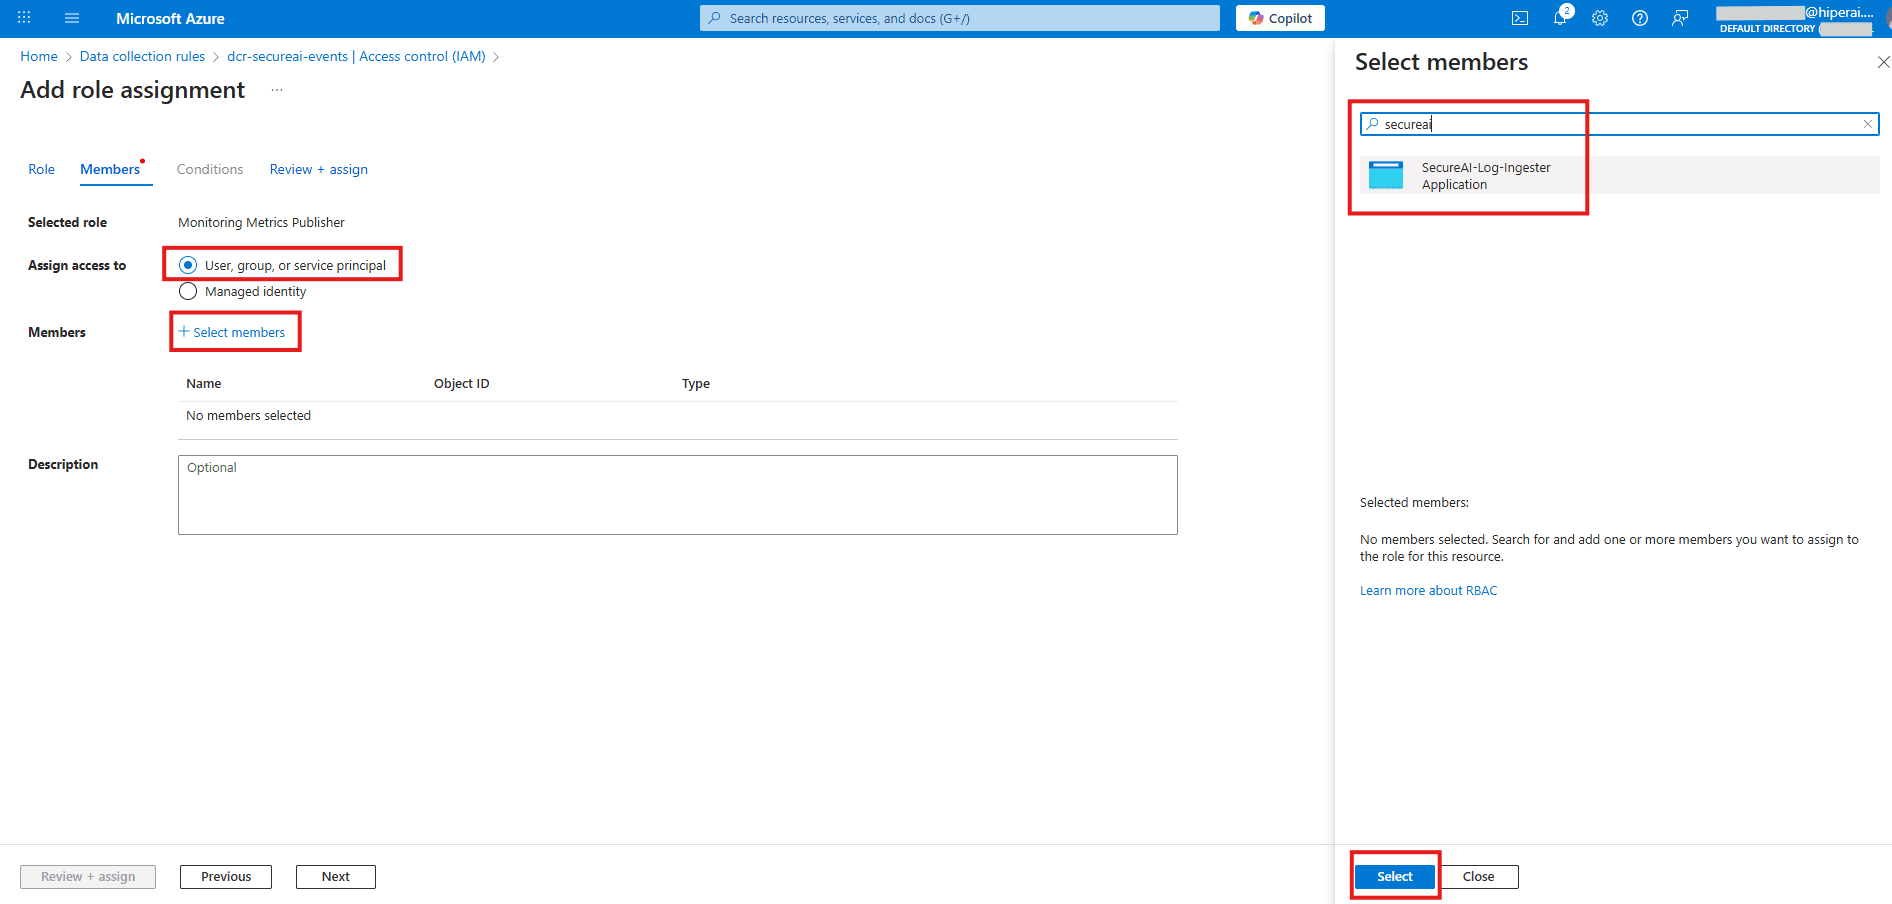
**Members**: Click **Select members** and search for your App Registration name (`SecureAI-Log-Ingester`). Select it.
Click **Review + assign**.
## Step 4: Finalize and Share Information
You're almost done. Just one final step.
### A. Gather the Information
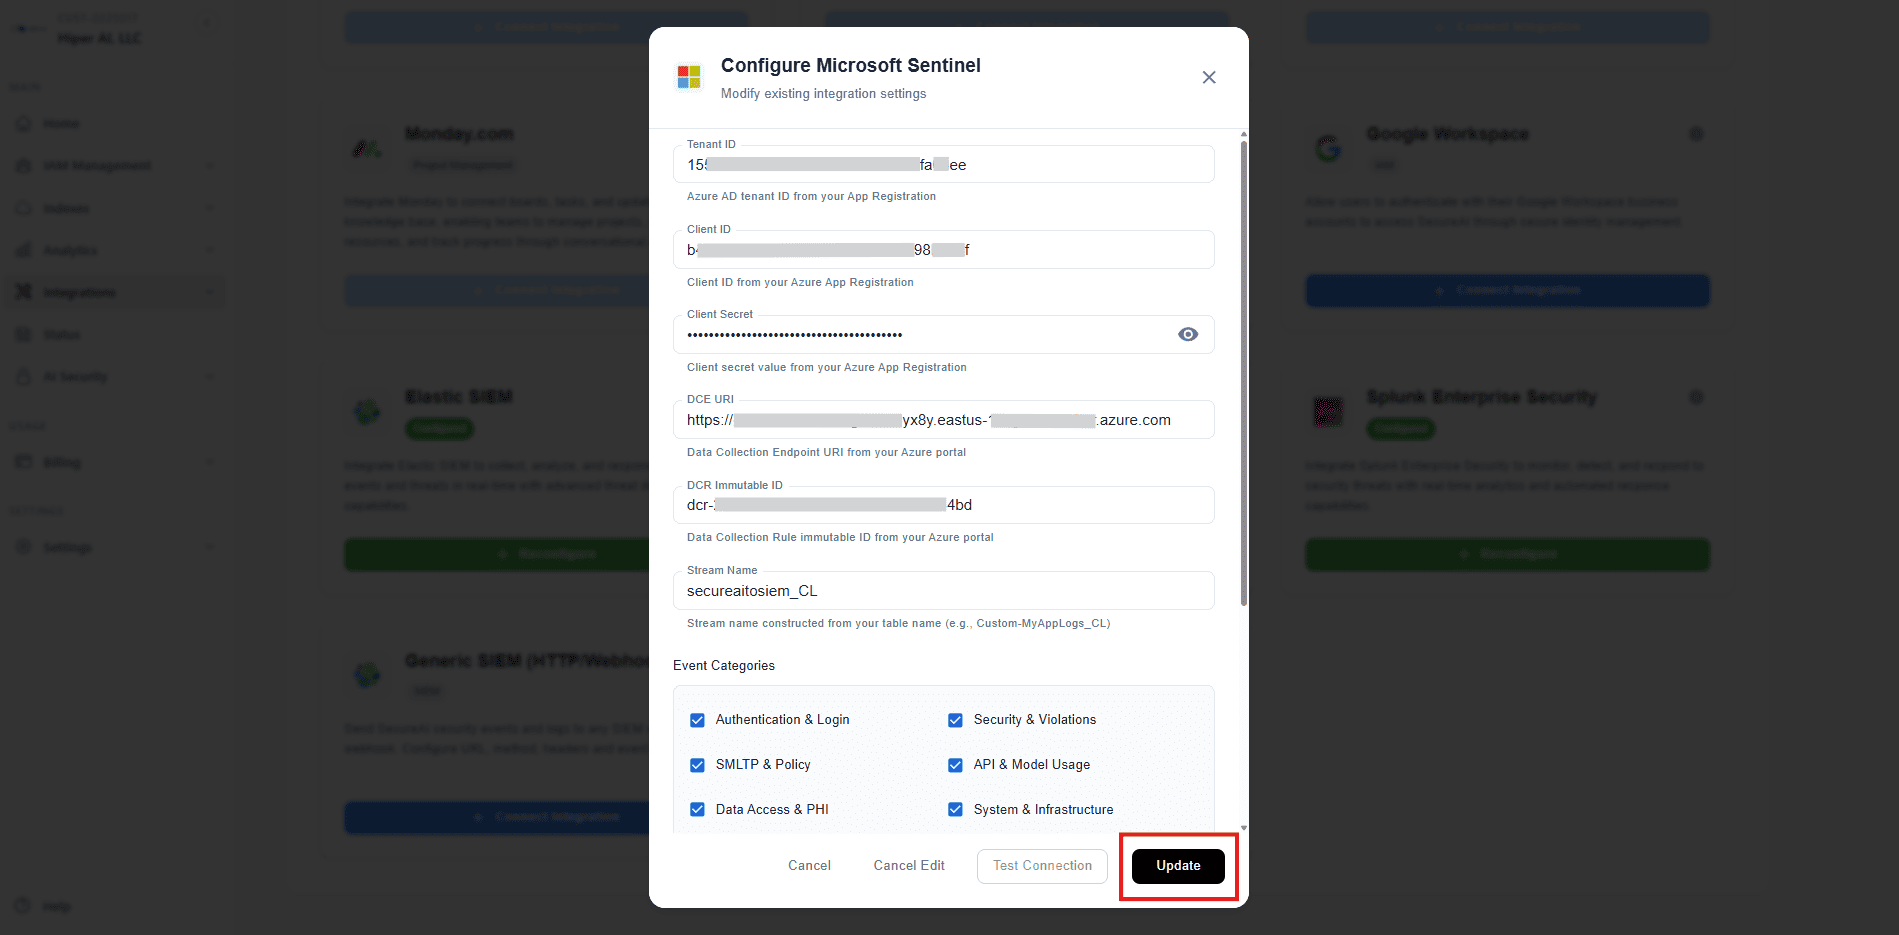
To complete the integration, the application needs the following six pieces of information:
1. **Tenant ID**: (From Step 1)
2. **Client ID**: (From Step 1)
3. **Client Secret**: (From Step 1)
4. **DCE URI**: (From Step 2A)
5. **DCR Immutable ID**: (Navigate to your DCR `dcr-secureai-events` and copy this from the JSON View)
6. **Stream Name**: This is a constructed value. The format is `Custom-{TableName}`. In our case, it will be: `Custom-secureaitosiem_CL`
### B. Configure the Application
Input these 6 values into your application's configuration settings.
## Step 5: Verify the Integration
Once you have entered the integration details into the SecureAI application, you can verify that the connection is working correctly.
### A. Test the Connection
Use the "Test Connection" button within our application. This will send a test event to your Microsoft Sentinel workspace.
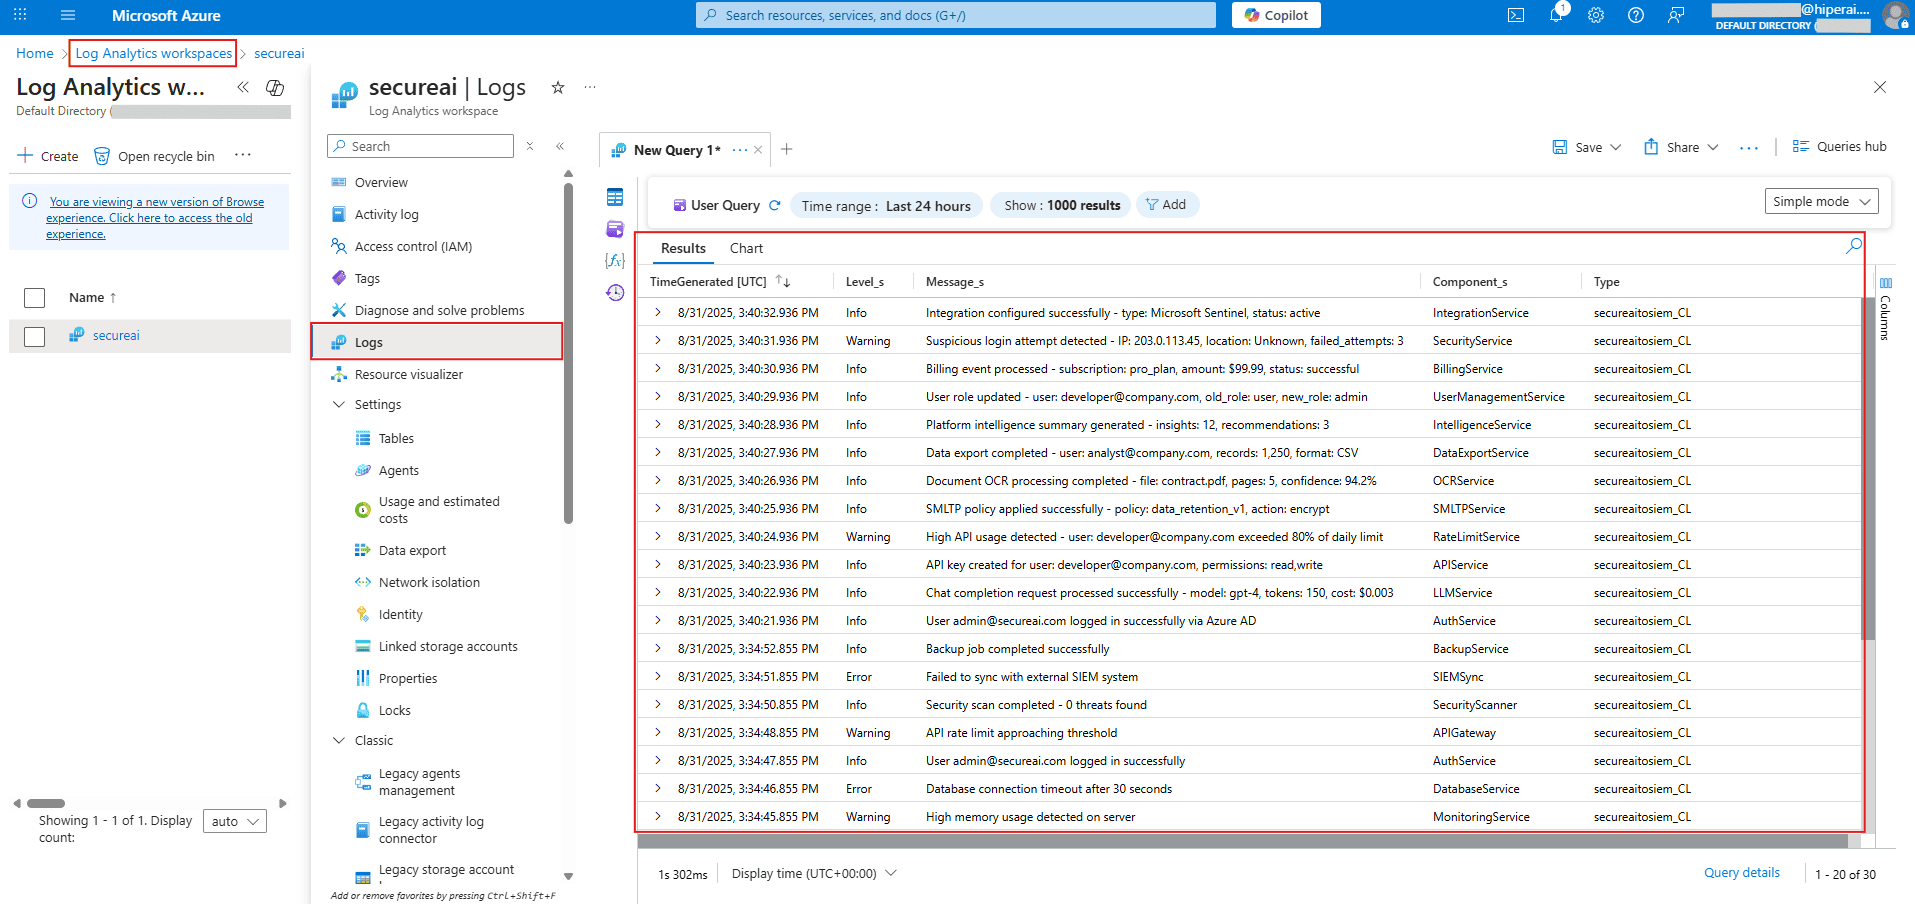
### B. Find the Test Event in Log Analytics
To see if the event arrived in Microsoft Sentinel, go to your Log Analytics Workspace and click on **Logs**.
Run the following query to see your incoming data:
```kql theme={null}
secureaitosiem_CL
| order by TimeGenerated desc
```
You should see your log data appearing with all columns (`TimeGenerated`, `Level_s`, `Message_s`, etc.) correctly populated. If so, your integration is a success! ✅
**Note**: Depending on network traffic and system load, it can sometimes take up to 10 minutes for logs to appear in Microsoft Sentinel.
## Done!
With these steps, your Microsoft Sentinel instance is fully configured to integrate with SecureAI 😎.