> ## Documentation Index
> Fetch the complete documentation index at: https://docs.hiperai.com/llms.txt
> Use this file to discover all available pages before exploring further.
# Microsoft Entra ID (SSO)
# Microsoft Entra ID (SSO) Integration
This guide will walk you through the process of configuring Microsoft Entra ID (formerly Azure Active Directory) for single sign-on (SSO) with SecureAI. You'll learn how to obtain the necessary credentials from Azure and submit them to complete the integration.
## Prerequisites
* Administrator access to Azure Portal
* An Azure Entra ID (Azure AD) tenant
* Administrator access to SecureAI
## Step 1: Create an Application in Azure Portal
1. Sign in to [Azure Portal](https://portal.azure.com)
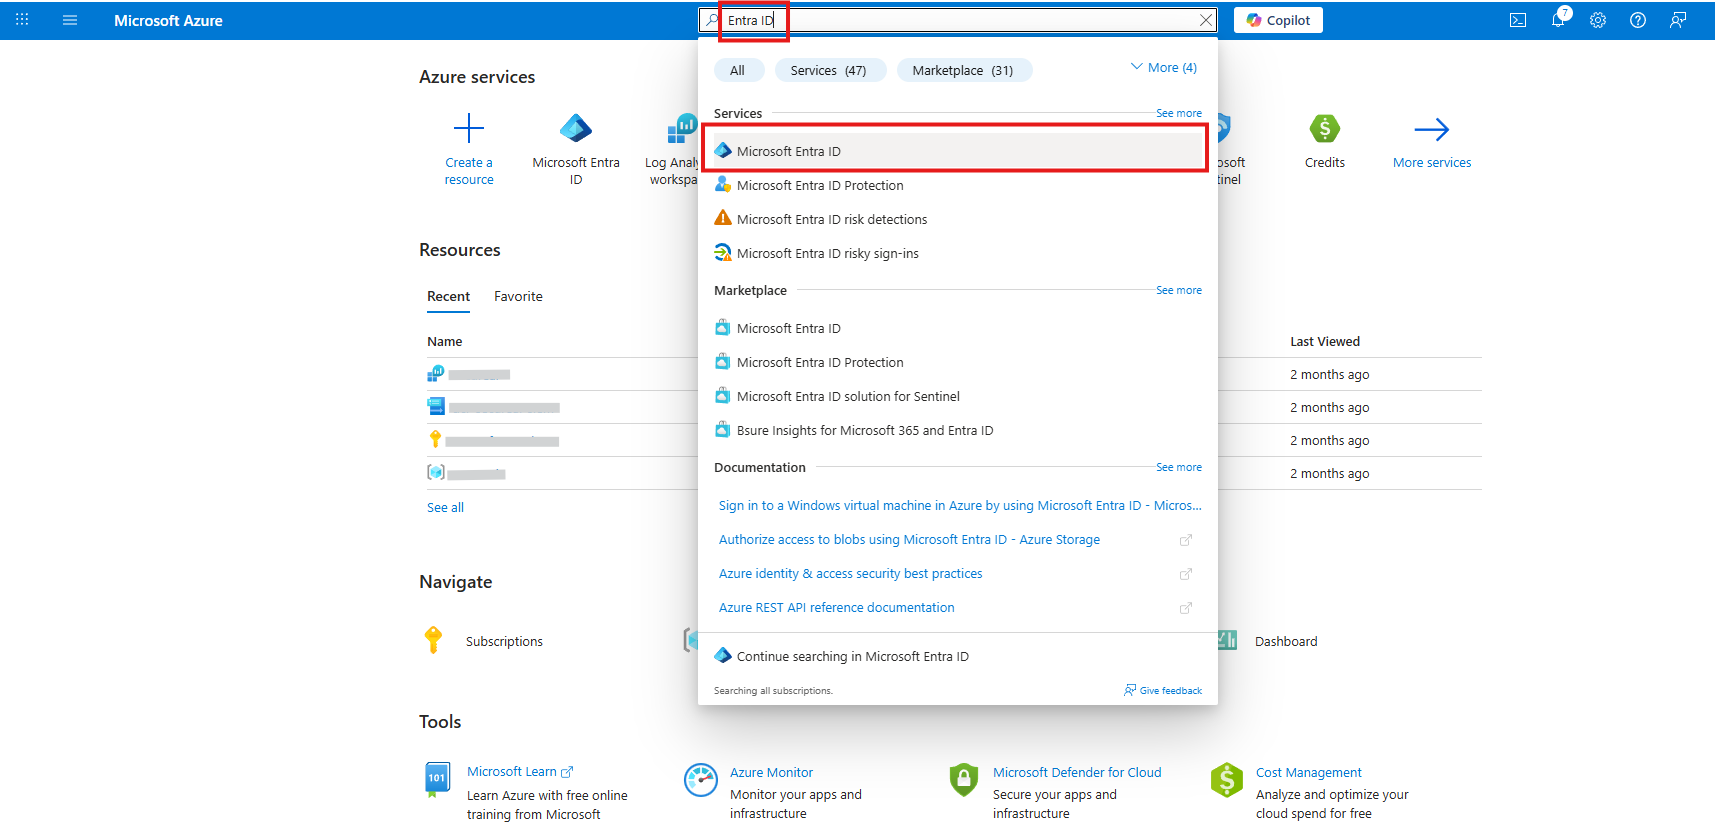
2. Search for and select **Azure Active Directory** or **Microsoft Entra ID**
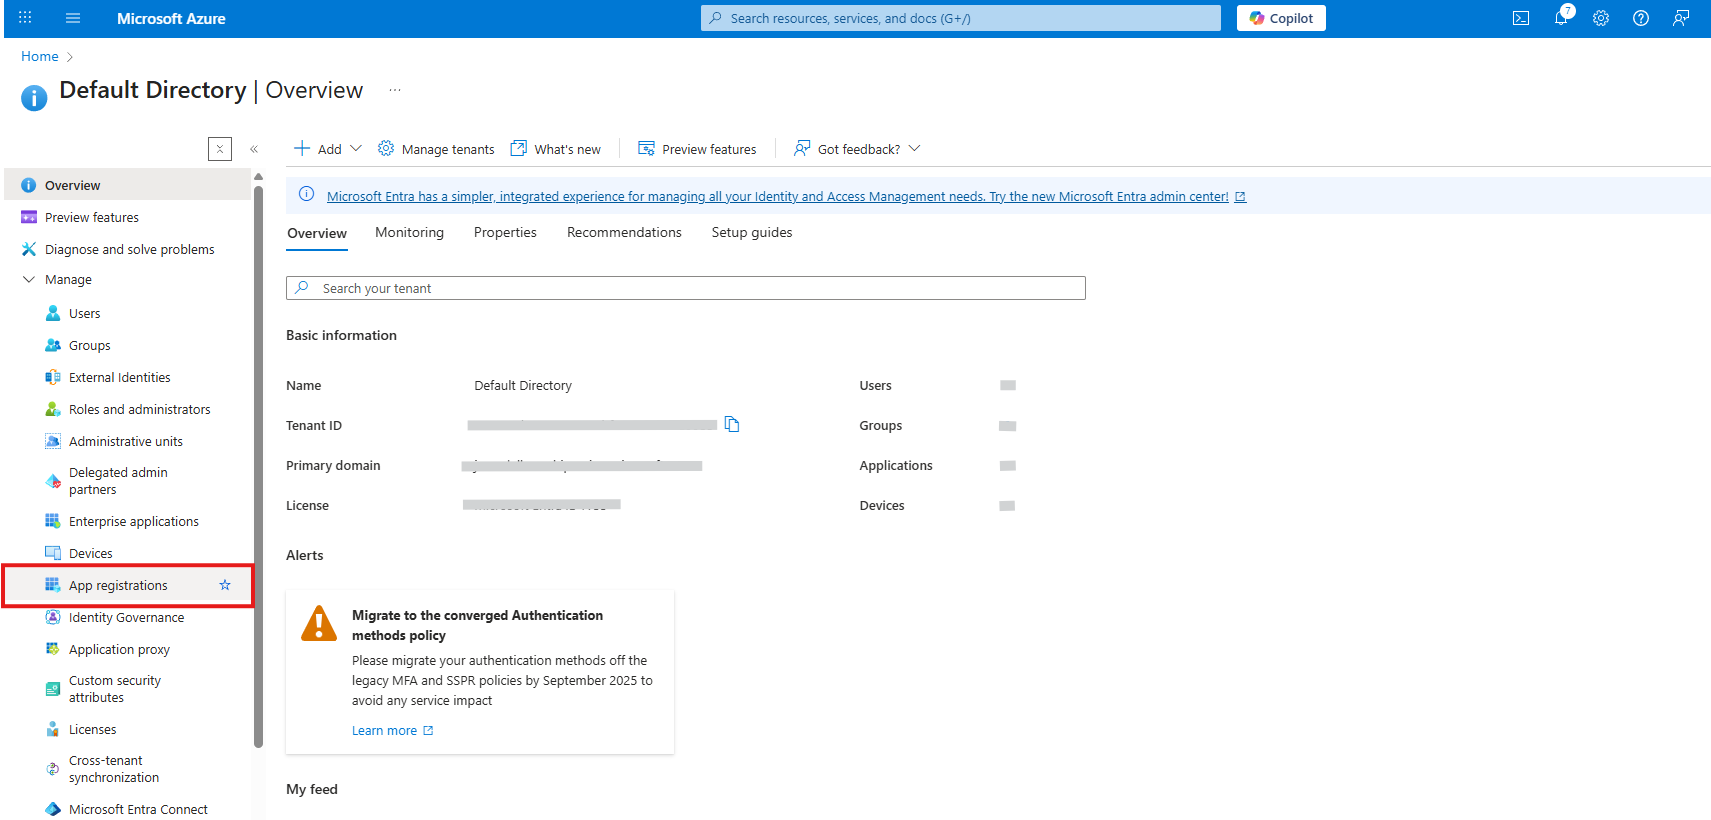
3. In the side menu, select **App registrations**
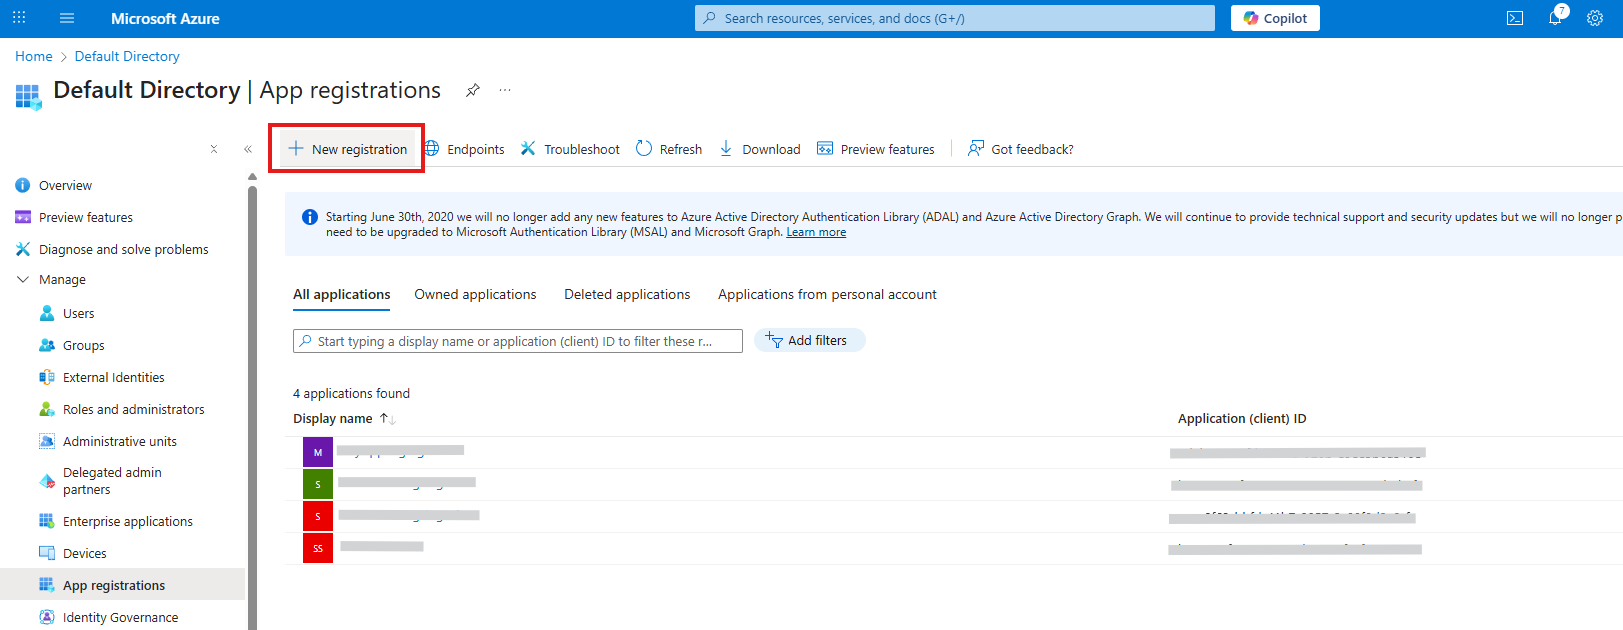
4. Click **+ New registration**
## Step 2: Configure the Application
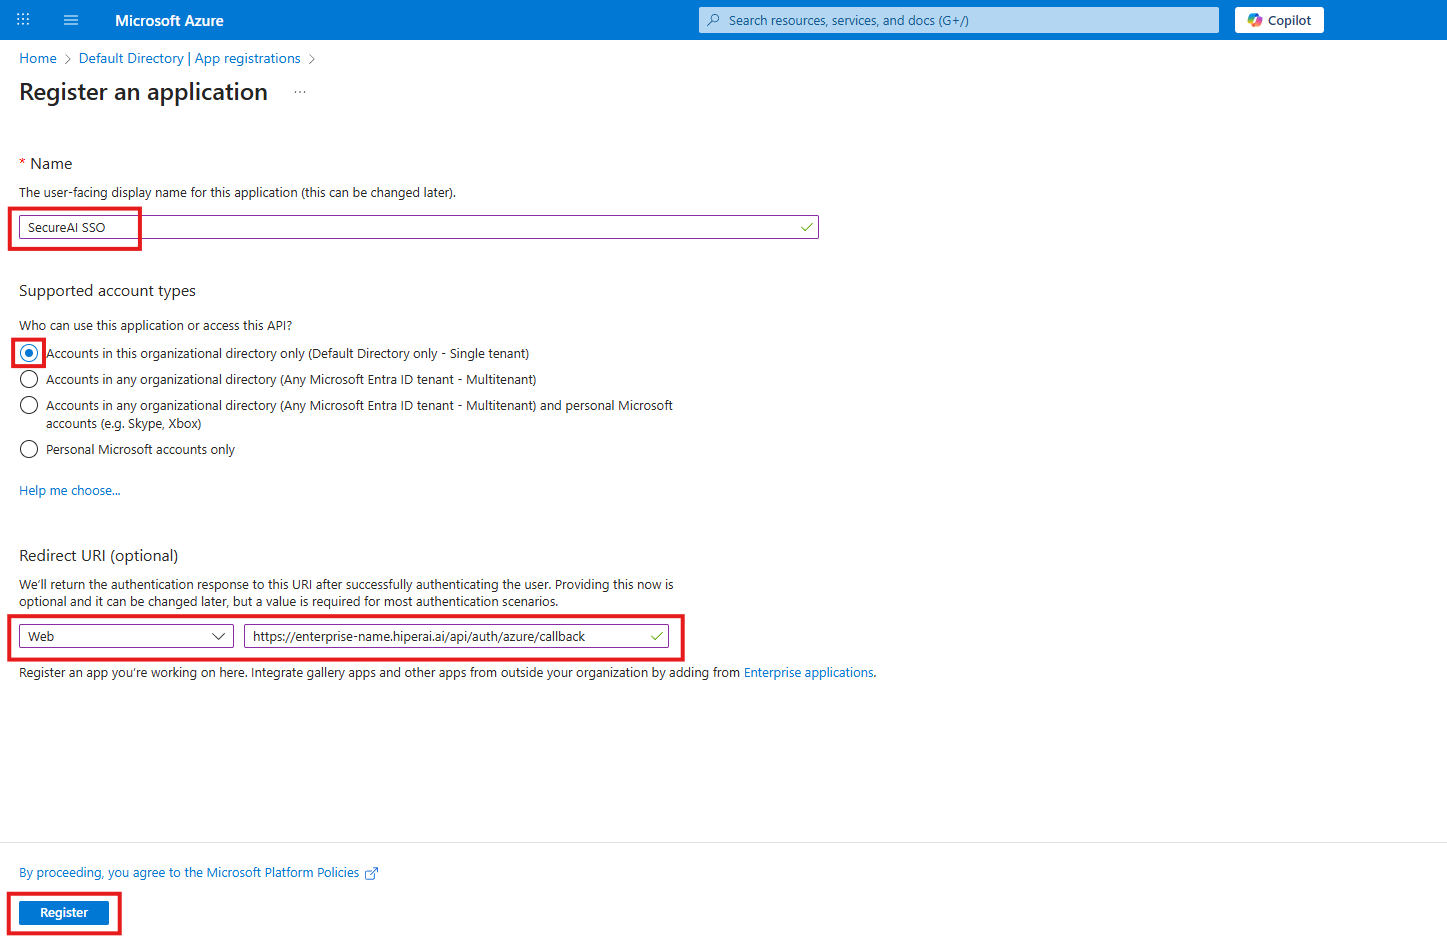
1. **Name**: Enter a descriptive name (e.g., "SecureAI SSO")
2. **Supported account types**:
* Select **Accounts in this organizational directory only**
* Or **Accounts in any organizational directory** if you need to support multiple organizations
3. **Redirect URI**:
* Platform: **Web**
* URI: `https://your-backend-domain.com/api/auth/azure/callback`
* **Note**: You will obtain this URL from your development team
4. Click **Register**
## Step 3: Get the Application (Client) ID
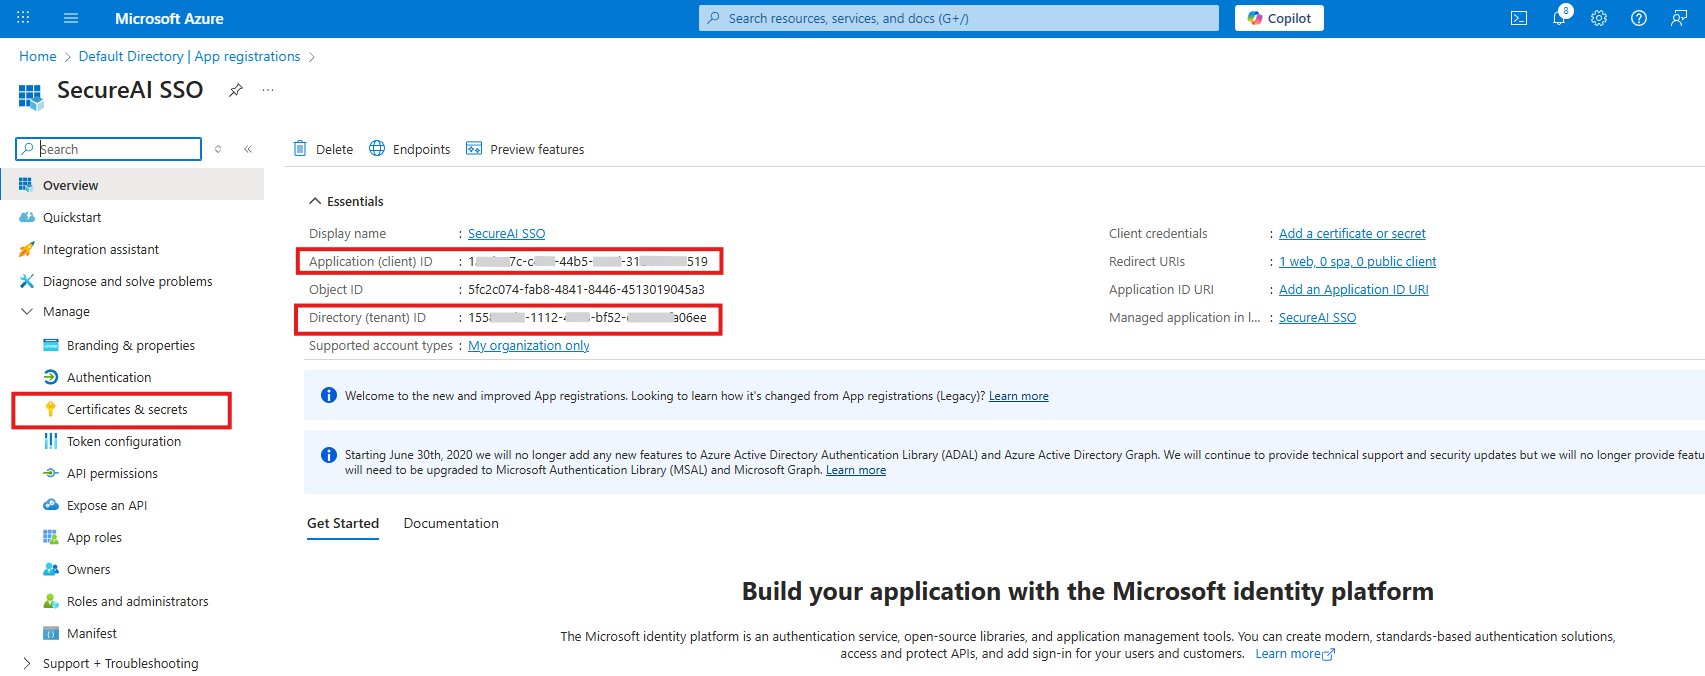
1. On the **Overview** page of your application
2. Copy the **Application (client) ID** value
* This is a GUID that looks like this: `b96ee19f-5a15-4a85-b936-****-****`
* **Save this value** - you will need it later
## Step 4: Get the Directory (Tenant) ID
1. On the same **Overview** page
2. Copy the **Directory (tenant) ID** value
* This is a GUID that looks like this: `155812d2-1112-46c8-bf52-****-****`
* **Save this value** - you will need it later
## Step 5: Create a Client Secret
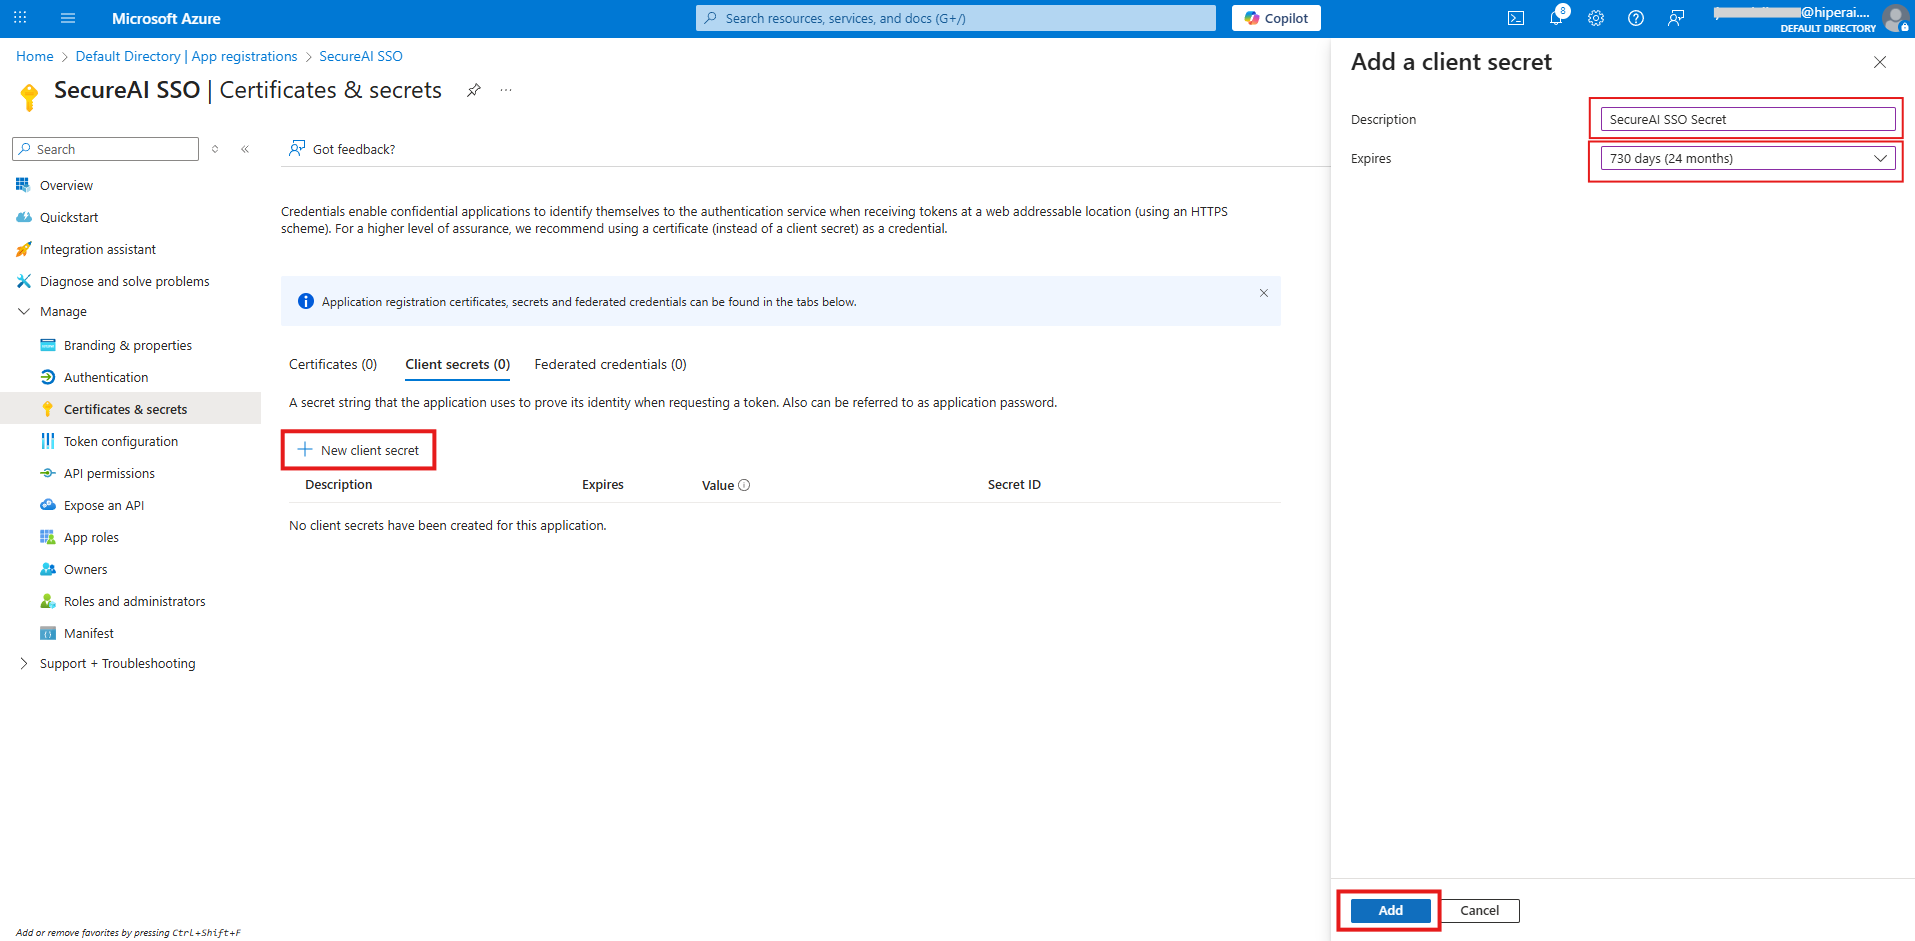
1. In your application's side menu, select **Certificates & secrets**
2. In the **Client secrets** section, click **+ New client secret**
3. **Description**: Enter a description (e.g., "SecureAI SSO Secret")
4. **Expires**:
* Select an expiration period (recommended: 24 months)
* **IMPORTANT**: Make sure to renew the secret before it expires
5. Click **Add**
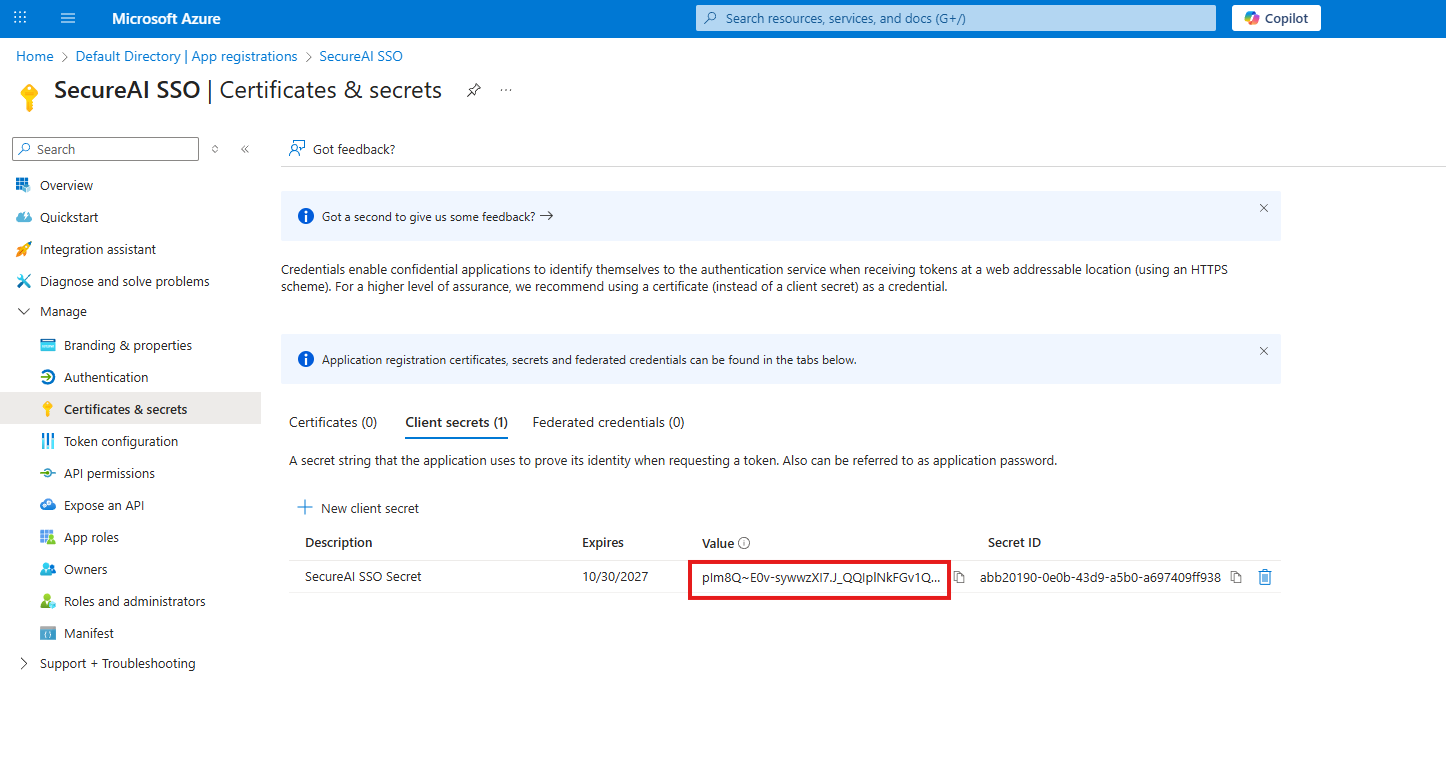
6. **IMMEDIATELY** copy the secret's **Value**
* It will look like this: `plm8Q~************************************`
* **WARNING**: This value is only shown once. If you lose it, you will need to create a new secret
* **Store this value securely**
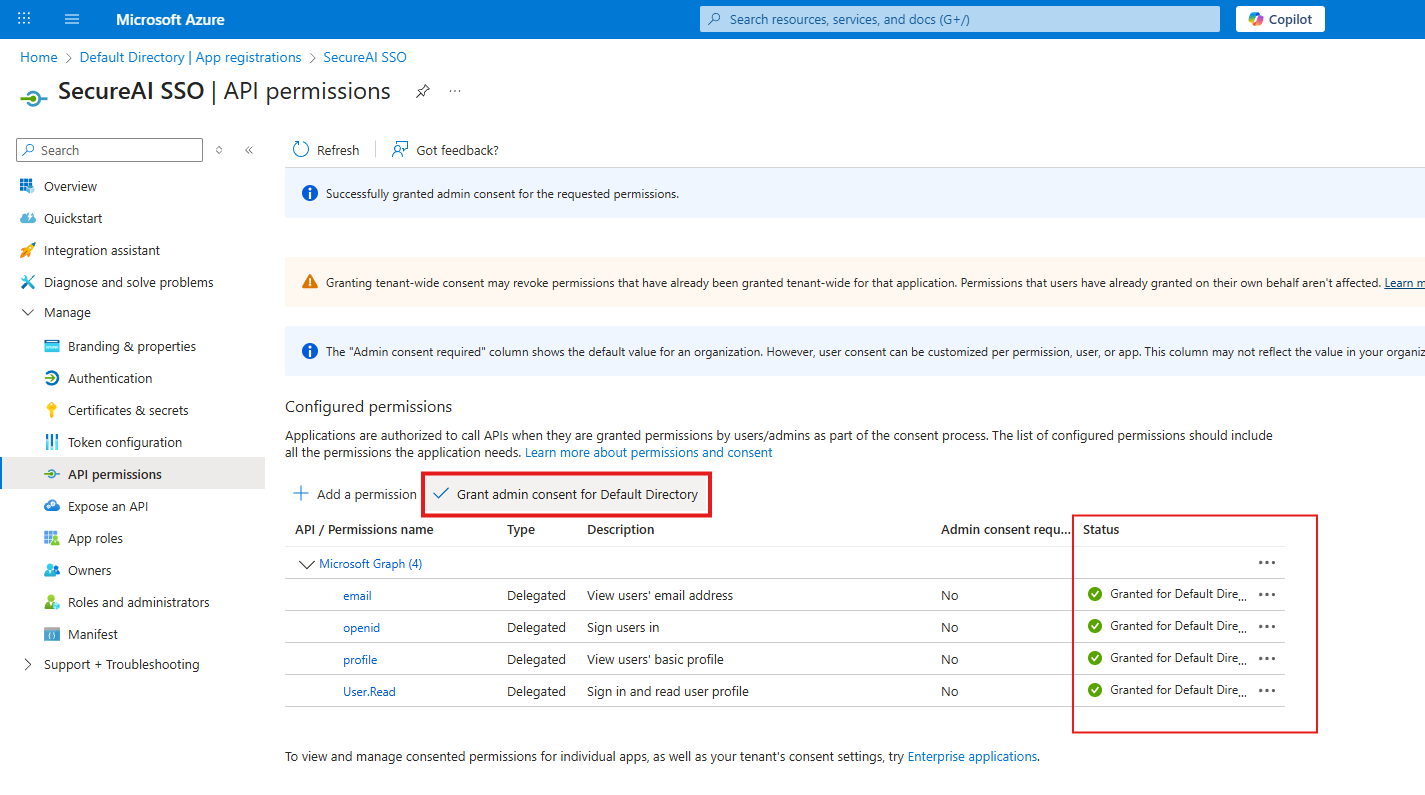
## Step 6: Configure API Permissions
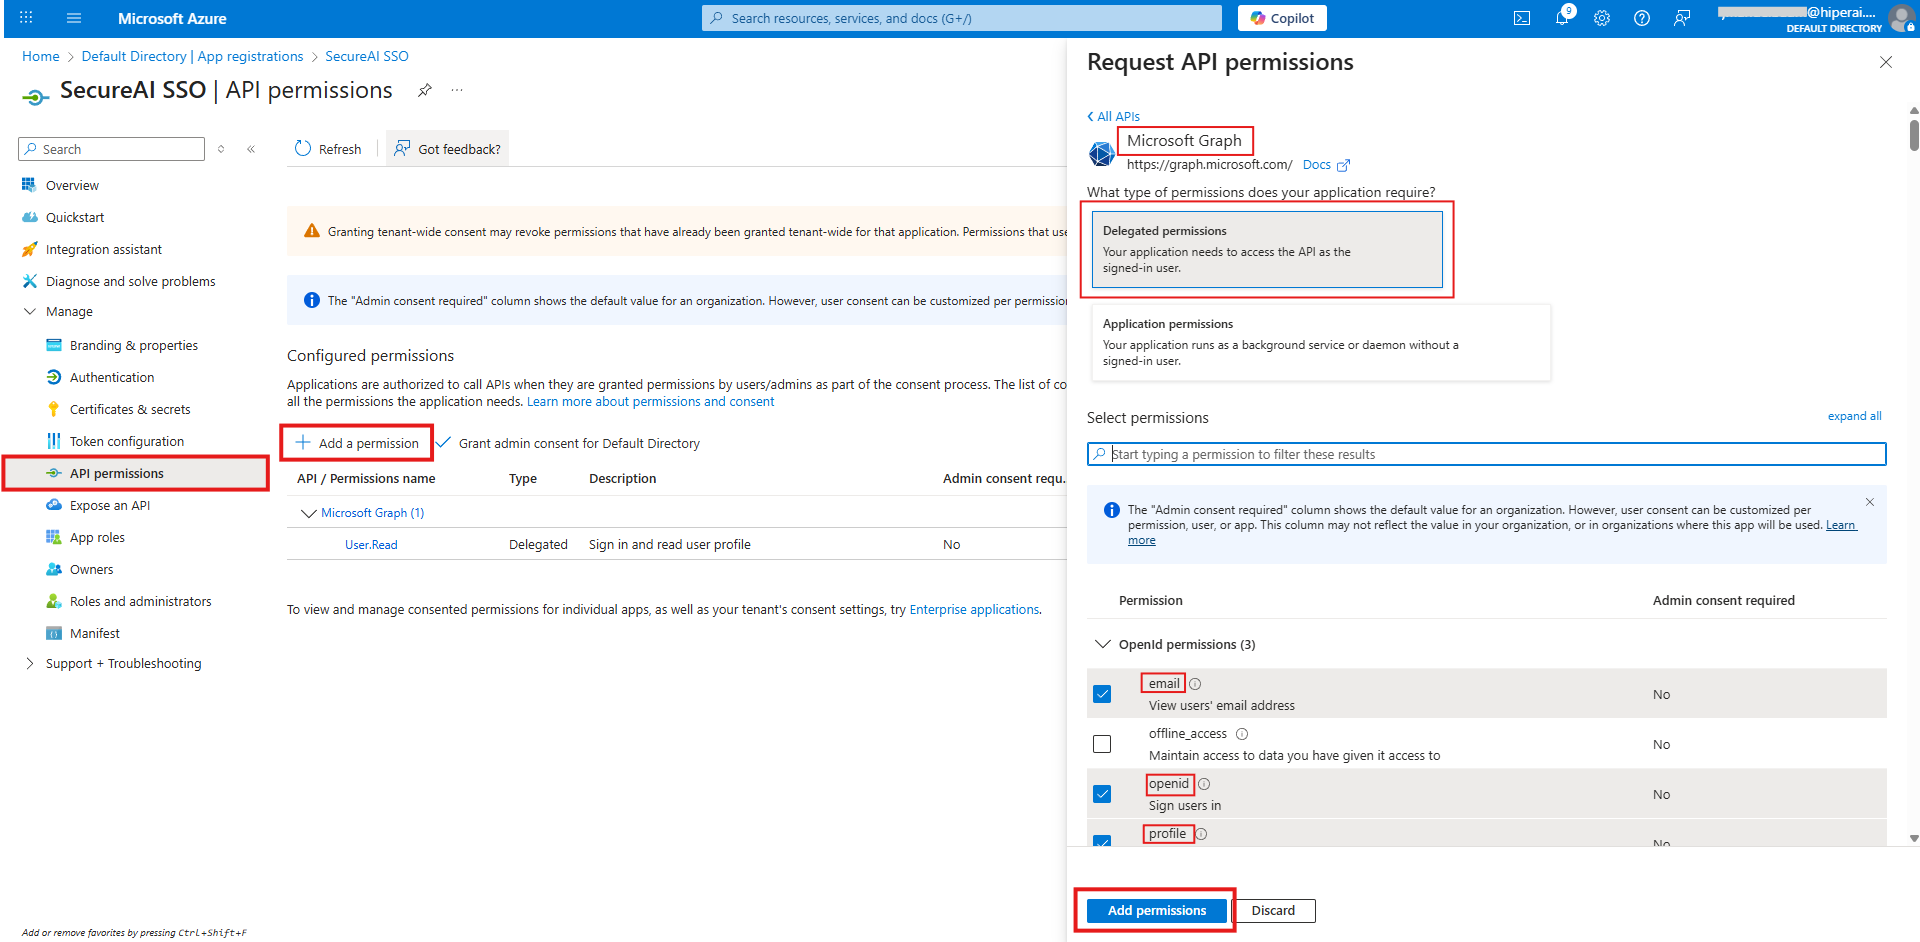
1. In the side menu, select **API permissions**
2. Click **+ Add a permission**
3. Select **Microsoft Graph**
4. Select **Delegated permissions**
5. Check the following permissions:
* `openid` (automatically included)
* `profile`
* `email`
6. Click **Add permissions**
7. If your organization requires administrator consent:
* Click **Grant admin consent**
## Step 7: Send Variables to the Hiper AI Team
Once you have created the application in Azure and followed the steps above, you will have obtained three critical pieces of information:
1. **Client ID** (from Step 3)
2. **Tenant ID** (from Step 4)
3. **Client Secret Value** (from Step 5)
You must send these three values to the Hiper AI team to complete the SSO integration.
### A. Access the Admin Panel
1. Log in to your SecureAI instance as an administrator
2. Navigate to `https://{enterprise.name}.hiperai.ai/admin/home`
3. In the upper right corner, click on your admin profile picture
4. This will open a dropdown menu with various options
### B. Submit the Support Request
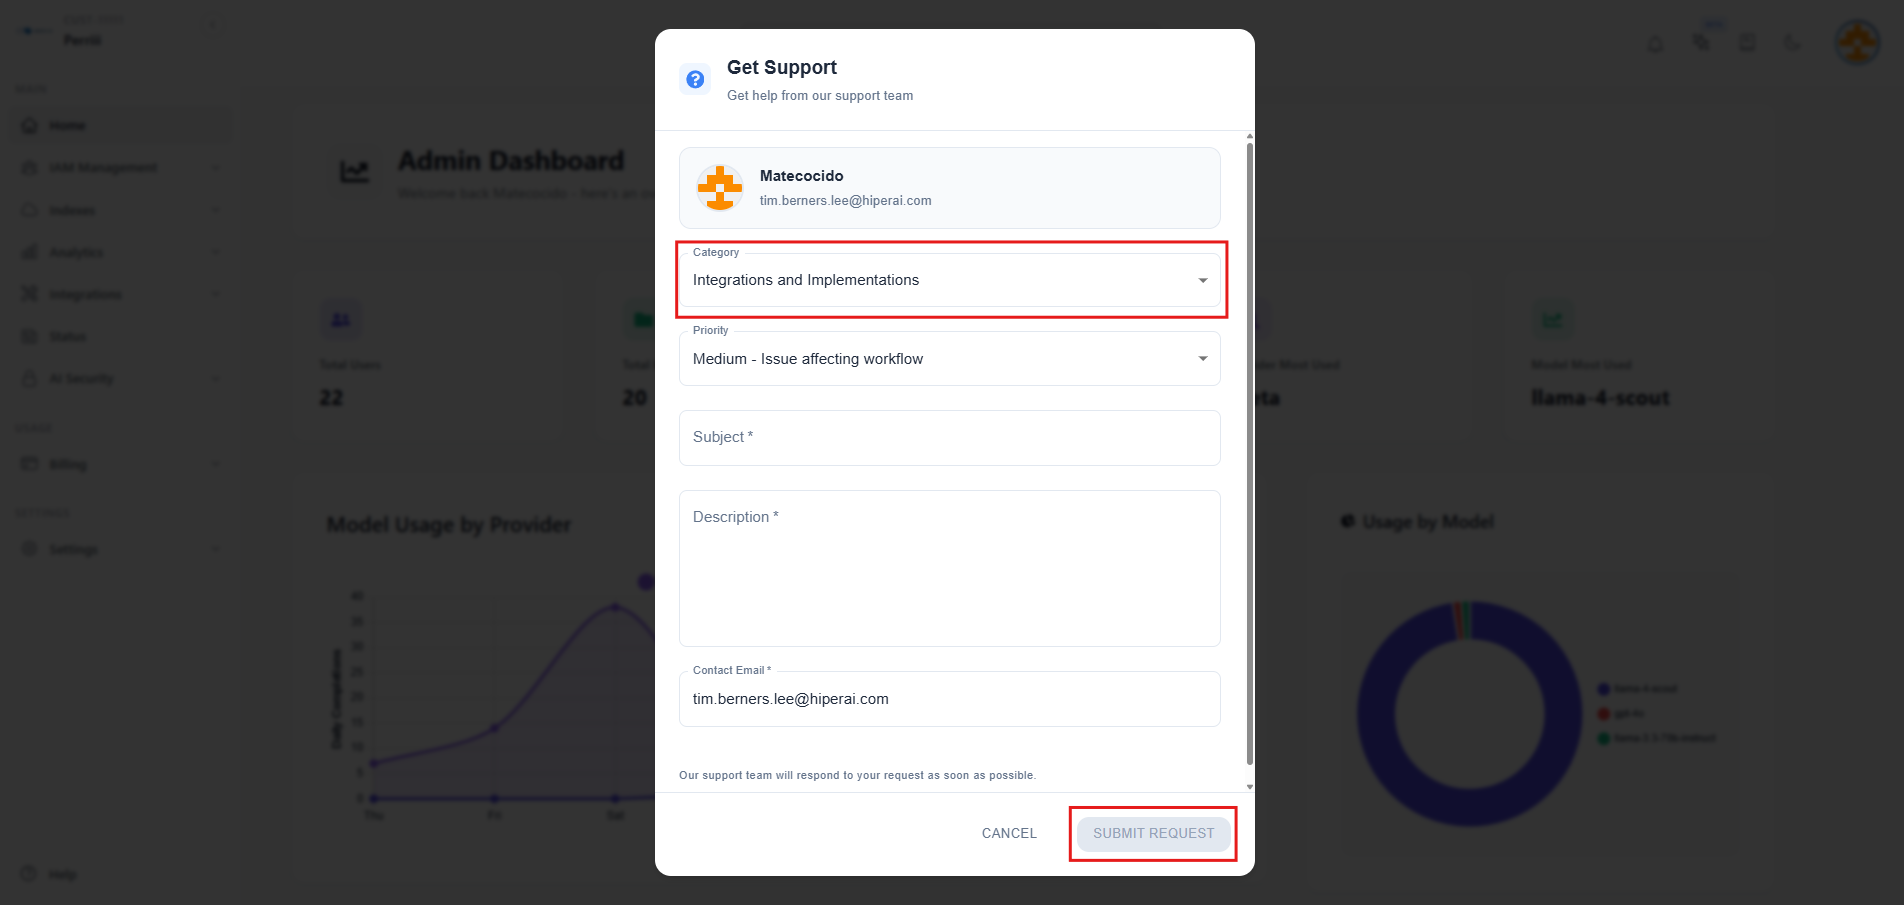
1. Click **"Get Support"** from the dropdown menu
2. A popup window will appear with a support ticket form
3. Fill in the form with the following information:
* **Category**: Select **"Integrations and Implementations"**
* **Subject**: Enter **"Microsoft Entra ID SSO Integration"**
* **Description**: Paste the three values you copied during the setup process:
* Client ID (Application ID)
* Tenant ID (Directory ID)
* Client Secret Value
4. Click the **"Submit request"** button
### C. Wait for Confirmation
* You will receive an email confirmation within **24 to 72 hours** (depending on availability)
* The email will confirm that your SSO has been successfully configured
* Once configured, you will be able to access your SecureAI instance using the **"Continue with Azure EntraID"** login button on the sign-in page
**Important**: Keep your credentials secure until the integration is complete. Do not share them through insecure channels.
## User Configuration
### Existing Users
Users who already have accounts in SecureAI (regardless of whether they use basic authentication) **do not need to be recreated**. They can continue using their existing accounts and will also be able to sign in using Azure Entra ID SSO once it's configured.
**Important**: The user's email in Azure must match exactly with the email in SecureAI for SSO to work.
### Creating New SSO Users
For new users who should access SecureAI exclusively through SSO:
1. Navigate to **User Management** in the SecureAI admin panel
2. Click to create a new user
3. When creating the user, select the **"Business Account / SSO"** option
4. This configuration ensures that:
* The new user **will not receive an email** to generate a password
* The user will be able to access SecureAI **directly using the Azure Entra ID SSO** login button
* The user's email in Azure must match exactly with the email entered in SecureAI
## Troubleshooting
### Error: "redirect\_uri value must be a valid absolute URI"
* Verify that the Redirect URI in Azure matches exactly with what is configured on the server
* Make sure to include `https://` or `http://` as appropriate
### Error: "User not found in SecureAI database"
* The user must be previously registered in SecureAI
* Contact the SecureAI administrator to create the user account
### Error: "Invalid client secret"
* The secret may have expired
* Create a new client secret and update the configuration
## Client Secret Renewal
The client secret has an expiration date. Before it expires:
1. Create a new client secret following Step 5
2. Provide the new value to your development team
3. They will update the configuration without interrupting the service
## Support
If you encounter problems during configuration:
1. Verify that you have administrator permissions in Azure
2. Contact your development team with:
* Screenshots of the errors
* The IDs you obtained (without the secret)
* The complete error message