> ## Documentation Index
> Fetch the complete documentation index at: https://docs.hiperai.com/llms.txt
> Use this file to discover all available pages before exploring further.
# Google Workspace (SSO)
# Google Workspace (SSO) Integration
This guide will walk you through the process of configuring Google Workspace for single sign-on (SSO) with SecureAI. You'll learn how to obtain the necessary credentials from Google Cloud Console and submit them to complete the integration.
## Prerequisites
* Administrator access to Google Cloud Console
* A Google Workspace account for your organization
* Access to your organization's Google Workspace admin console (if using domain restrictions)
* Administrator access to SecureAI
## Step 1: Create a Project in Google Cloud Console
1. Sign in to [Google Cloud Console](https://console.cloud.google.com)
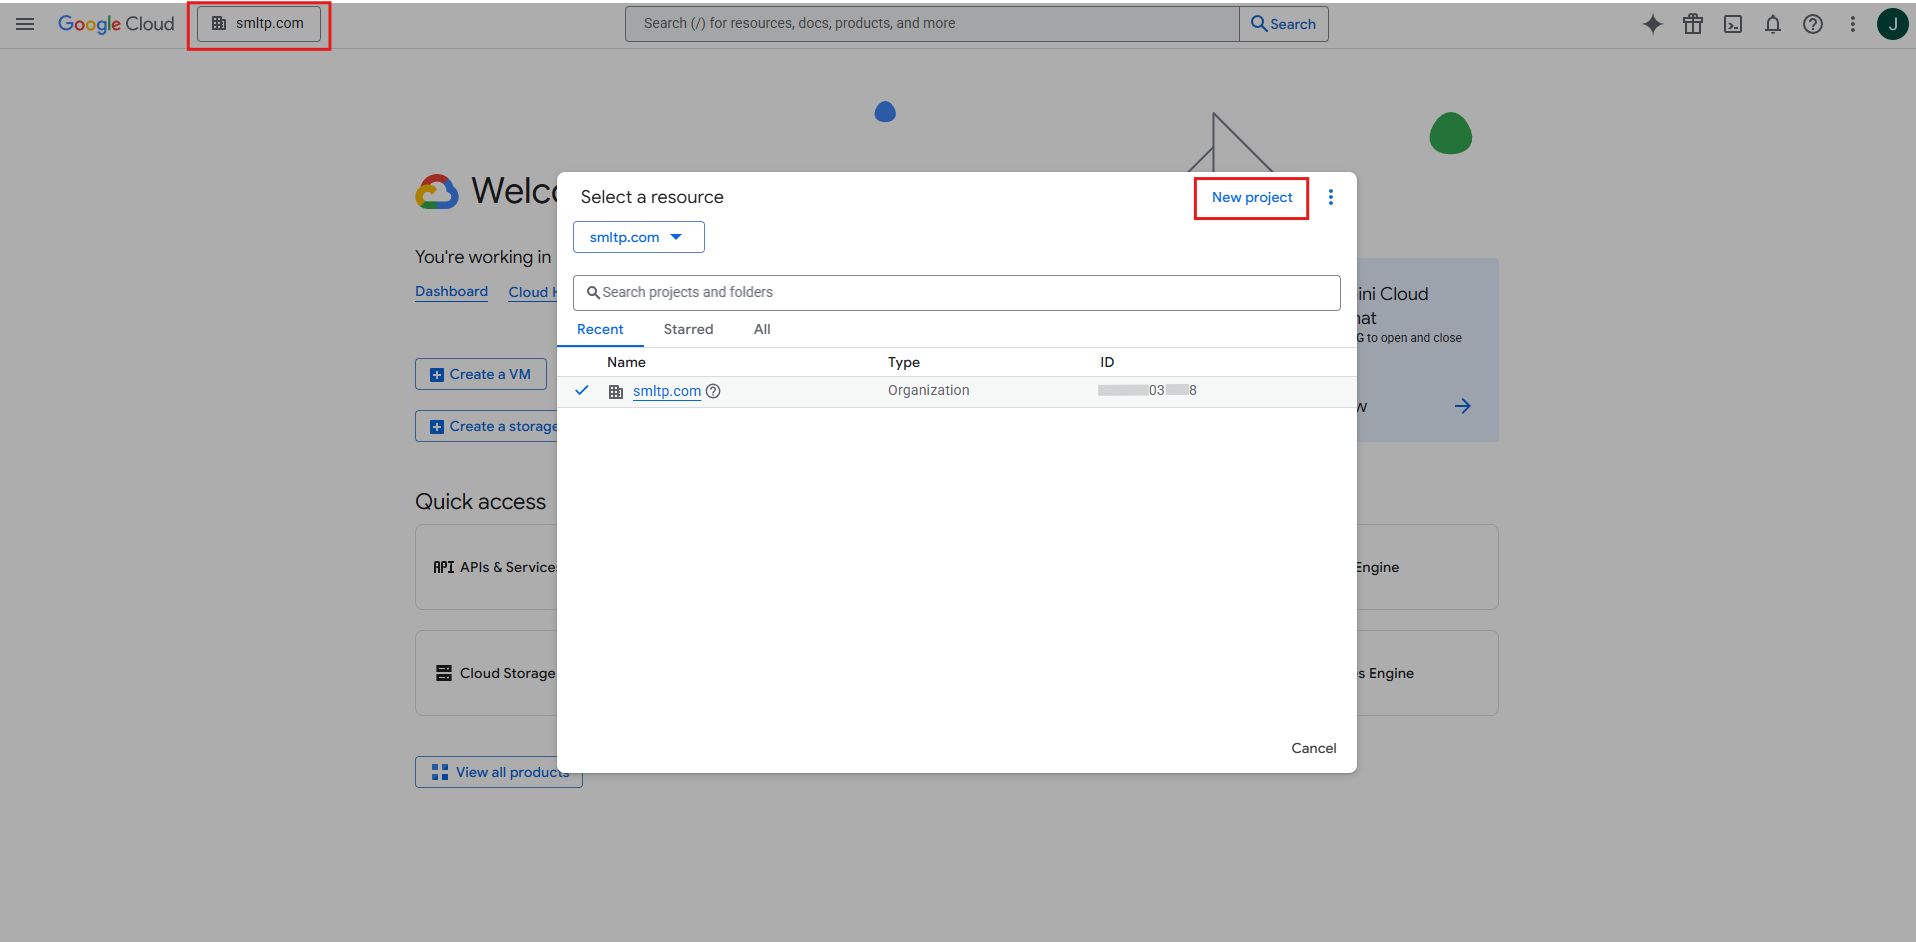
2. Click on the project dropdown at the top of the page
3. Click **New Project**
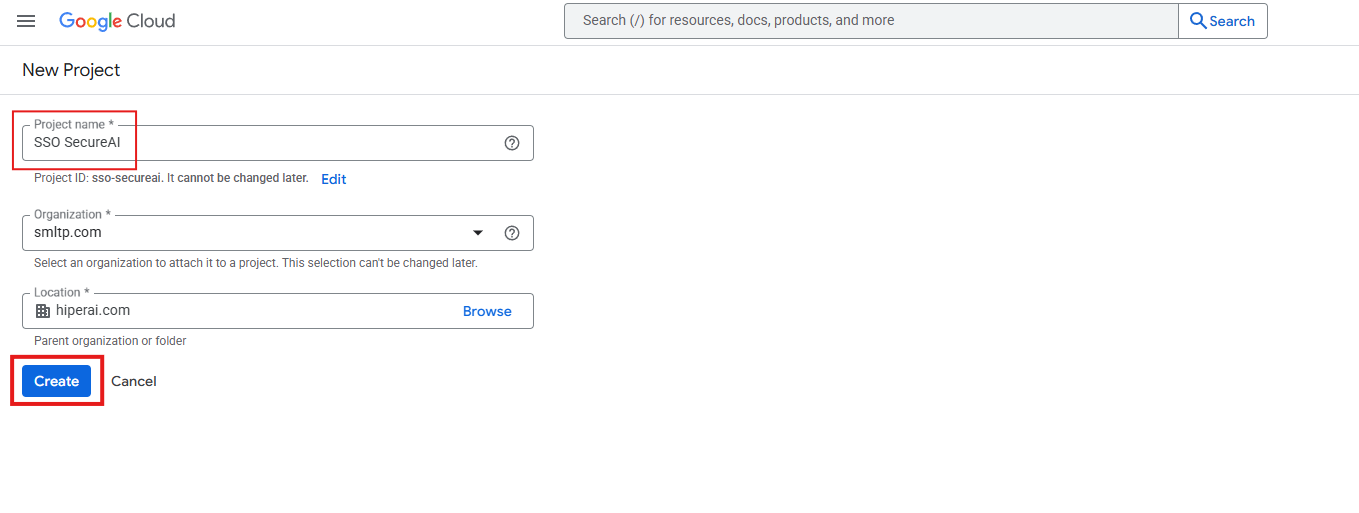
4. Enter a project name (e.g., "SecureAI SSO")
5. Click **Create**
## Step 2: Enable the Google+ API (if needed)
1. In your project, go to **APIs & Services** > **Library**
2. Search for "Google+ API" or "Google Identity"
3. Click on it and click **Enable** (if not already enabled)
4. **Note**: Modern Google OAuth may not require this, but enabling it ensures compatibility
## Step 3: Configure the OAuth Consent Screen
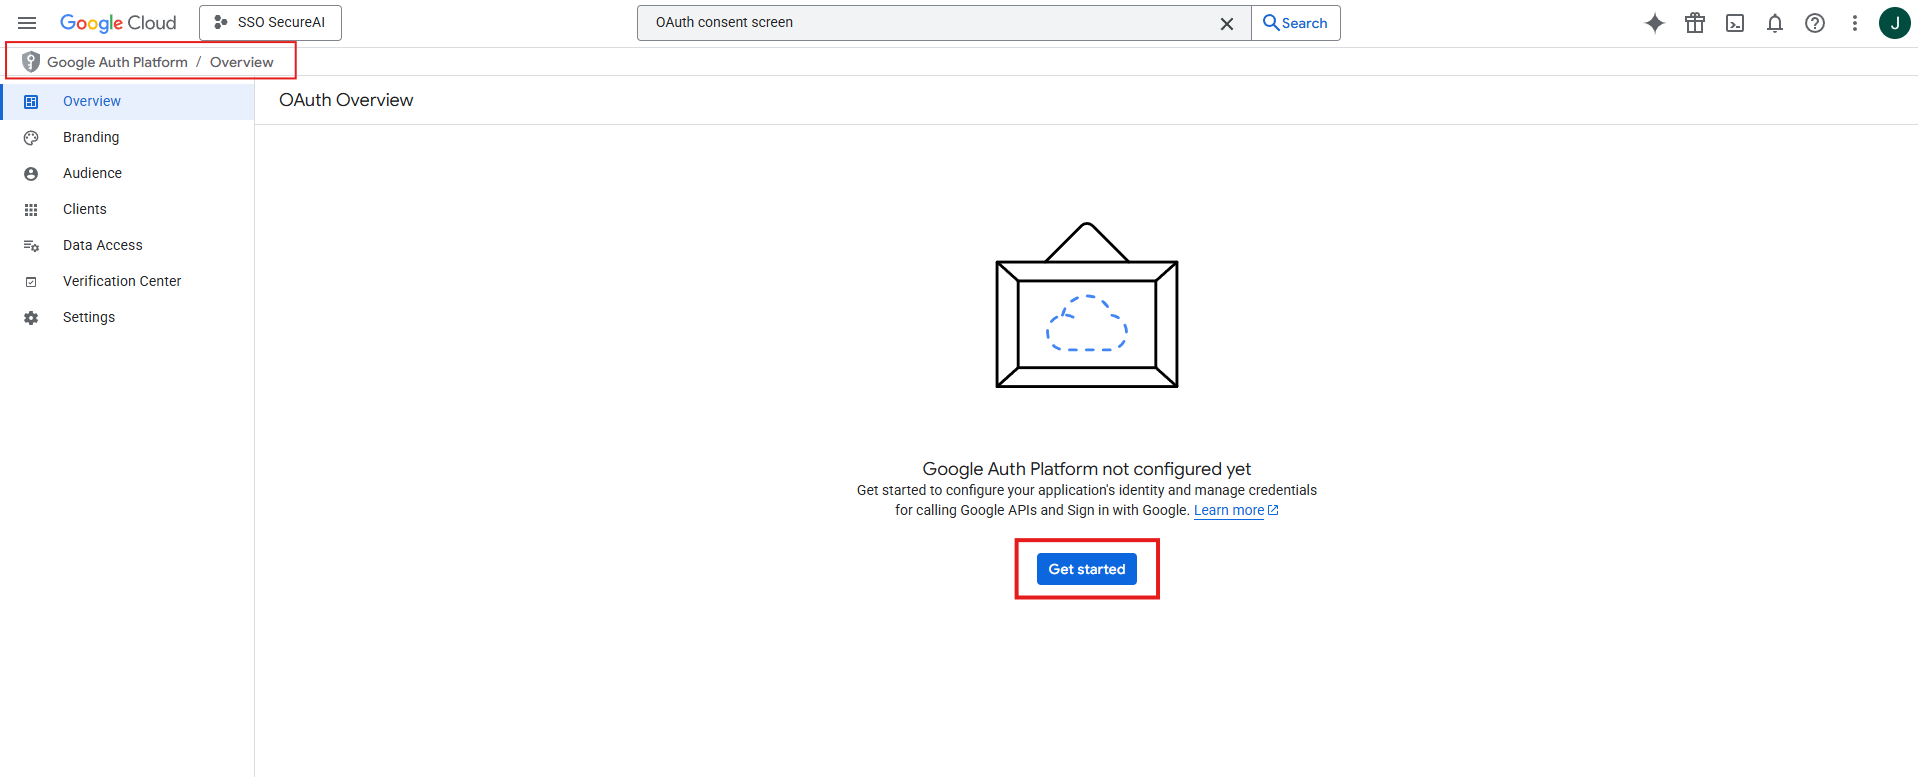
1. Go to **APIs & Services** > **OAuth consent screen**
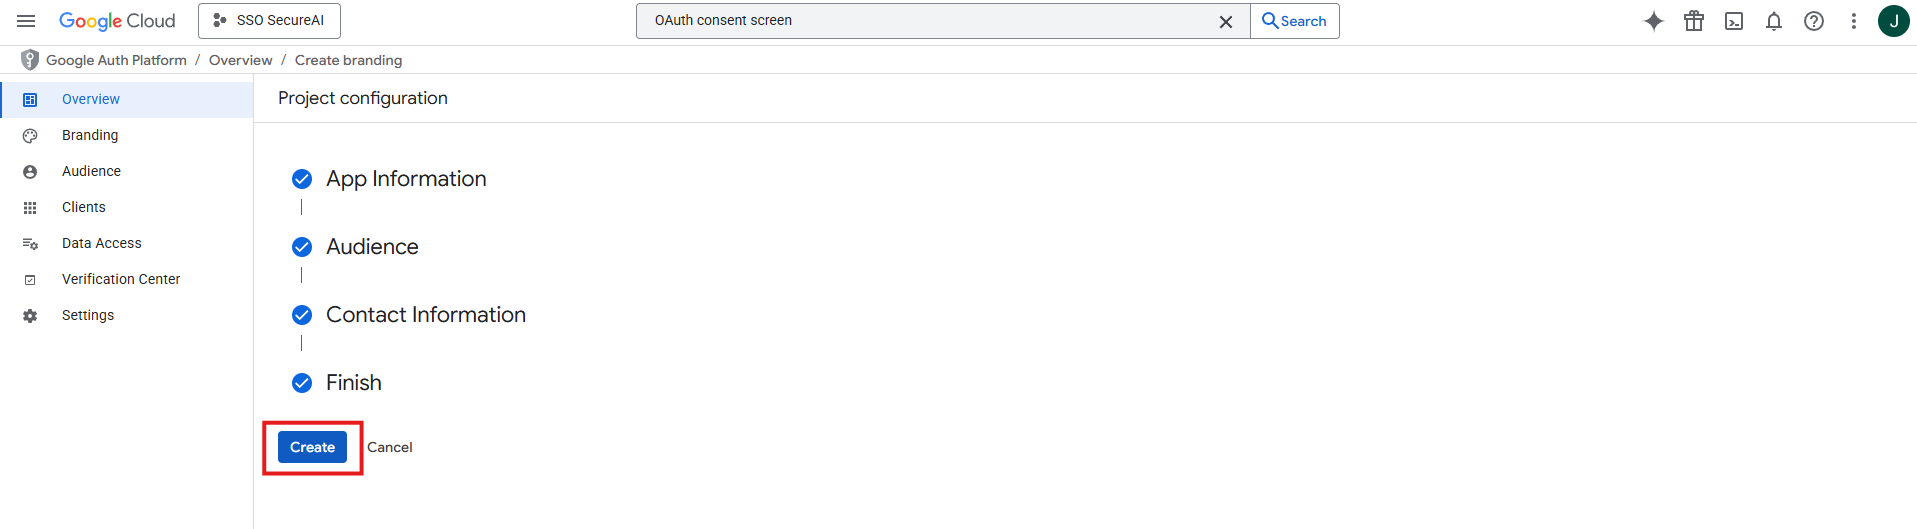
2. Fill in the required information:
* **App name**: Enter a name (e.g., "SecureAI")
* **User support email**: Select a support email address
* **Contact information**: Add a contact email address
3. Choose **User Type**:
* **Internal**: Only for users in your Google Workspace organization (recommended for company use)
* **External**: For users outside your organization
4. Click **Create**
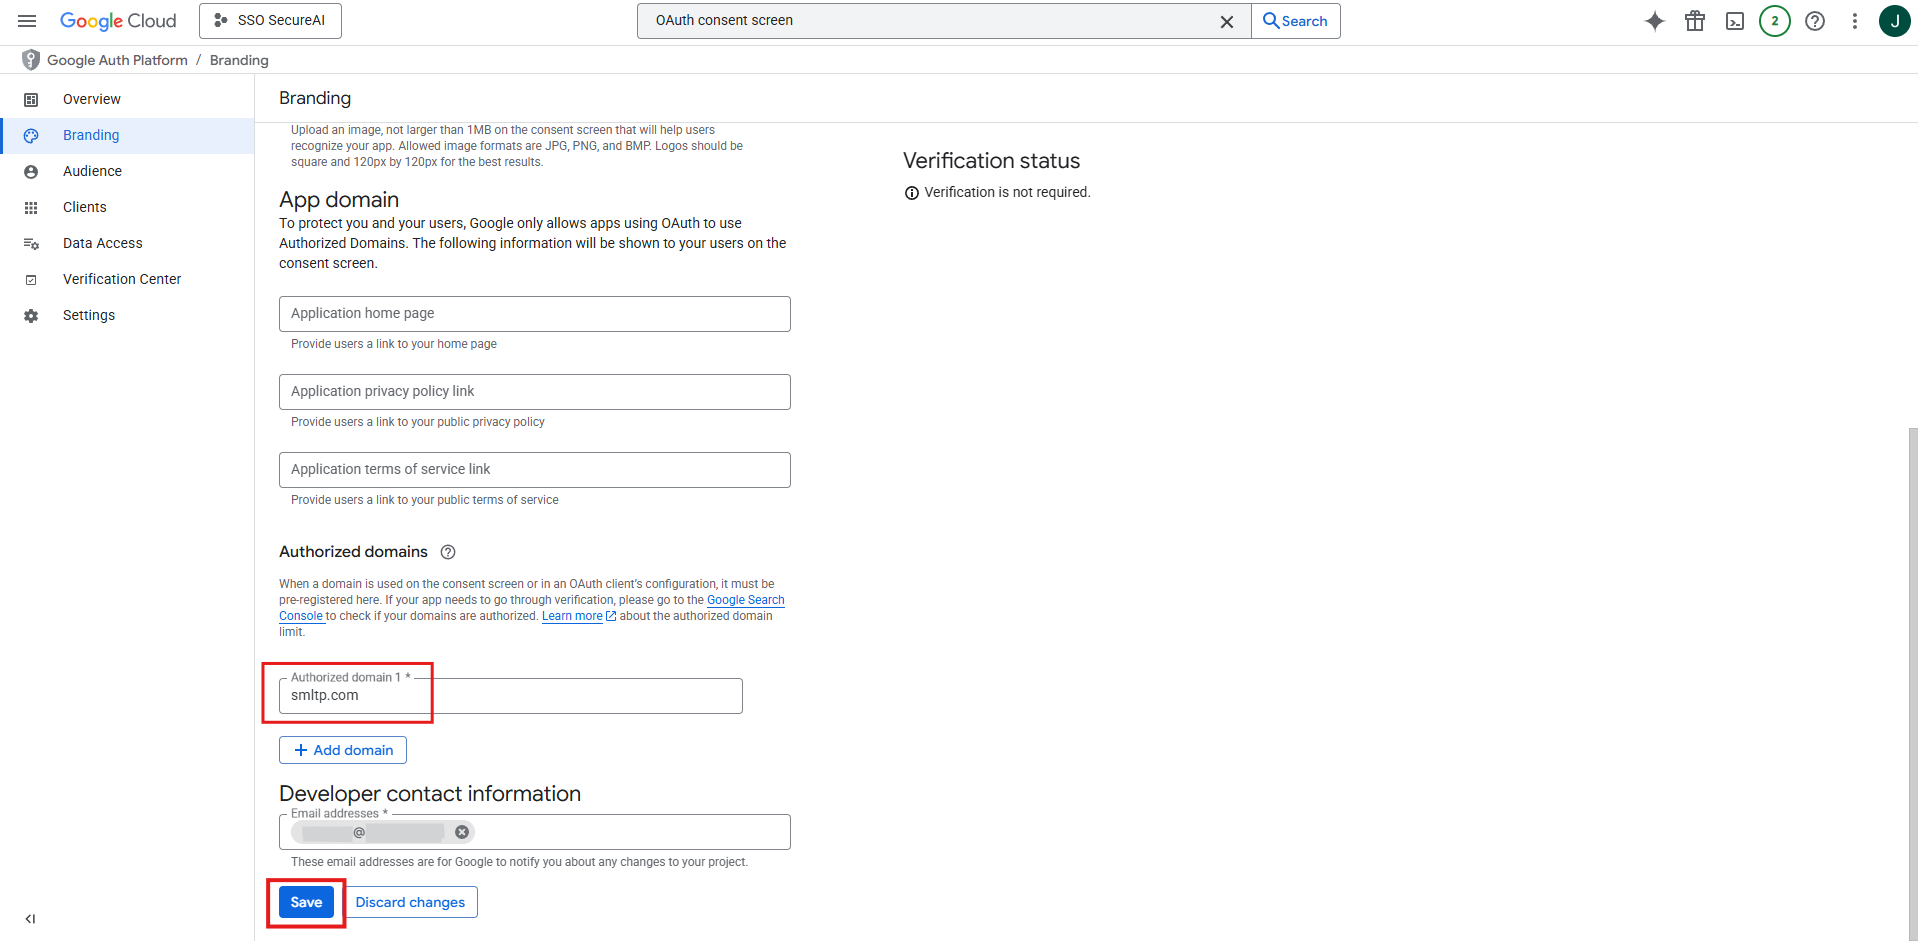
5. **Branding**:
* Go to the **Branding** section in the left menu
* Find **Authorized domains** and add your company domain
* This allows users to sign in with their company email address
* (Additionally, you can add your homepage URL, privacy policy, and terms of service if desired)
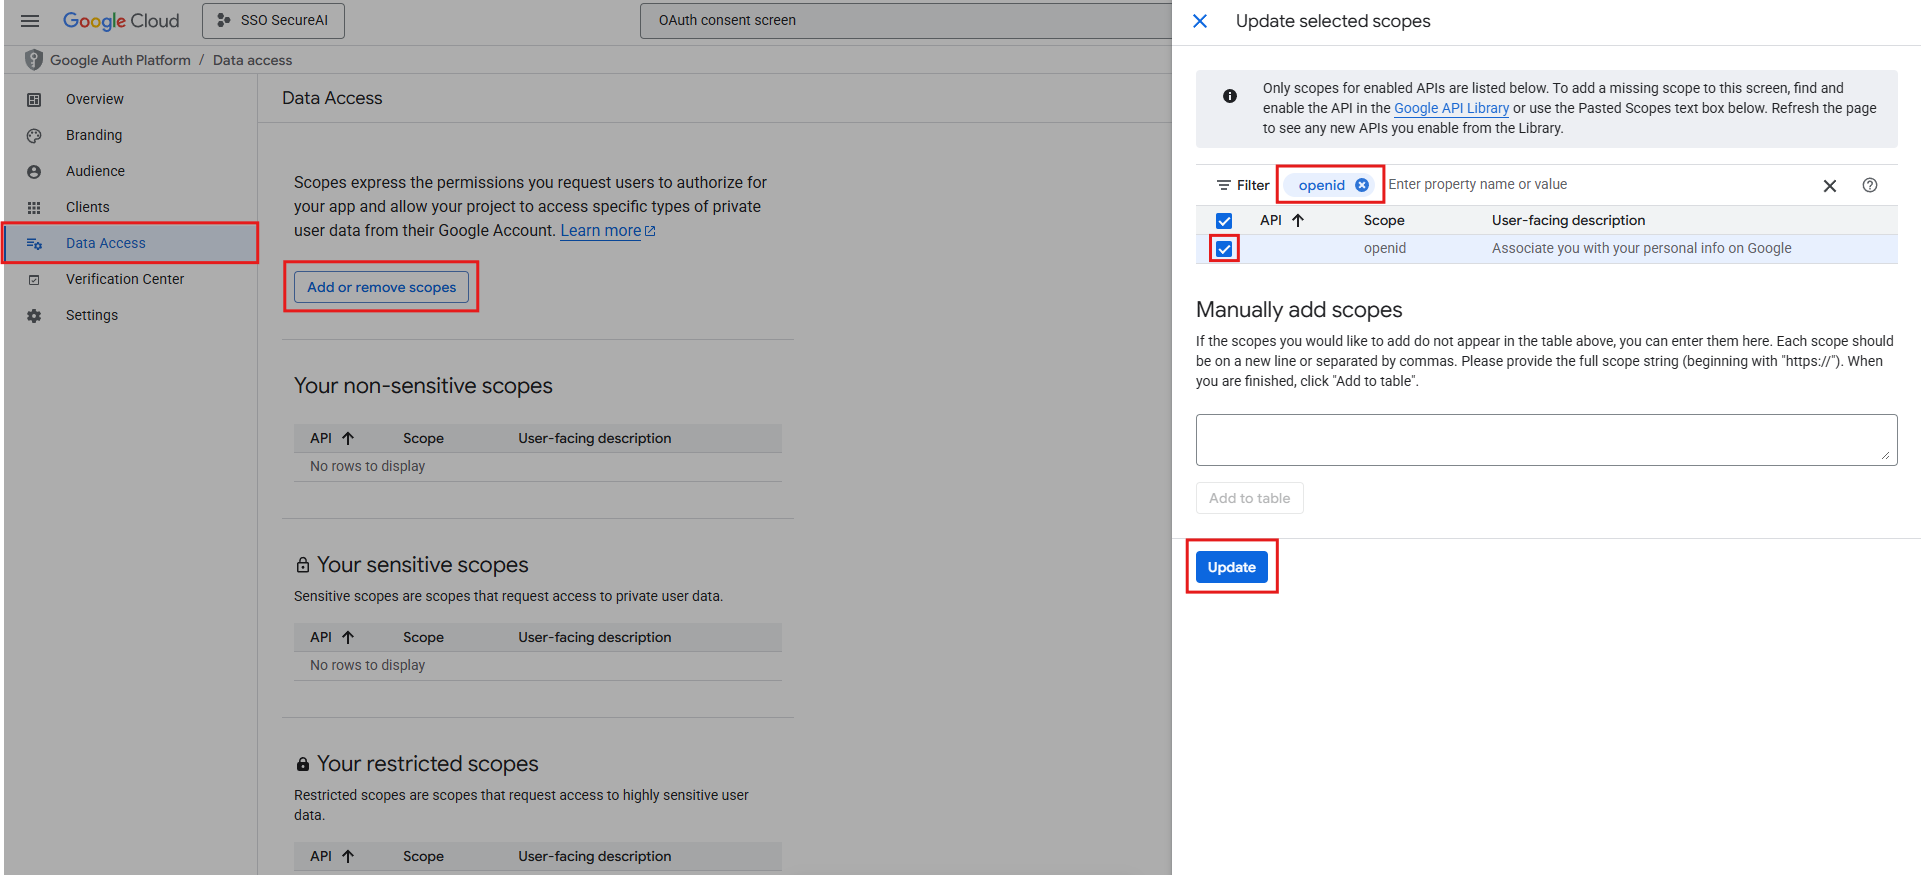
6. **Scopes**:
* In the left menu, click on the **Data Access** section
* Within the Data Access section, click **Add or Remove Scopes**
* A window will open from the left side where you can search for roles
* Search for the role **"openid"** and select it
* Click **Update**
* Then click **Save** in the Data Access section
* **Note**: The `openid` scope automatically includes `profile` and `email` access - you don't need to add them separately
* If you see other scope options, you only need **OpenID** for SecureAI SSO
* **Important**: The OpenID scope provides access to:
* User's email address
* Basic profile information
* This is all that's needed for SecureAI authentication
7. **Test users** (if using External):
* Add test users if needed during testing
* Click **Save and Continue**
8. **Summary**:
* Review your configuration
* Click **Back to Dashboard**
## Step 4: Create OAuth 2.0 Credentials
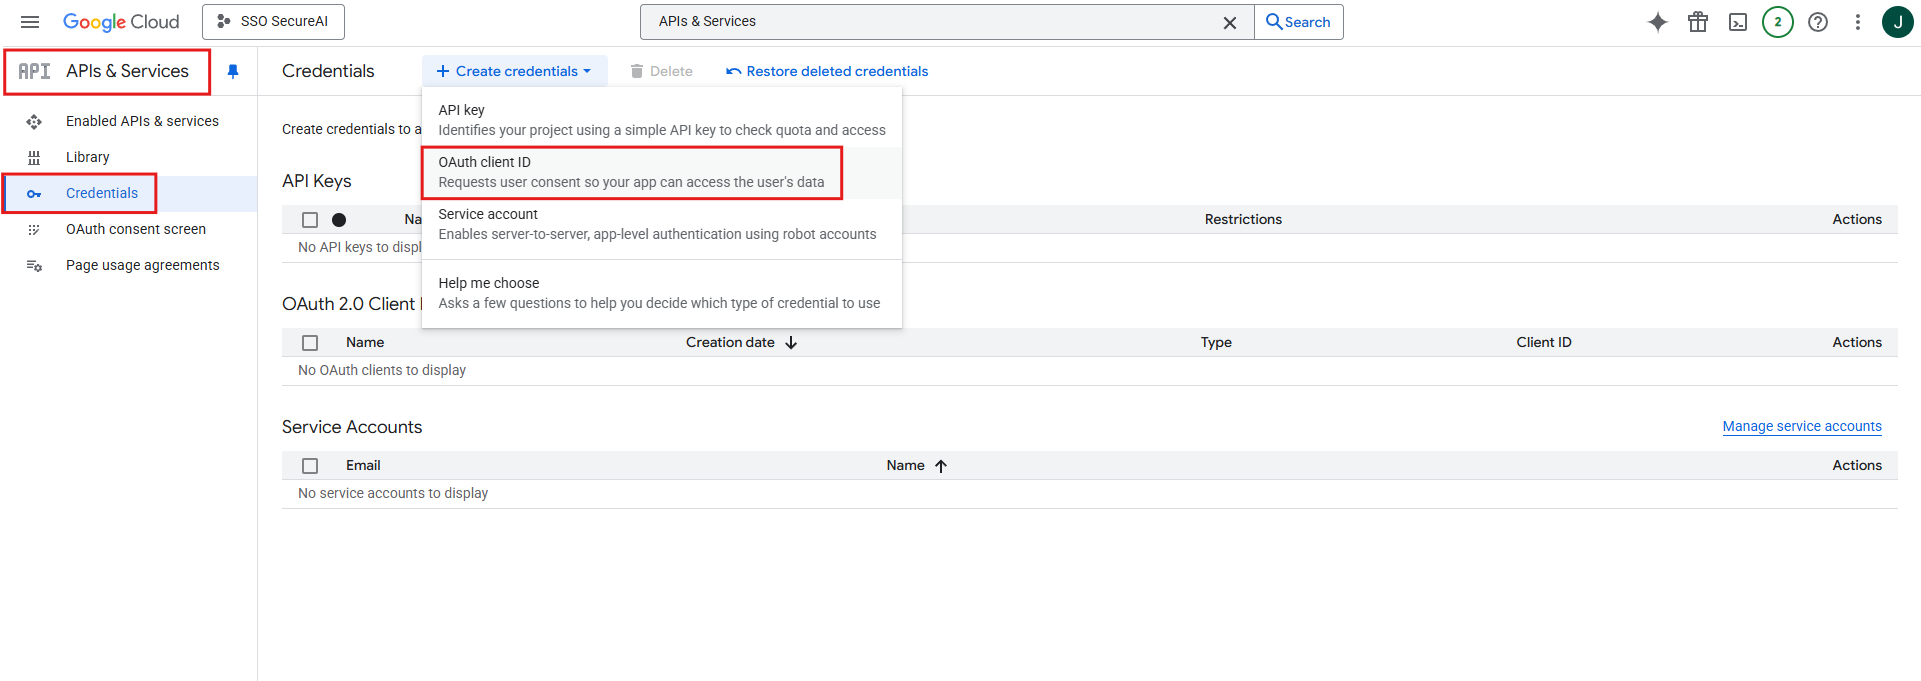
1. Go to **APIs & Services** > **Credentials**
2. Click **+ Create Credentials** > **OAuth client ID**
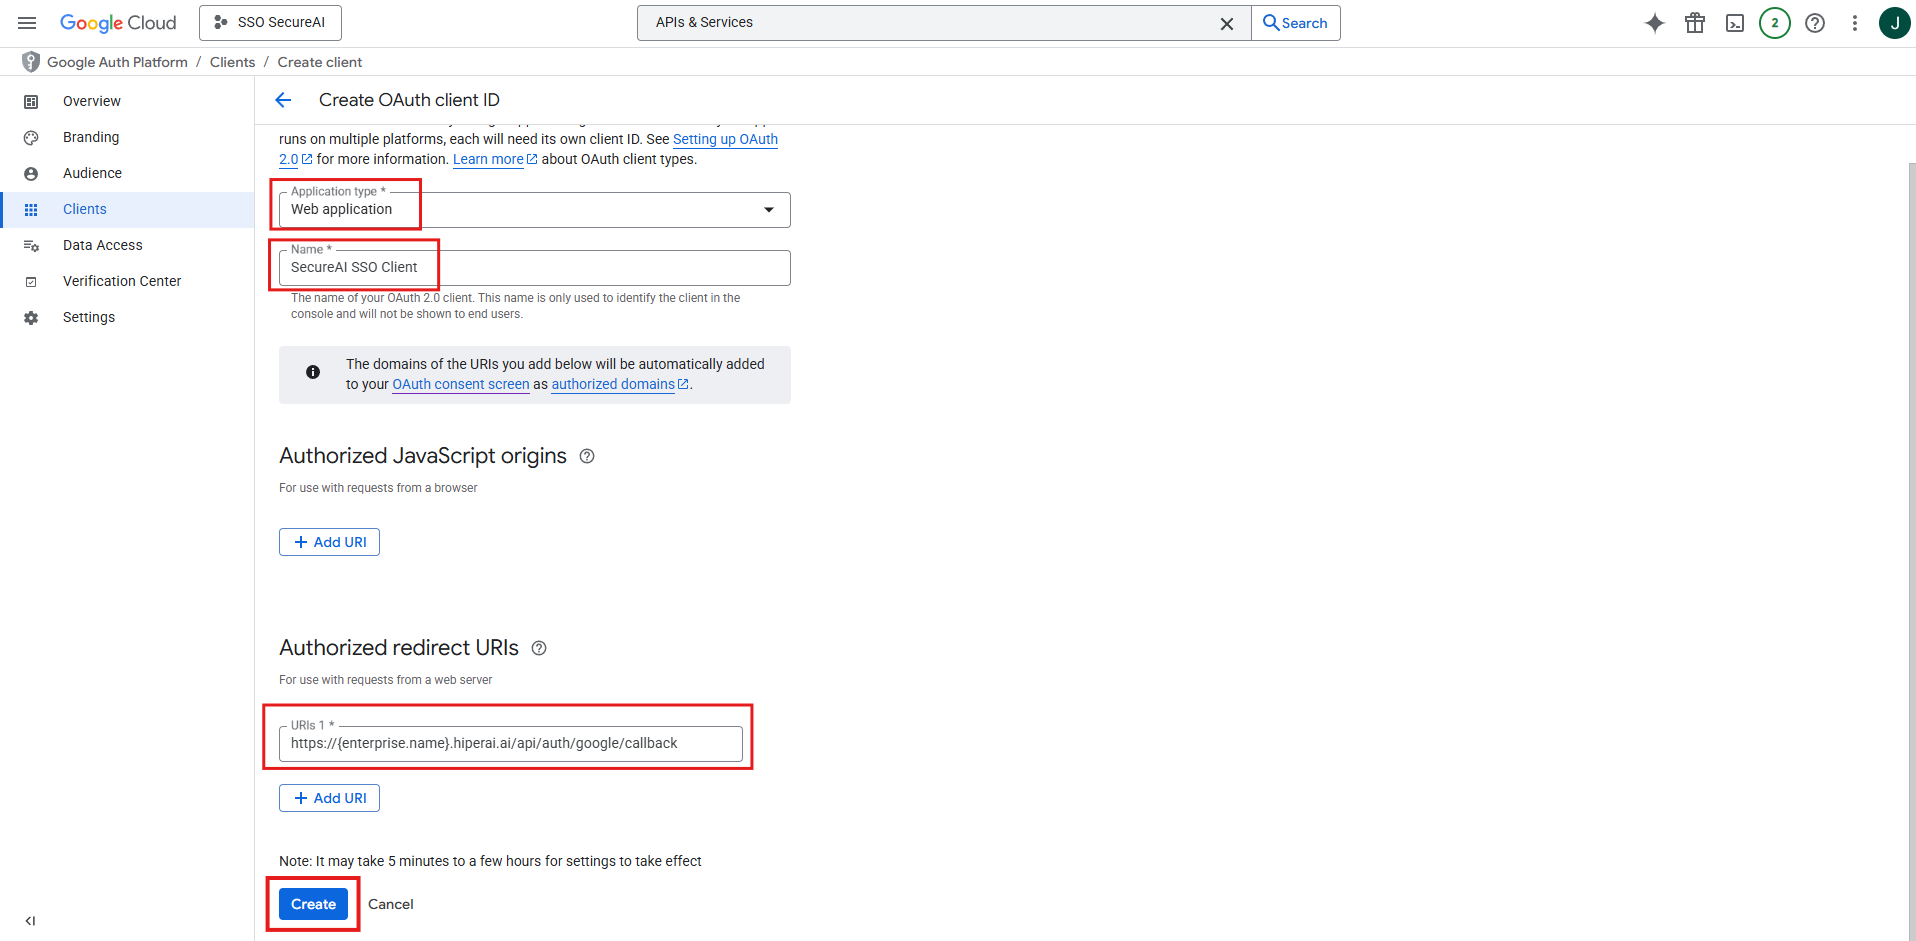
3. **Application type**: Select **Web application**
4. **Name**: Enter a descriptive name (e.g., "SecureAI SSO Client")
5. **Authorized redirect URIs**: Click **+ Add URI** and enter:
* `https://{enterprise.name}.hiperai.ai/api/auth/google/callback`
* **Important**: The URL must match exactly (including `https://` and `/api/auth/google/callback`)
6. Click **Create**
## Step 5: Get Your Credentials
After creating the OAuth client:
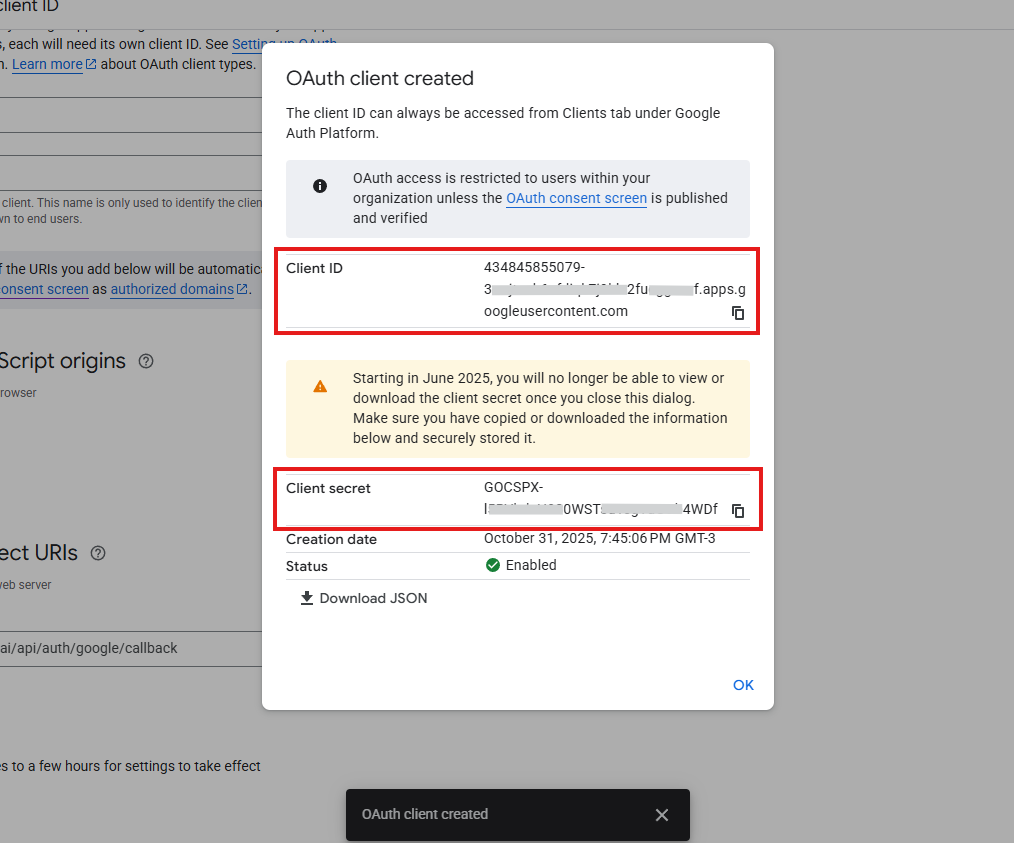
1. A popup will appear with your credentials
2. **Client ID**:
* Looks like: `123456789012-abcdefghijklmnopqrstuvwxyz123456.apps.googleusercontent.com`
* **Copy this value** - you will need it later
3. **Client secret**:
* Looks like: `GOCSPX-abcdefghijklmnopqrstuvwxyz`
* **Copy this value immediately**
* **WARNING**: This secret is only shown once in the popup. If you lose it, you will need to create a new OAuth client
## Step 6: Send Variables to the Hiper AI Team
Once you have created the OAuth client in Google Cloud Console and followed the steps above, you will have obtained the following critical pieces of information:
1. **Client ID** (from Step 5)
2. **Client Secret** (from Step 5)
3. **Redirect URI**: `https://{enterprise.name}.hiperai.ai/api/auth/google/callback`
You must send these values to the Hiper AI team to complete the SSO integration.
### A. Access the Admin Panel
1. Log in to your SecureAI instance as an administrator
2. Navigate to `https://{enterprise.name}.hiperai.ai/admin/home`
3. In the upper right corner, click on your admin profile picture
4. This will open a dropdown menu with various options
### B. Submit the Support Request
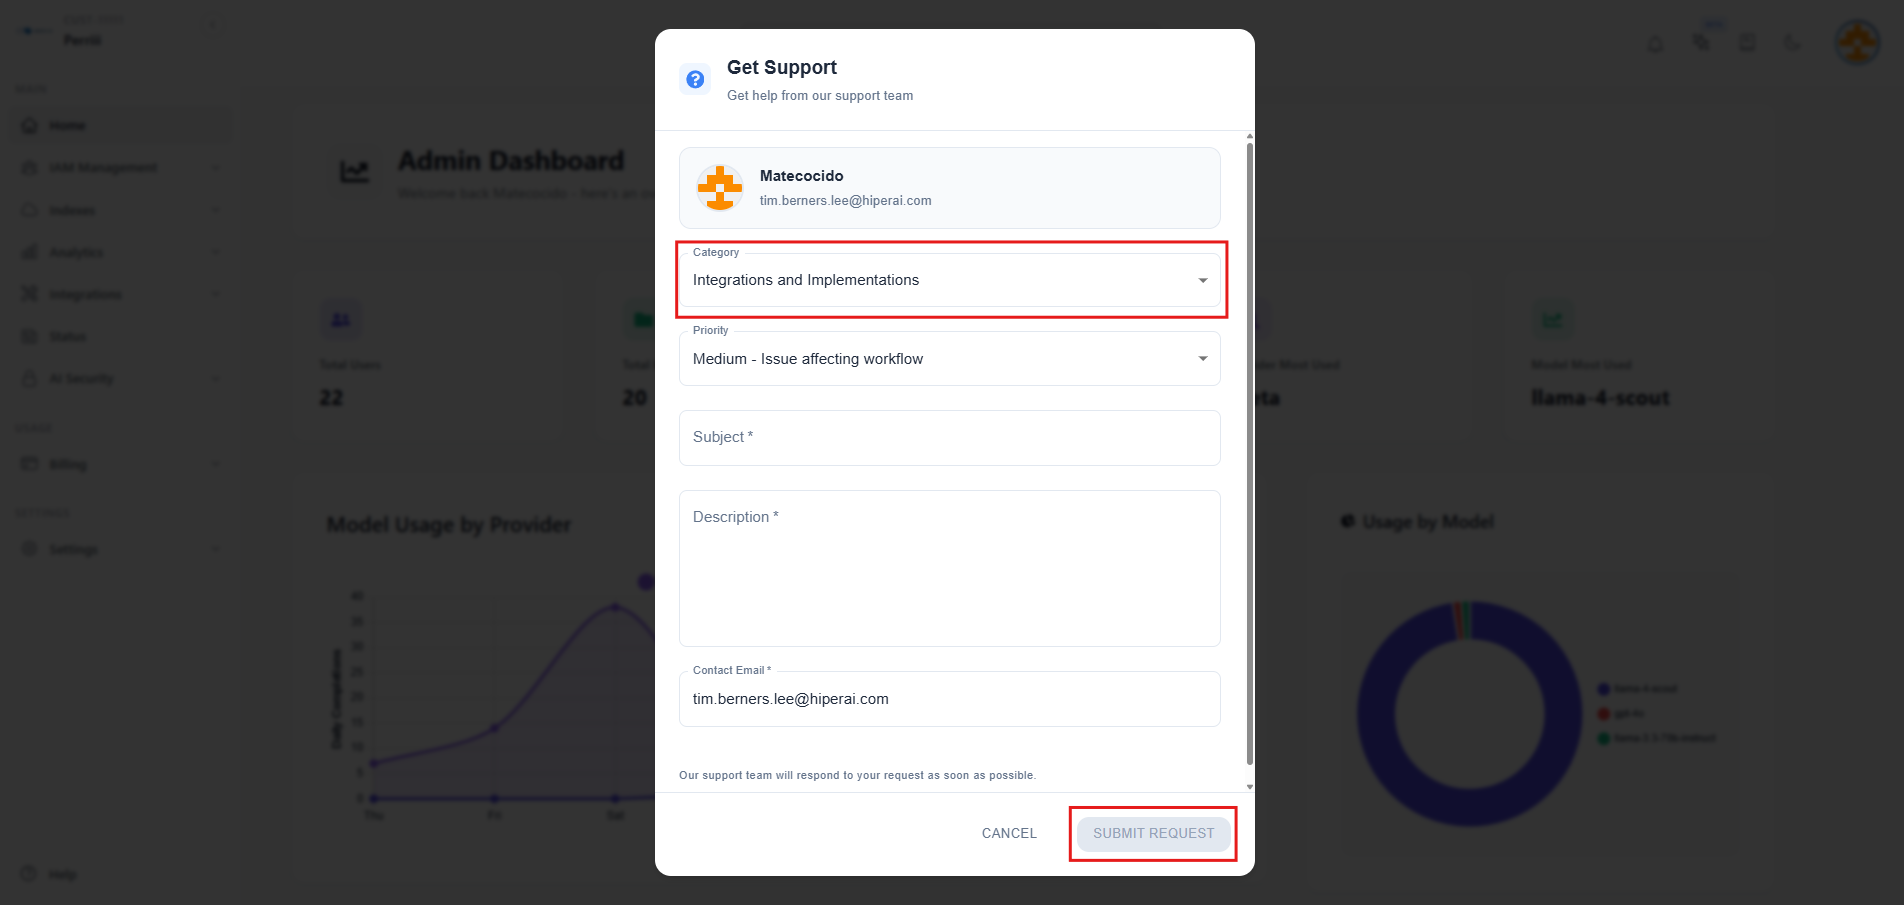
1. Click **"Get Support"** from the dropdown menu
2. A popup window will appear with a support ticket form
3. Fill in the form with the following information:
* **Category**: Select **"Integrations and Implementations"**
* **Subject**: Enter **"Google Workspace SSO Integration"**
* **Description**: Paste the values you copied during the setup process:
* Client ID
* Client Secret
* Redirect URI: `https://{enterprise.name}.hiperai.ai/api/auth/google/callback`
4. Click the **"Submit request"** button
### C. Wait for Confirmation
* You will receive an email confirmation within **24 to 72 hours** (depending on availability)
* The email will confirm that your SSO has been successfully configured
* Once configured, you will be able to access your SecureAI instance using the **"Continue with Google"** login button on the sign-in page
**Important**: Keep your credentials secure until the integration is complete. Do not share them through insecure channels.
## User Configuration
### Existing Users
Users who already have accounts in SecureAI (regardless of whether they use basic authentication) **do not need to be recreated**. They can continue using their existing accounts and will also be able to sign in using Google Workspace SSO once it's configured.
**Important**: The user's email in Google Workspace must match exactly with the email in SecureAI for SSO to work.
### Creating New SSO Users
For new users who should access SecureAI exclusively through SSO:
1. Navigate to **User Management** in the SecureAI admin panel
2. Click to create a new user
3. When creating the user, select the **"Business Account / SSO"** option
4. This configuration ensures that:
* The new user **will not receive an email** to generate a password
* The user will be able to access SecureAI **directly using the Google Workspace SSO** login button
* The user's email in Google Workspace must match exactly with the email entered in SecureAI
## Troubleshooting
### Error: "redirect\_uri\_mismatch"
* Verify that the Redirect URI in Google Cloud Console matches exactly with what is configured on the server
* Make sure to include `https://` (not `http://` in production)
* The redirect URI must be exactly: `https://{enterprise.name}.hiperai.ai/api/auth/google/callback`
* Check for trailing slashes or typos
### Error: "User not found in SecureAI database"
* The user must be previously registered in SecureAI
* Contact the SecureAI administrator to create the user account
* Verify that the email address in Google Workspace matches the email in SecureAI exactly
### Error: "Email domain not allowed for Google Workspace login"
* The user's email domain is not in the allowed domains list
* Contact your development team to add your domain to the allowed list
* Or verify that the domain restriction configuration is correct
### Error: "access\_denied" or "unauthorized\_client"
* Verify that the OAuth consent screen is properly configured
* Check that your application is approved (if using External user type)
* Ensure the Client ID and Client Secret are correct
### Error: "invalid\_client"
* The Client Secret may have been reset or is incorrect
* Verify the Client Secret in Google Cloud Console
* Create a new Client Secret if needed and provide the new value to your development team
## Client Secret Security Best Practices
1. **Never commit secrets to code repositories**
2. **Rotate secrets periodically** (recommended: every 90 days)
3. **Limit access** to Google Cloud Console credentials page
4. **Use secure channels** when sharing secrets with your development team
5. **Monitor usage** in Google Cloud Console for suspicious activity
## Client Secret Renewal
To rotate your Client Secret (recommended every 90 days):
1. Go to **APIs & Services** > **Credentials**
2. Find your OAuth 2.0 Client ID
3. Click the **pencil icon** (Edit)
4. In the **Client secret** section, click **Reset Secret**
5. **Immediately copy** the new secret value
6. Provide the new secret to your development team through the admin panel support request
7. They will update the configuration without interrupting the service
8. After confirming the new secret works, you can optionally delete the old secret
**Note**: There is a brief overlap period during rotation where both secrets work, allowing for a smooth transition.
## Testing SSO Login
After configuration is complete:
1. Go to your SecureAI login page
2. Click **Continue with Google**
3. Select your Google Workspace account
4. Grant permissions if prompted
5. You should be redirected to SecureAI and logged in
If you encounter issues:
* Clear your browser cookies and try again
* Verify you're using the correct Google Workspace account
* Check that your email exists in SecureAI
## Support
If you encounter problems during configuration:
1. Verify that you have administrator permissions in Google Cloud Console
2. Verify that you have Google Workspace admin access (if domain restrictions are used)
3. Contact your development team through the admin panel support request with:
* Screenshots of the errors
* The Client ID (you can share this - it's not sensitive)
* The complete error message
* Any relevant browser console errors
**Never share your Client Secret in support requests** - only share it through secure channels after establishing identity verification.
## Additional Resources
* [Google Cloud Console Documentation](https://cloud.google.com/docs)
* [Google OAuth 2.0 Documentation](https://developers.google.com/identity/protocols/oauth2)
* [Google Workspace Admin Help](https://support.google.com/a)