> ## Documentation Index
> Fetch the complete documentation index at: https://docs.hiperai.com/llms.txt
> Use this file to discover all available pages before exploring further.
# SharePoint & OneDrive — Add from SharePoint
> Let your users attach files from SharePoint sites and OneDrive in the SecureAI chat. Self-serve setup with your own Microsoft Entra ID app registration.
# SharePoint & OneDrive — Add from SharePoint
With this integration, your users attach files from **SharePoint sites** (including Teams sites), **OneDrive**, and **Shared with me** directly from the chat, using the **Add from SharePoint** option in the attach button.
Setup is **self-serve**: an administrator in your organization registers SecureAI as an application in **your own Microsoft Entra ID directory** and enters the identifiers in **Admin → Integrations → Files**. There is no need to open a ticket or wait for Hiper AI: the option appears in the chat as soon as you save the configuration.
Estimated time: 10 minutes.
## How it works
1. The user clicks **Attach → Add from SharePoint**. The first time, Microsoft asks them to sign in with **their own Microsoft 365 account**.
2. The SecureAI browser opens on top of Microsoft Graph: sites, libraries, folders, search, and files shared with the user. The user selects one or more files.
3. The user's browser downloads **only the selected files**, using the user's own token, and attaches them to the message.
4. The file follows the same path as any attachment: it **goes through DLP** and your organization's policies before reaching a model.
**Delegated permissions, never application permissions.** SecureAI always acts **on behalf of the signed-in user**: a user only sees and attaches what they can already open in SharePoint. The application is a "single-page application" (SPA) with no client secret, and SecureAI does not read anything in the background.
## Prerequisites
* An Entra ID role that allows registering applications and **granting admin consent** for Microsoft Graph permissions (for example **Cloud Application Administrator** or **Global Administrator**).
* SecureAI administrator access, with **Administrator** permission on the **Integrations** section.
* A SecureAI plan that includes **Attach from Drive / SharePoint**. Without it you can leave the configuration ready, but users will not see the option.
## Step 1: Copy the redirect URI from SecureAI
1. Sign in to SecureAI as an administrator.
2. Go to **Admin → Integrations** and filter by the **Files** category.
3. On the **SharePoint & OneDrive** card, click **Connect integration**.
4. In the **1. Register SecureAI in Microsoft Entra ID** section, click **Copy** next to the **Redirect URI**.
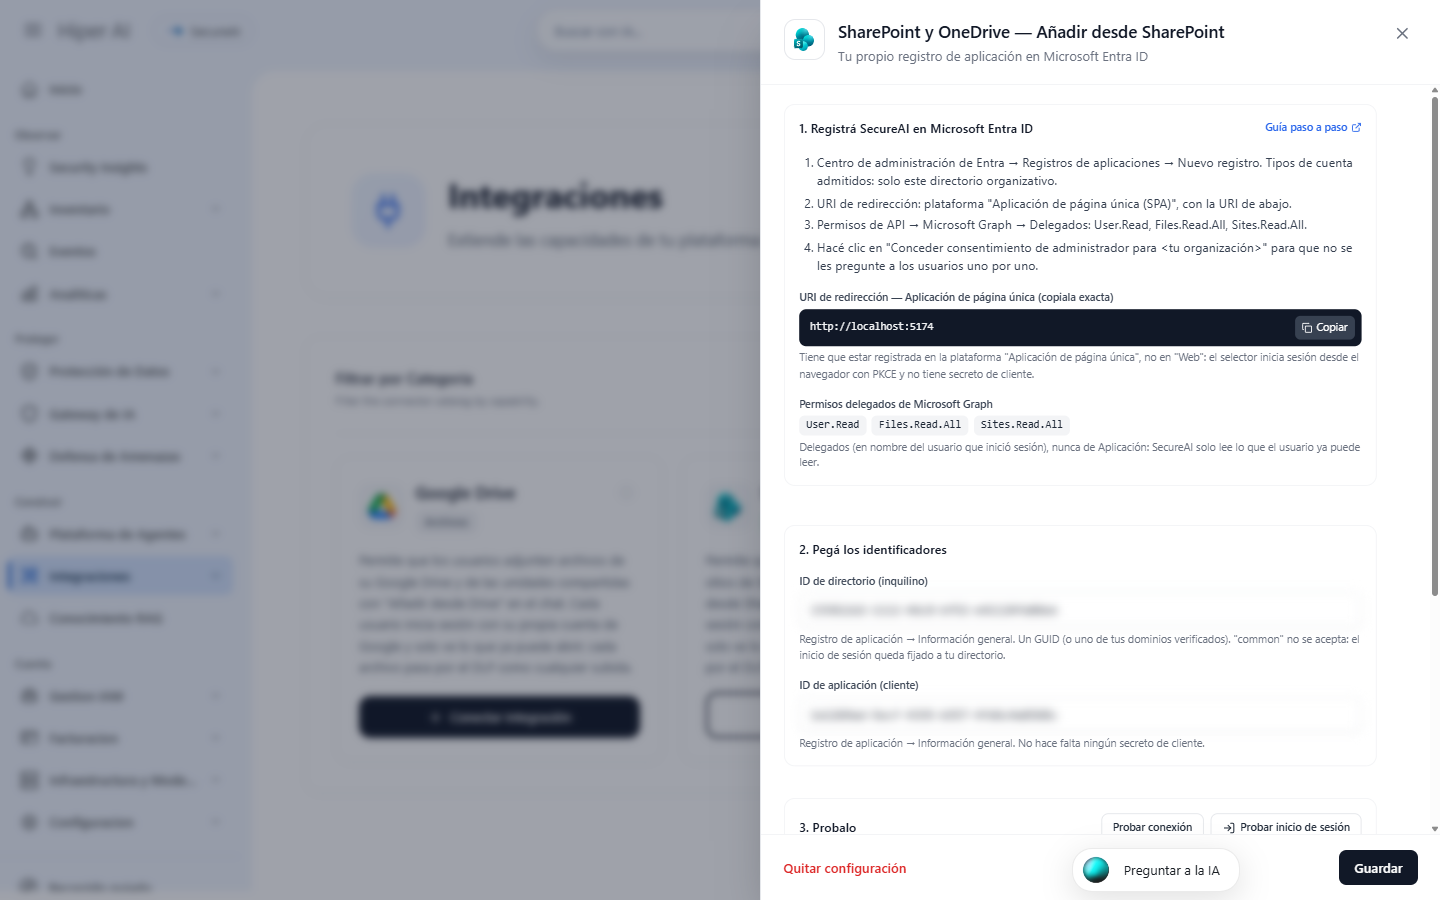
The URI is the address of your instance, for example `https://.hiperai.ai`. Always use the one shown by your instance: it must match exactly.
## Step 2: Register the application in Entra ID
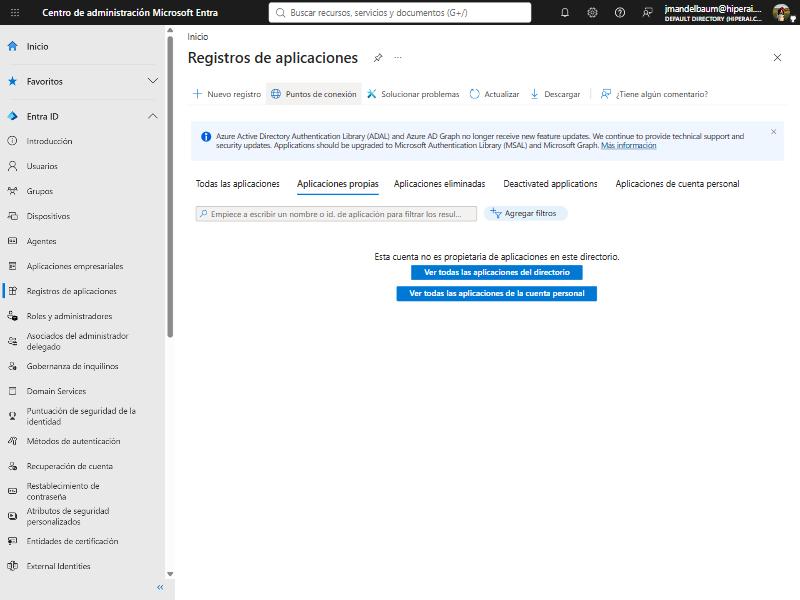
1. Open the [Microsoft Entra admin center](https://entra.microsoft.com) and go to **Entra ID → App registrations**.
2. Click **New registration**.
3. Fill in:
* **Name**: for example `SecureAI — Add from SharePoint`.
* **Supported account types**: **Accounts in this organizational directory only** (single tenant).
* **Redirect URI**: in the dropdown choose **Single-page application (SPA)** and paste the URI you copied in step 1.
4. Click **Register**.
The platform must be **Single-page application (SPA)**, not **Web**. With **Web**, sign-in fails with the error `AADSTS9002326`. If you already registered it as Web, go to **Authentication**, add a **Single-page application** platform with the same URI, and remove the Web one.
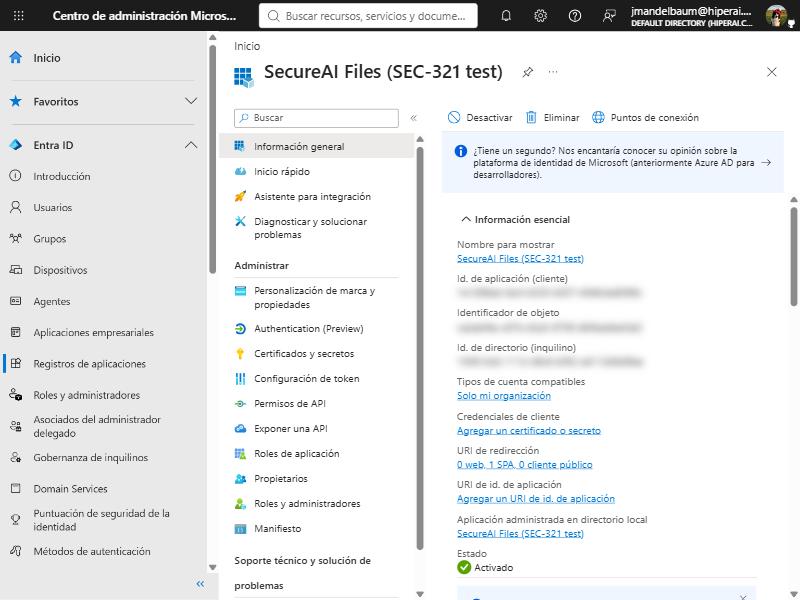
5. On the application's **Overview**, copy the **Application (client) ID** and the **Directory (tenant) ID**. You do not need to create any client secret.
## Step 3: Add the Microsoft Graph permissions
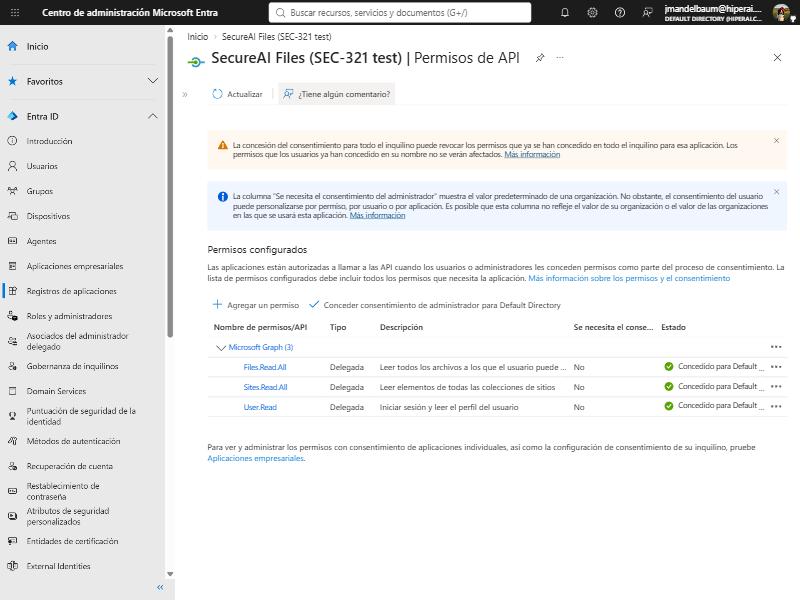
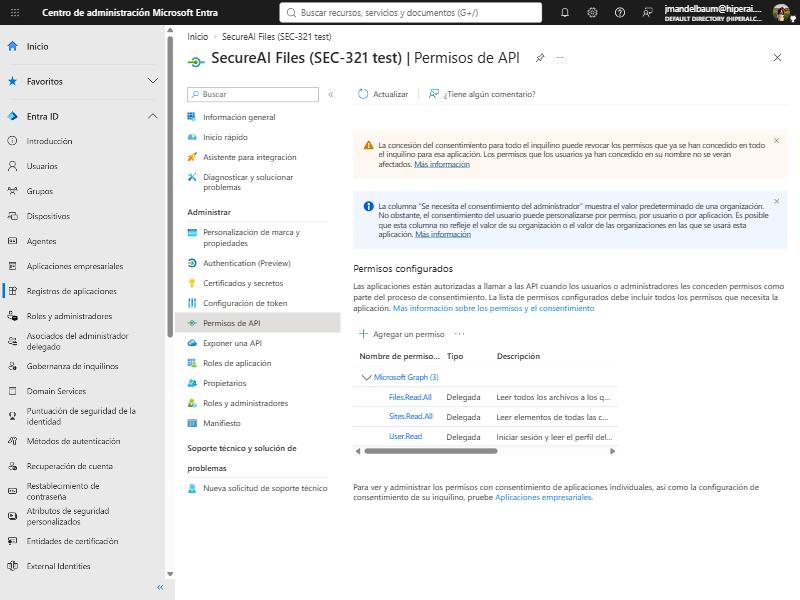
1. In the application, go to **API permissions → Add a permission → Microsoft Graph → Delegated permissions**.
2. Search for and select:
* `Files.Read.All` — read the files the user has access to.
* `Sites.Read.All` — list and search the SharePoint sites the user has access to.
3. Click **Add permissions**. `User.Read` is already added by default; leave it.
## Step 4: Grant admin consent
1. In **API permissions**, click **Grant admin consent for \** and confirm with **Yes**.
2. All three permissions must show the status **Granted for \**.
Without this step, each user would see a consent request (or an `AADSTS65001` error if your organization does not allow users to consent).
## Step 5: Enter, test, and enable in SecureAI
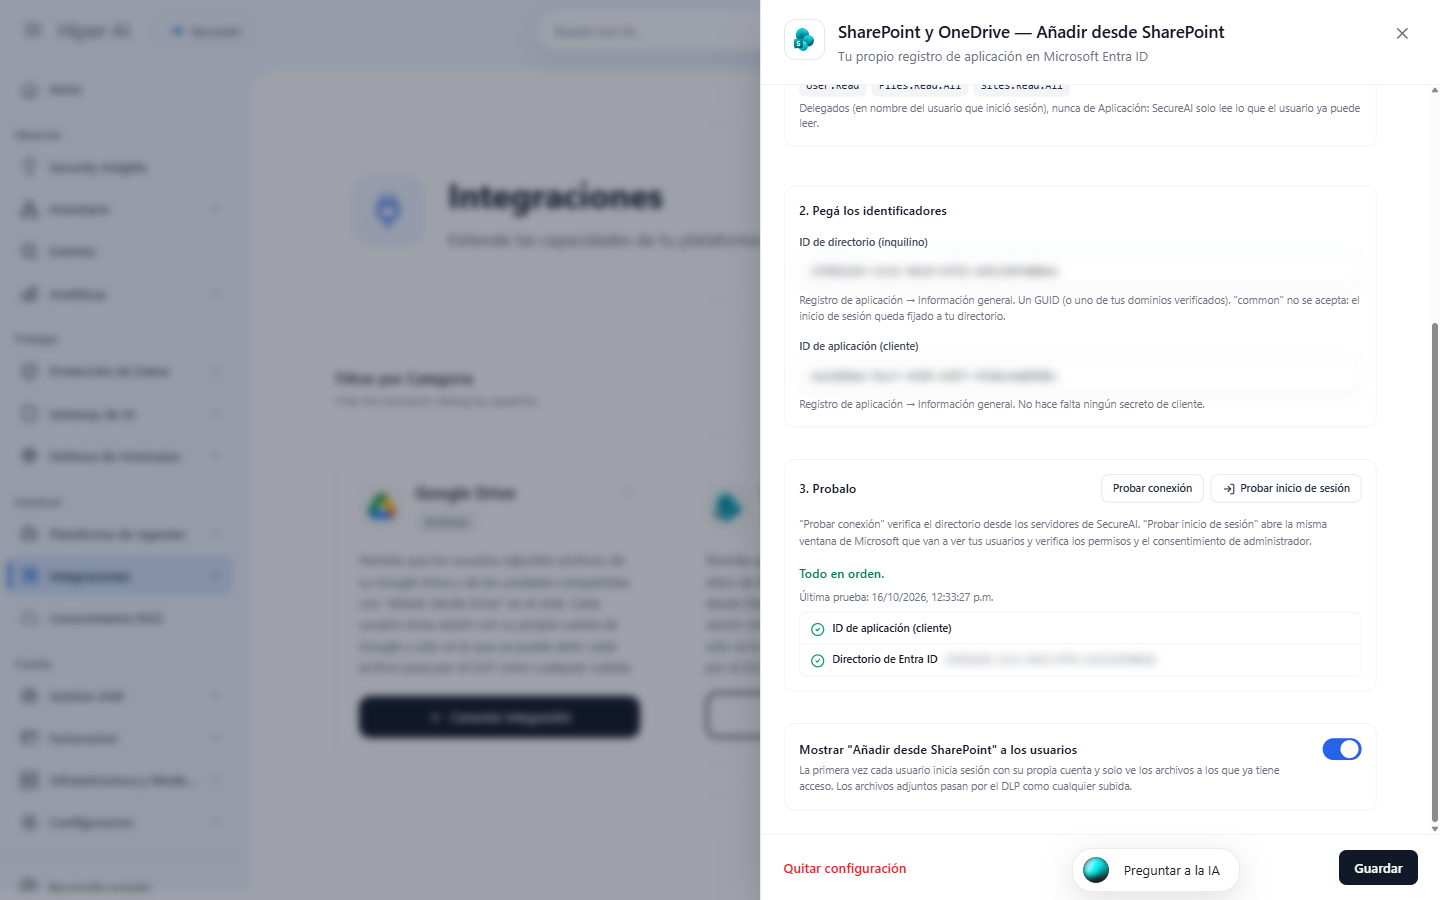
1. Go back to the **SharePoint & OneDrive** drawer in SecureAI.
2. Under **2. Paste the identifiers**, paste the **Directory (tenant) ID** and the **Application (client) ID**.
3. Under **3. Test it**:
* **Test connection** verifies from SecureAI's servers that the directory exists.
* **Try signing in** opens the same Microsoft window your users will see: sign in with your account. SecureAI confirms that the redirect URI is of the SPA type, that `Files.Read.All` and `Sites.Read.All` have consent, and that Microsoft Graph responds.
4. Under **4.**, leave **Show "Add from SharePoint" to users** turned on and click **Save**.
The card changes to **Available in the chat**.
## Step 6: How your users use it
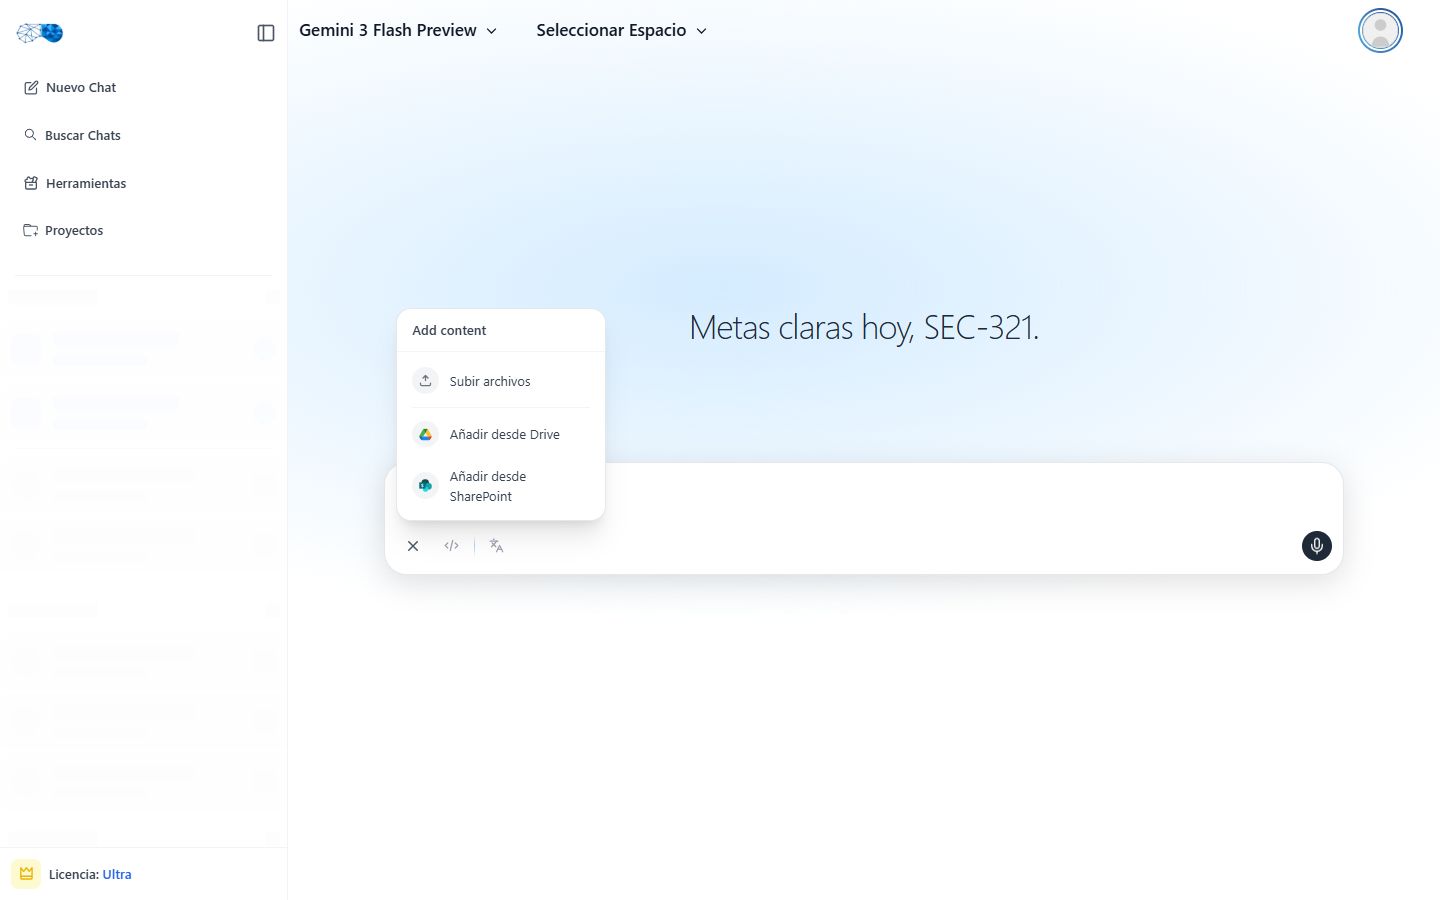
1. In the chat, the user clicks the **attach** button and chooses **Add from SharePoint**.
2. The first time, they click **Sign in with Microsoft** and choose their organization account.
3. They browse **Sites**, **Shared**, or use search, select one or more files, and click **Add**.
4. The files appear attached to the message, with the SharePoint icon.
## Restrict who can use it (optional)
To allow only certain users or groups to use **Add from SharePoint**:
1. In Entra, go to **Enterprise applications** and open the application you registered.
2. Under **Properties**, turn on **Assignment required?** and save.
3. Under **Users and groups**, assign the users or groups that should have access.
An unassigned user gets the error `AADSTS50105` when signing in and cannot attach files.
## Troubleshooting
| What you see | Cause | What to do |
| - | - | - |
| `AADSTS50011` — the redirect URI does not match | The URI from step 1 is not registered | Add it under **Authentication → Single-page application** |
| `AADSTS9002326` | The URI is registered as **Web** | Move it to **Single-page application** |
| `AADSTS65001` — consent missing | Admin consent was not granted | Step 4 |
| `AADSTS700016` — application not found | Wrong application ID or directory ID | Copy them again from **Overview** |
| `AADSTS50105` | The user is not assigned to the application | Assign them, or turn off **Assignment required?** |
| **Try signing in**: "These delegated permissions are missing" | `Files.Read.All` or `Sites.Read.All` is missing, or its consent is | Steps 3 and 4 |
| The user does not see sites, only "Shared" | The user is not a member of any site | Expected: they only see what they can already open |
| The user does not see **Add from SharePoint** | The integration is turned off, not saved, or the plan does not include it | Check the card in **Admin → Integrations → Files** |
## Frequently asked questions
**What can SecureAI read?** Only what the signed-in user can already read, and only when they select a file in the browser. The permissions are delegated: SecureAI has no access "as an application" to your SharePoint.
**Do conditional access policies work?** Yes. Sign-in is a normal Microsoft 365 sign-in and honors MFA, managed devices, and the rest of your policies.
**How do I turn it off?** Turn off **Show "Add from SharePoint" to users** and save, or click **Remove configuration**. To also revoke tokens that have already been issued, delete the app registration in Entra ID or disable sign-in for your enterprise application.
**Hiper AI had already configured SharePoint for me. Do I need to do anything?** No. As long as you do not save a configuration of your own, the card shows **Configured by Hiper AI** and everything keeps working the same. If you save your own, it replaces that one.
This documentation is built and hosted on [Mintlify](https://mintlify.com), a developer documentation platform.